
In the following article I would like to describe a few options to speed up the painting process of our miniatures for Wargames. The idea underlying fast painting techniques is to use simple and rapid methods to accelerate the work, meaning that we will sacrifice part of the quality. But this does not meant that fast painting techniques are equivalent to paint bad. We will still pay attention to the details, but will focus more on the general looking of the miniature, and more importantly, of the unit or army (after all fast painting techniques evolved to paint a large number of models in a short time).
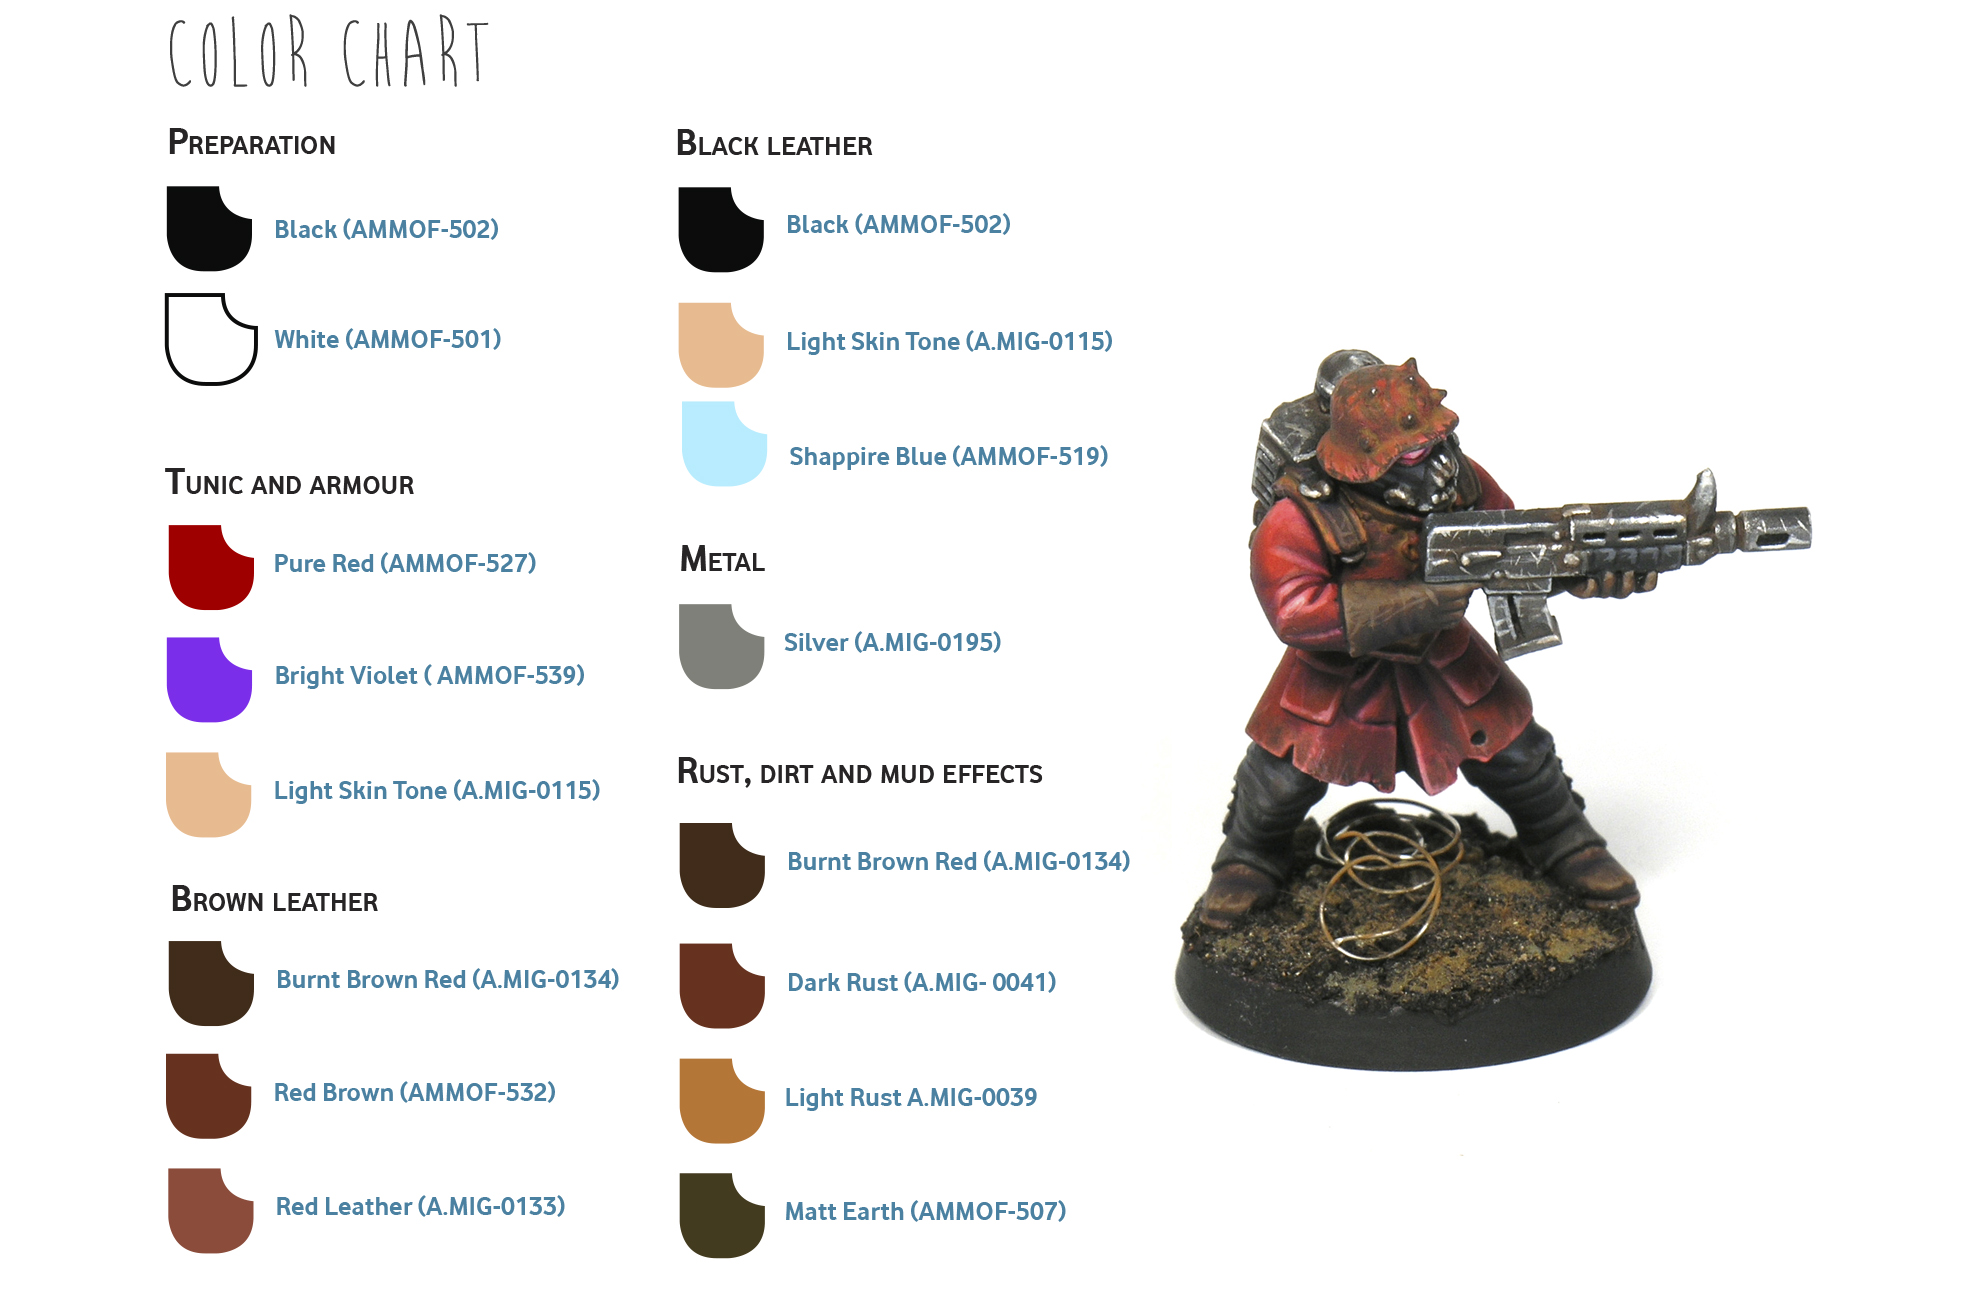
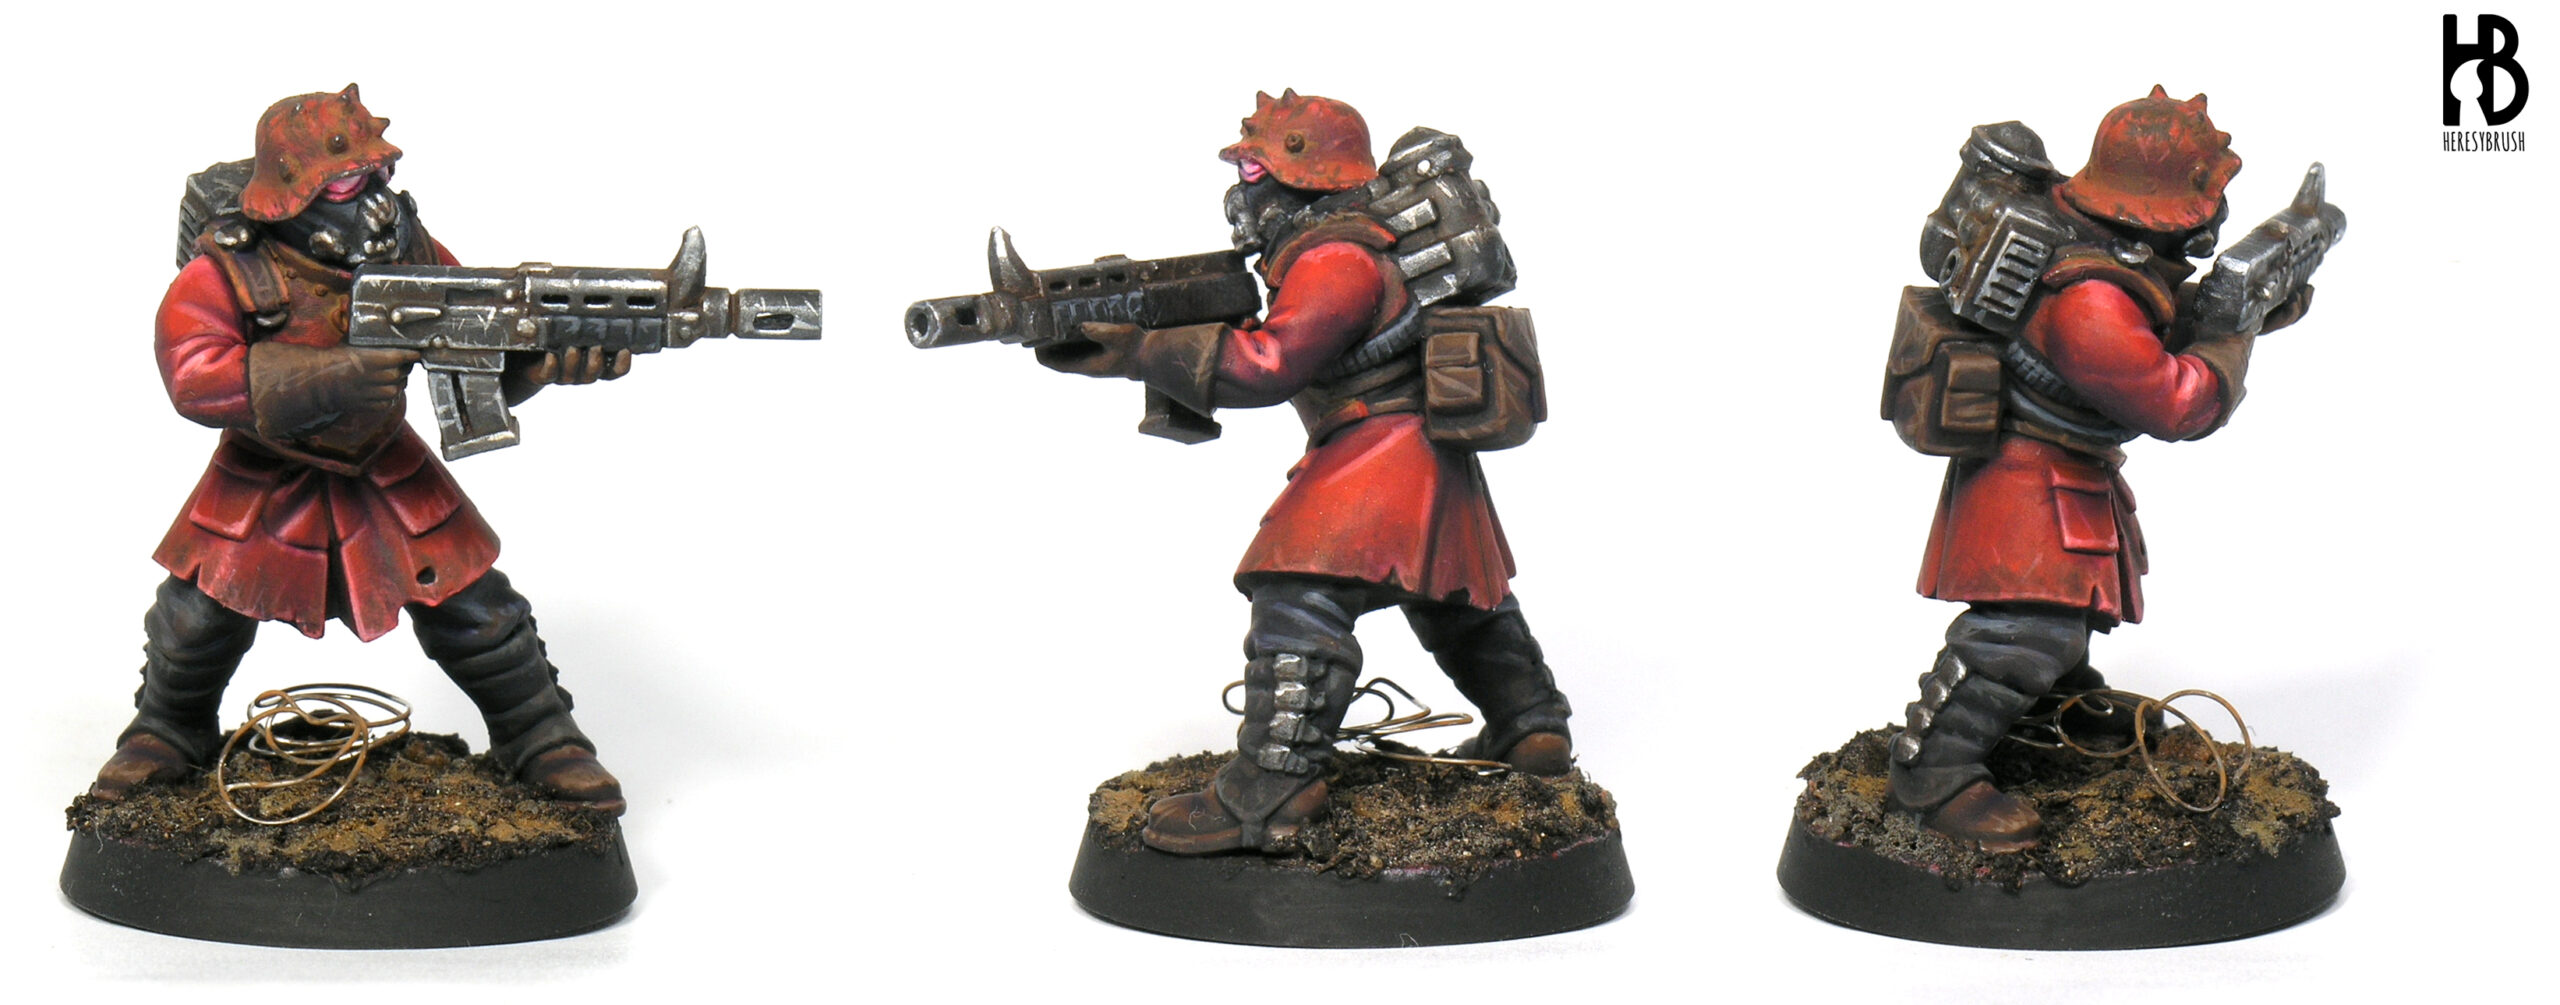
In this example I will paint a sci-fi cultist belonging to the Blood Pact Cult (readers of Dan Abnett will recognize it), which are easily recognized by their red garments and facial mask. And since they are vassals of a corrupted Chaos deity, we have plenty of room for weathering effects such as scratches, chippings and rust. I will use only acrylic paints mostly from Figures range by AMMO of Mig Jimenez. These are the colors we are going to use:
Note that the goal of this article is to give you some ideas about how we can combine different painting techniques to get fast and interesting results. But this is not the only way. Each painting project will require a different approach, and the same project can be executed in multiple ways. It is a good advice to sit down for a while before start painting to consider which are the options you have, and which ones fit your time and goals best.
And remember that we covered in the blog another fast painting method to paint Warhammer 30K space marines (here) and a more elaborated option to paint Warhammer 40k Genestealer Cult followers (here).
Step 1 – Preparation
For this particular project I decided to start applying a black and white grisaille to create an initial map of lights and shades. First, we airbrush the whole miniature with Black Primer (A.MIG-2023), and then with White (AMMOF-501) from the top of the model in a 90º angle. By doing this we create very rapidly and easily light areas in the most raised parts of the miniature, that we will be later cover with a thin layer of our desired color (red).
Step 2 – Thin layer of red
Now we thin Pure Red (AMMOF-527) with 75% of acrylic thinner or water and airbrush thin layers over the whole miniature. We should not cover completely the black and white pre-shading, or we will ruin the grisaille. The idea is to apply a thin and semi-transparent layer of red paint so that this color will look brighter when falling on the whiter parts, and darker when applied on the grey and black ones. In matter of minutes we have already created shades and lights in the red tunic!
This method is especially useful to paint the largest element of the figure (the tunic in our case). But we can exploit it and accelerate even more the painting process if we are able to paint other parts of the figure with the same color. For example, here I decided to paint the helmet and armor also with red. To generate contrast and separate the red tone of these elements we will play with the saturation and temperature of the color (see below). This approach will highly depend on the miniature we are painting. The grisaille works very well with bright colors such as pure red; but not that well with neutral colors such as brown.
Step 3 – Shades
Although the grisaille has created already the shades, we can enhance them a little bit more. We thin Bright Violet (AMMOF-539) with a 65% of water or Transparator (A.MIG-2042, a glazing medium) and apply glazes* on the deepest parts and nooks of the tunic and armor. Furthermore, we can use this color to apply a dark profiling around the pockets and other details to gain definition using a thin brush. Note that the violet will create more vivid and interesting shades compared with the black.
* A glaze is a very thin layer of semi-transparent paint that slightly change color of the surface. We use very thinned paint with 60%-80% of water or thinner, and brush off most of the paint before moving onto the model. We do not want to overflow the surface as we do when applying a wash. We always leave more paint in the area where we remove the brush. Therefore, we will end the glaze in the area where we want a more intense or opaque color. In our case, we start the violet glaze in the intermediate zones and finish it in the recesses and deepest part of wrinkles. We can apply several glazes to intensify the effect, but will wait until the previous layer is dry before adding a new one.

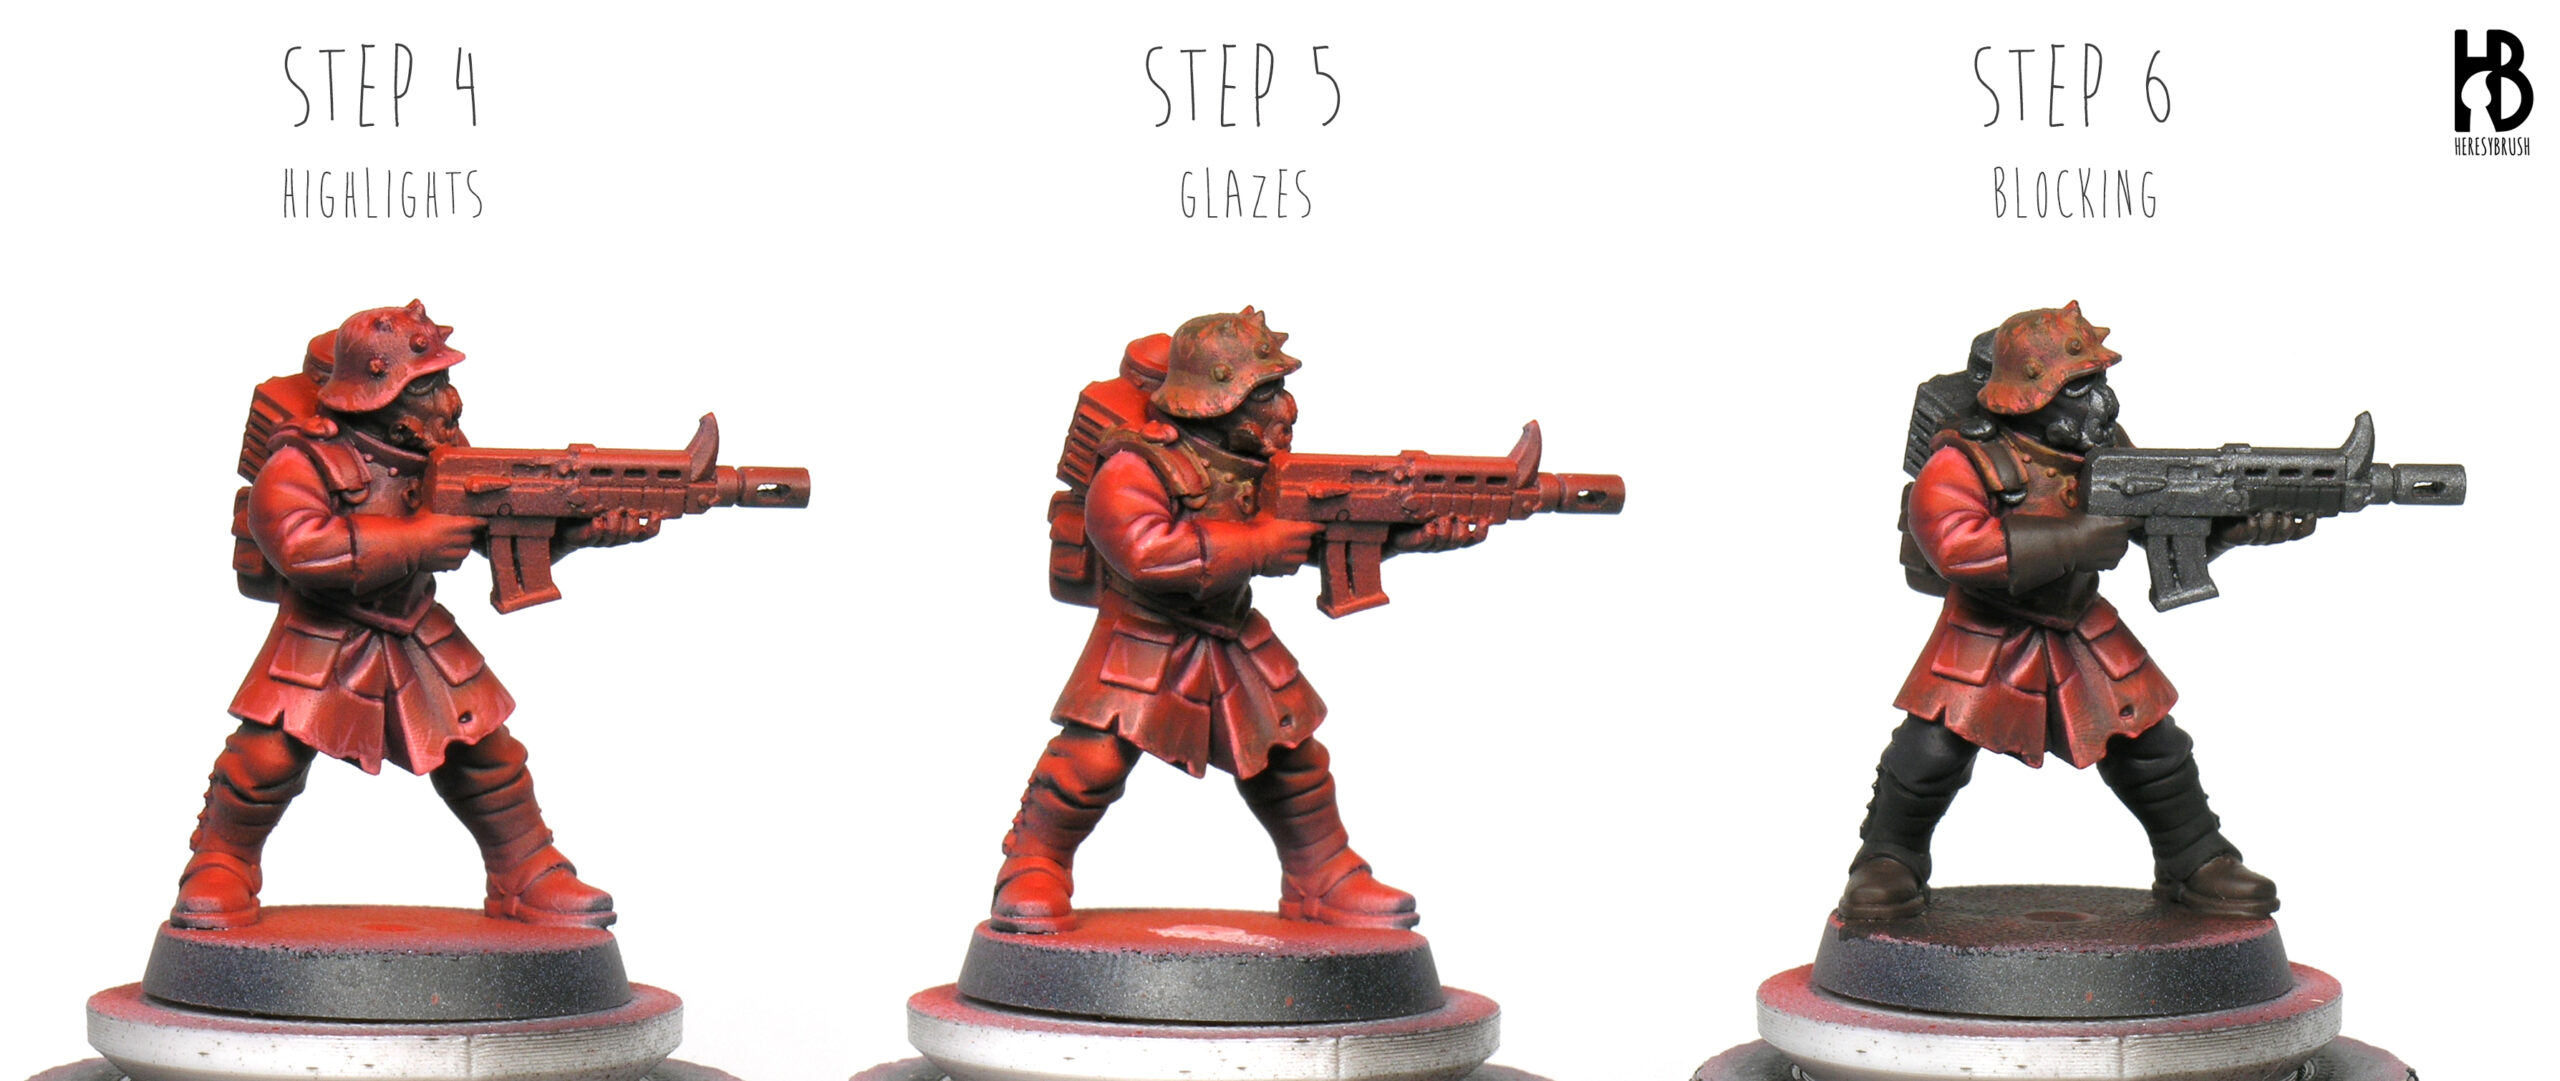
Step 4 – Highlights
We apply a single highlight by mixing the red with 30% of pink or a skin color such as Light Skin Tone (A.MIG-0115). These colors are lighter but contain red, which will help to create more natural highlights. We apply the highlights around all edges and the most raised parts of the wrinkles. Whenever it is possible, to apply edge-highlights we use the body of the brush rather than the tip, which will help to create more straight lines.
We can also use this color to create scratches and chipping effects. Using a thin brush we paint small dots and thin lines around all edges.
Step 5 – Glazes
Now we are going to change how the red color looks in the armor and helmet. Compared with the cold and desaturated (palid) red color of the tunic, we will create a warm red tone on the armor. This will also simulate rust effects. First, we create additional chipping effects on the edges of the armor using Burnt Brown Red (A.MIG-0134). This color will not only create more contrast, but will represent deeper chipping effects. We use a thin brush and paint small dots and lines, as before.
Then, we apply several consecutive glazes with Dark Rust (A.MIG-0041) and Light Rust (A.MIG-0039) over the whole helmet and armor, but also trying to accumulate a little bit of paint around the details and nooks. We can apply several layers of Light Rust to get a more intense rust effect, but let dry the previous layer before applying a new one. The orange color will transform our previously cold red color into a warm one, separating chromatically the helmet and amour from the tunic.
To create mud or dirt on the lower part of the tunic we apply randomly glazes with Burnt Brown Red (A.MIG-0134). We try to avoid patterns, creating some areas more opaque than others.
Step 6 – Blocking
To paint the remaining elements of the miniature we are going to use the fast painting technique “blocking, wash and highlight” (classically utilized by Games Workshop). The first step, blocking, means that we will apply a base coat on each part of the miniature.
For example, we can use Burnt Brown Red (A.MIG-0134) for the brown leather gloves and boots, Pure Black (AMMOF-502) for the black leggings and trousers and Silver (A.MIG-0195) mixed with 75% of black for the metallic parts. We will separate chromatically the black leggings and trousers later by using warm or cold lighter colors for the highlights as we did with the red. Using the same base coat color for different elements of the miniature is a very useful option to save time. Also note that our palette is very small, only three paints.
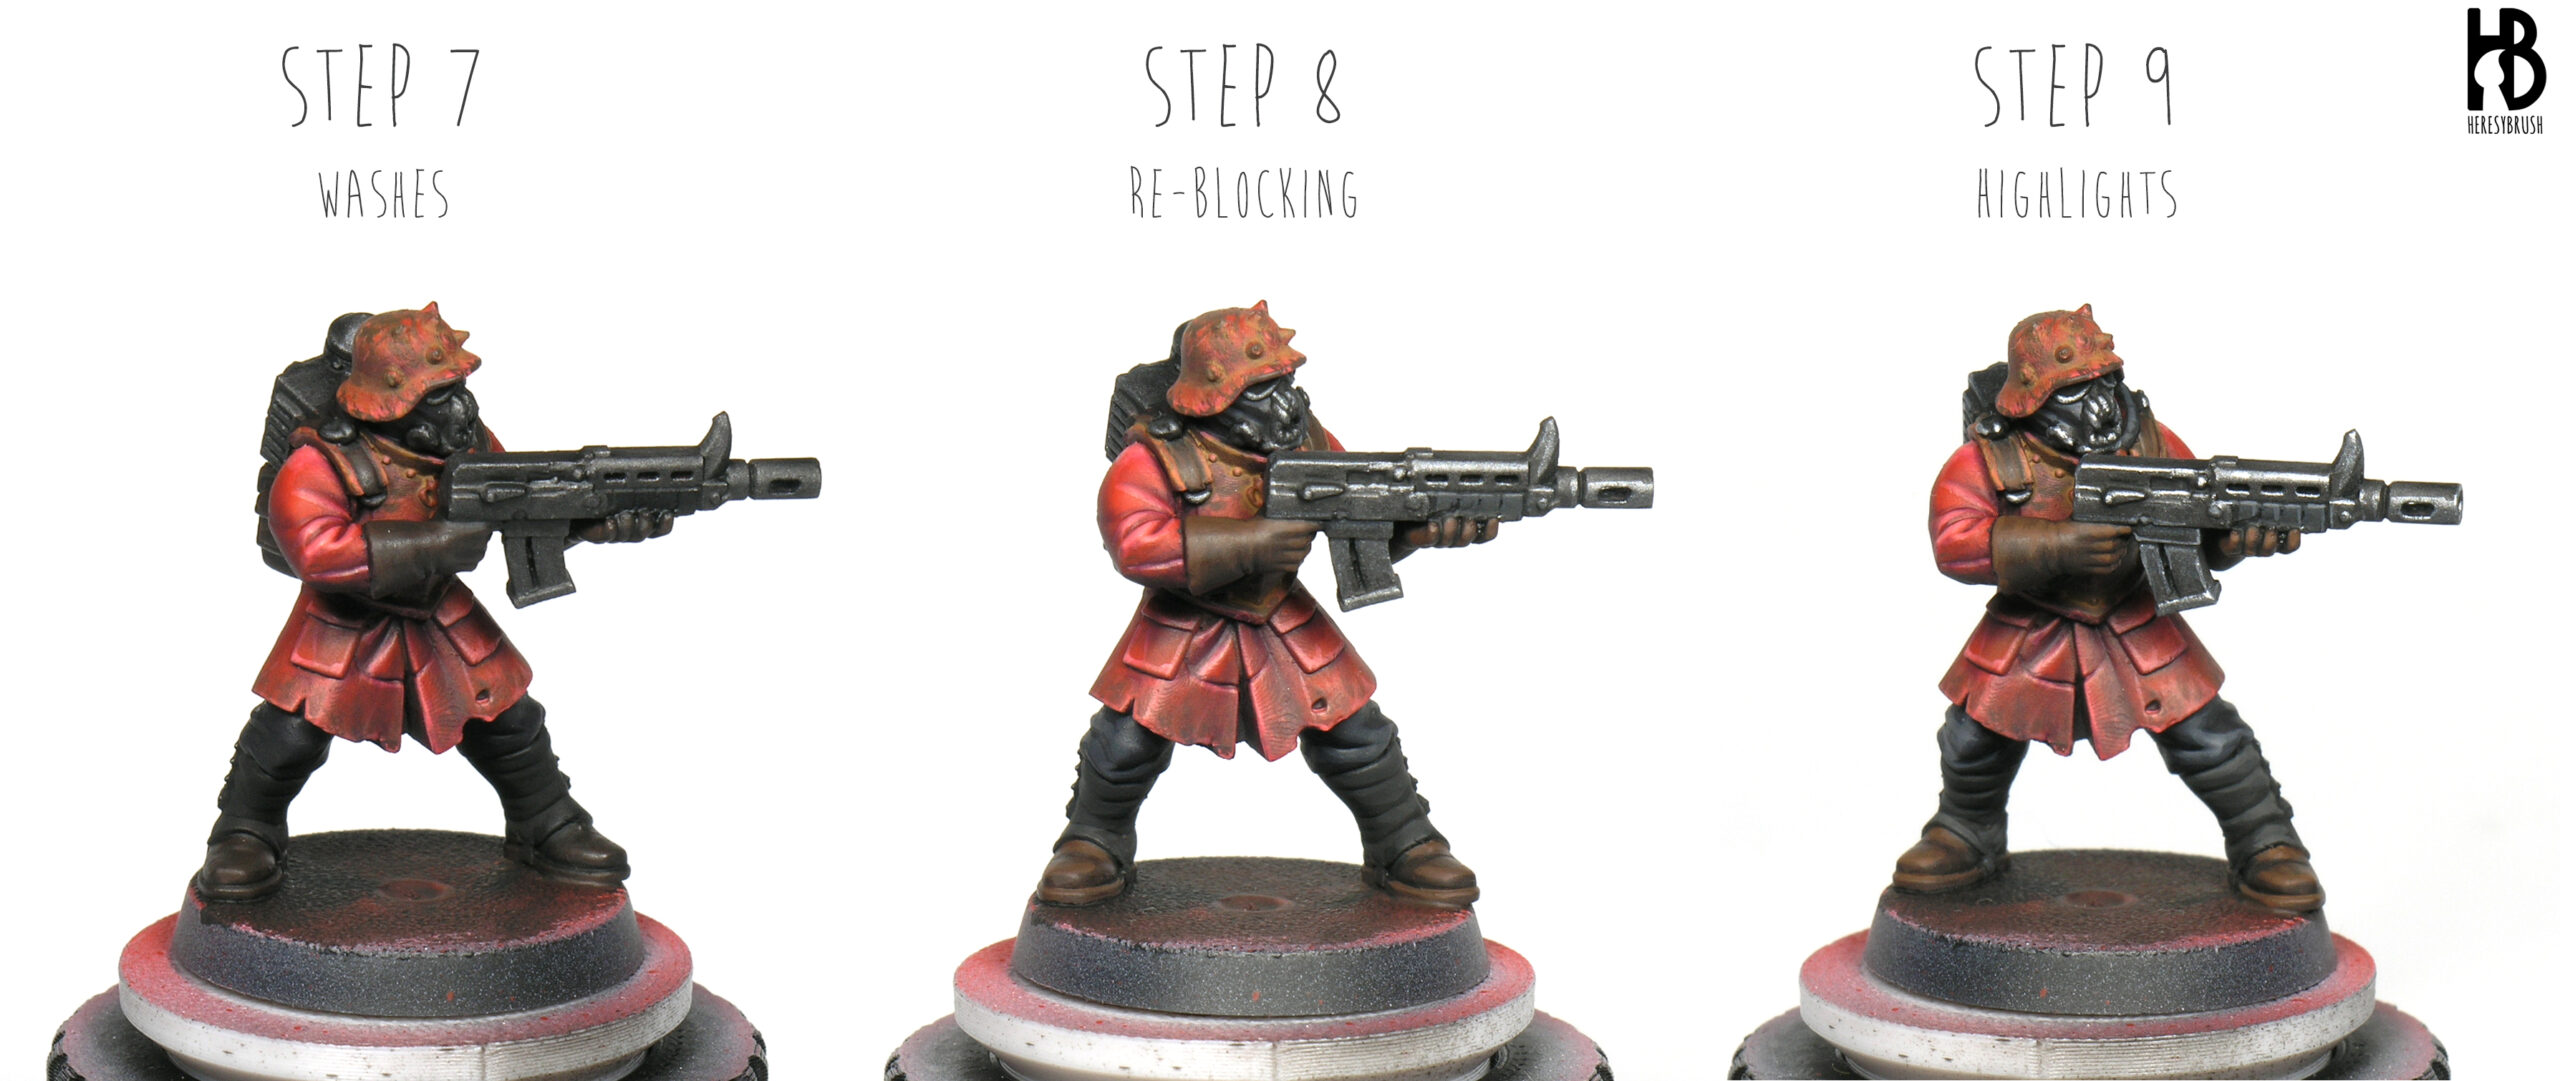
Step 7 – Washes
Next we apply the washes. Depending on the base coat color, we will apply a black wash (for very dark colors and metal) or brown wash (medium colors and gold). For very light base coats, including white, we should use a light brown or grey wash. Here, we apply a single black wash on the previously blocked parts by mixing black with 50% of Transparator (A.MIG-2042). Whether we apply several washes, we should let dry the first one before applying the next.
Step 8 – Re-blocking
The wash accumulates and stand out all the recesses, but it also darkens the whole surface. Therefore, the next step is to recover the original color. We normally do this using the same paints we used previously in the step 6. However, to speed up the process we can already apply a first highlight using lighter colors.
For the brown leather we mix Burnt Brown Red (A.MIG-0134) and Red Brown (AMMOF-532) in the same proportion. For the black color, we can create warm highlights by mixing it with 20% of pink or Light Skin Tone (A.MIG-0115), or cold highlights with Sapphire Blue (AMMOF-519). We the former option on the leggings and the latter on the trousers. Finally, for the metallic parts we increase the proportion of Silver in our initial mix up to 50%. We apply this first highlight on the most raised parts, leaving the wash in the recesses; and focus specially on the edges of the metallic parts.
Step 9 – Highlights
We apply a second highlight on the most exposed areas using lighter colors. Note that we should not cover completely the previous layer, and therefore, we should reduced the painted area. For the brown leather we use directly Red Brown (AMMOF-532), whereas for the black parts we increase the proportion of skin or blue up to 40%, and for the metallic part we increase the Silver up to 75% in the previous mix.
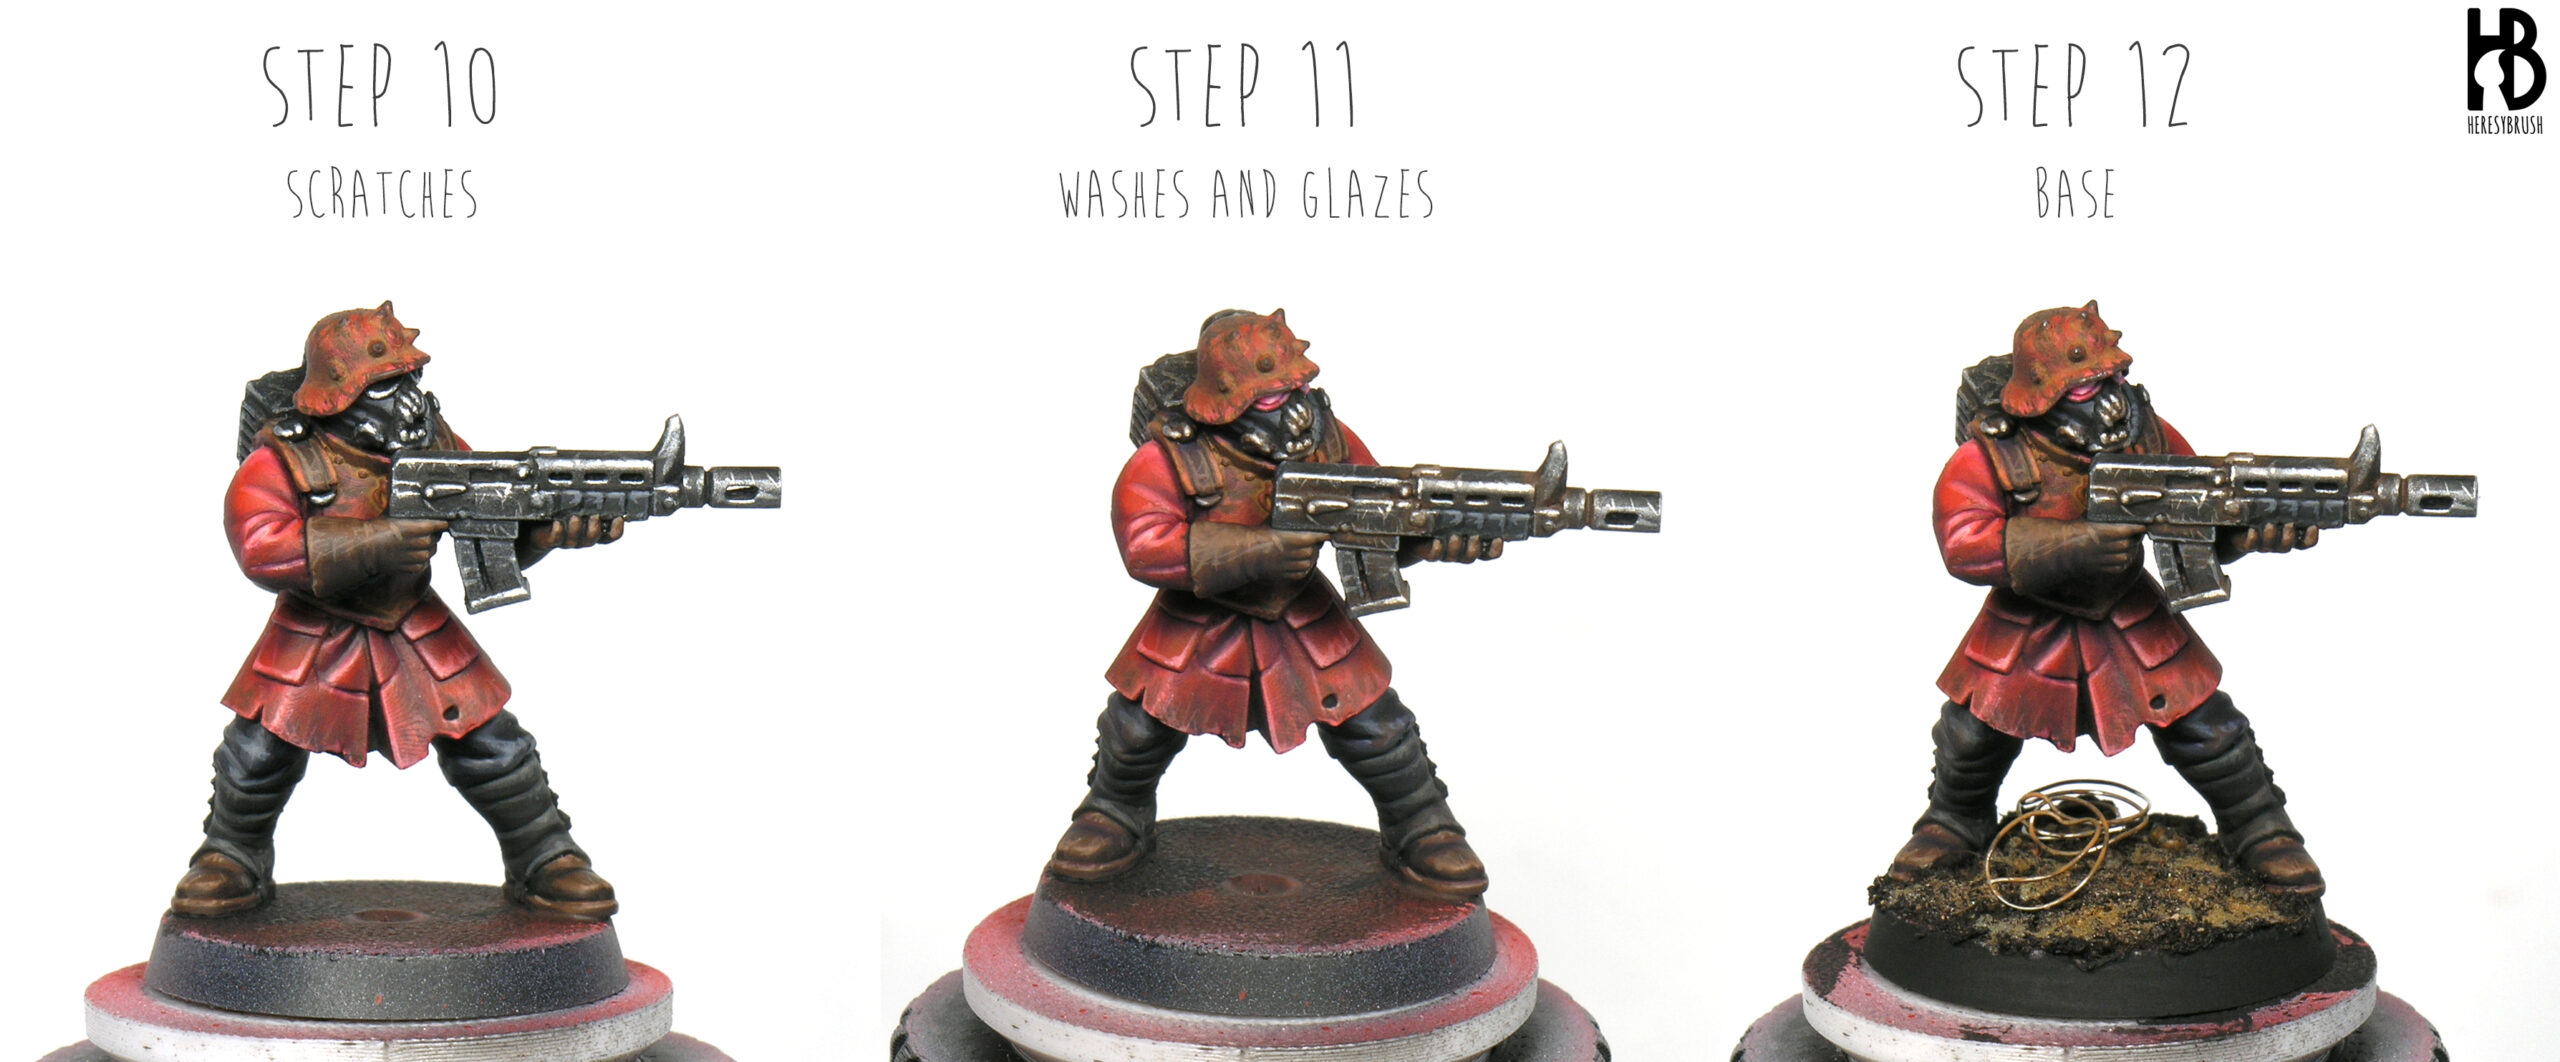
Step 10 – Scratches
Optionally, we can add now scratches and worn effects to somehow represent the little care that this corrupted cultist applied on his belongings. For this we will use even lighter colors than before, which will also serve as a third and last highlight. Using a the tip of a sharp brush, we paint small dots and thin lines in the most exposed areas and trying to avoid patterns. We do not need to weathered everything, and will try to make these details as small as possible. We use Red Leather (A.MIG-0133) for the brown leather, increase the amount of pink and blue for the black parts and finally use pure Silver (A.MIG-0195)
Step 11 – Washes and glazes
Finally, we add some color variations to gain even more contrast and avoid a flat and monotonous looking. We do this by applying glazes (to slightly change the color of a surface) or washes (to more heavily accumulate paint on the recesses).
For example, we can create rust effects on the metallic parts following a similar approach as we did in the helmet and armor using Dark Rust (A.MIG-0041) and Light Rust (A.MIG-0039). But this time, instead of a glaze we apply a wash focusing on the recesses. To create a wash we thin the paint with 50% of thinner and apply it directly onto the nooks.
We can also create more vivid shades on the leather (both black and brown) by applying a purple glaze in the intermediate areas (between the final shade and highlight). Remember that to create a glaze we thin the paint down with 60-80% of thinner, and before applying the paint on the miniature we brush off most of the paint on a piece of paper or cloth. And as we did on the tunic, we can apply glazes with Matt Earth (AMMOF-507) on the boots and leggings to represent mud or dust.
For the lenses of the glasses I decided to simulate some short of red / pinkish lightning, painting the central part with pure white and the surrounding with pink. And as a final touch, I used a graphite pen to mark the most exposed edges of the helmet and armor to create a metallic shine.
Step 12 – Base
To finish the miniature we create the base. One of the quickest options is to use an acrylic texture such as Turned earth ground (A.MIG-2103). This product combines in a single application an interesting texture and a color, saving as a lot of time. We apply it with a small spatula or old brush. Once it is dry, we can add an additional touch for example by adding rust pigments mixed with water.
And with this our Blood Pact cultist is ready. As a take-home message, we have speed up the painting process by:
- We used a grisaille to easily create an initial map of shades and lights on the largest element of the miniature, the tunic. Furthermore, we exploited the grisaille by painting the helmet and armor also red.
- We use the technique block, wash and highlight to quickly paint the rest of elements of the miniature. We kept our color palette very small, using only three colors: black, brown and metal.
- Despite the reduce color palette, to gain variation and contrast we can highlight the same base coat color using either a warm (skin) or cold (light blue) color. Similarly, we can use white to desaturate the color (note the pink tone of the tunic) or a vivid color to keep the saturation (the orange of the armor).
- Glazes and washes are very useful to quickly add more colors on different part of the miniature and create weathering effects.
Great guide! The color really pops. What is the model you used?
Thanks a lot! It is an 3D printed model by https://reptilianoverlords.com