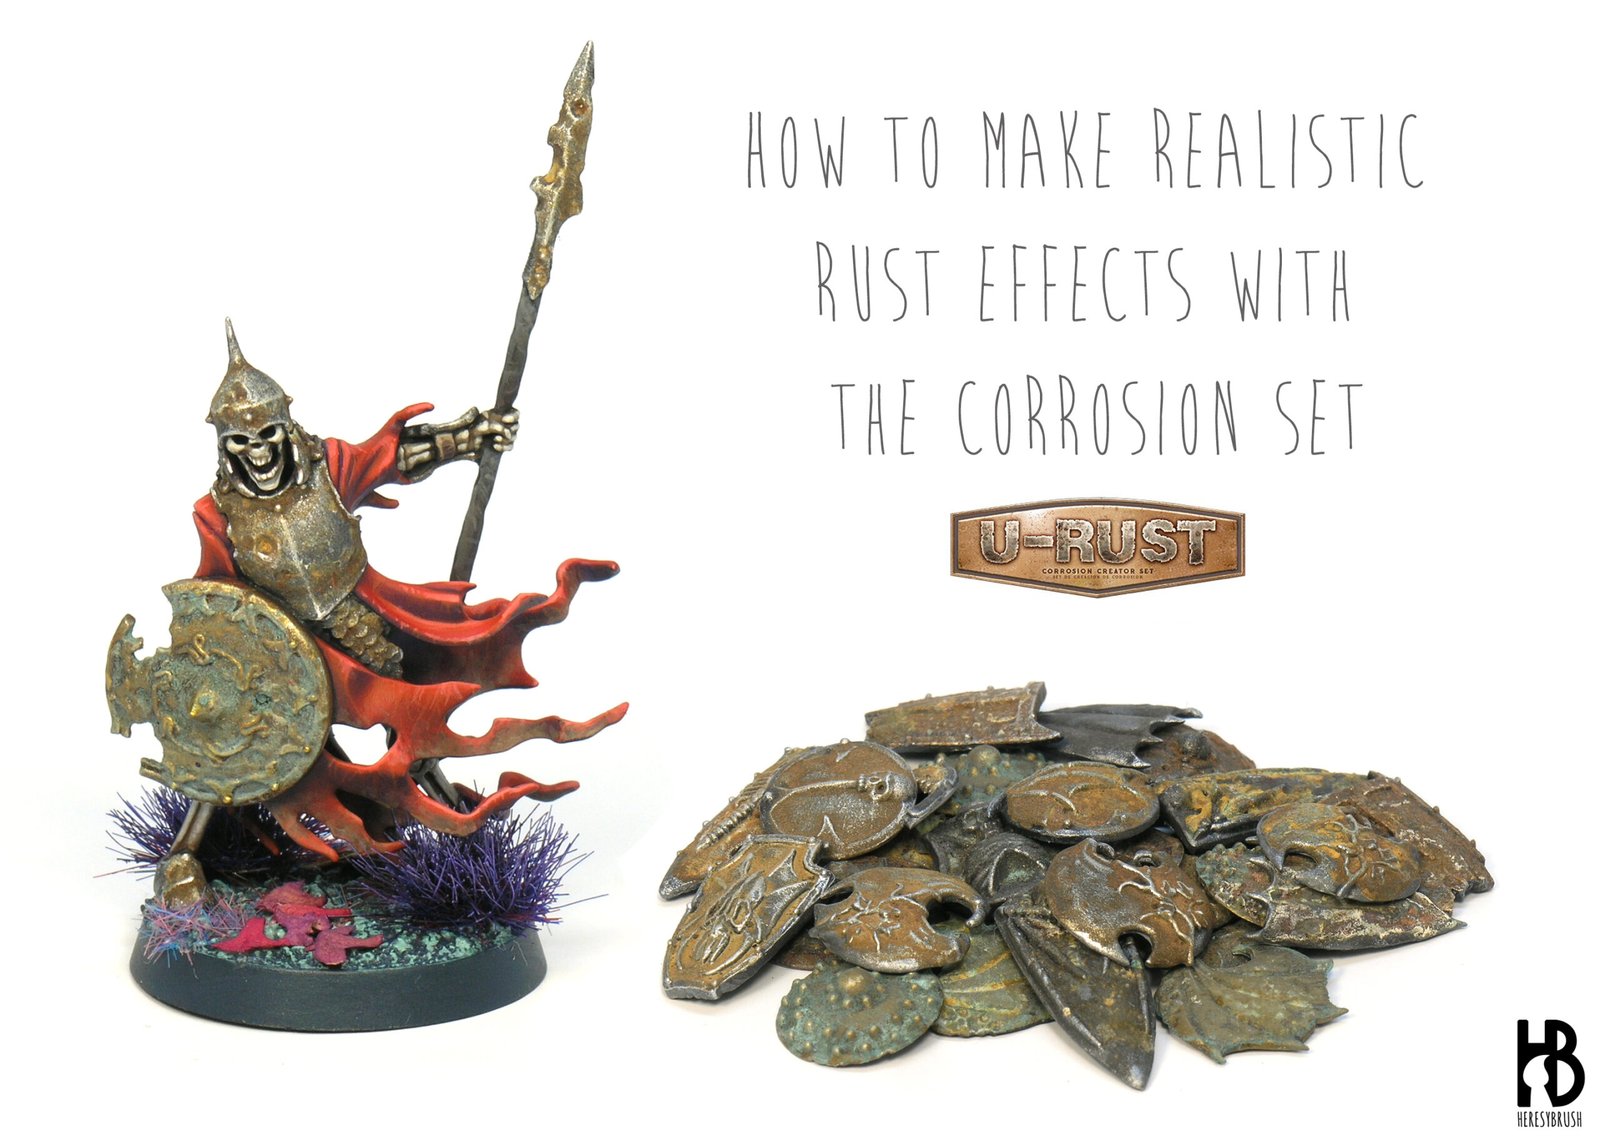
Some weathering effects are created rather than painted. This applies to any textured effect, such as mud, snow or rust, among others. Of course, we can try to simulate these by painting them. But it is easier -and more realistic when painting a 3D model- when we create them. In this tutorial I will explore the new corrosion creator set by AMMO, U-Rust, designed to create textured rust effects. I think that this kit was initially meant for dioramas and big scale models, but as a wargamer I was curious to see whether we could also use it to paint small parts of 30mm fantasy miniatures. And for this, my Warhammer undead warriors full of worn out metallic elements are perfect experimental subjects.
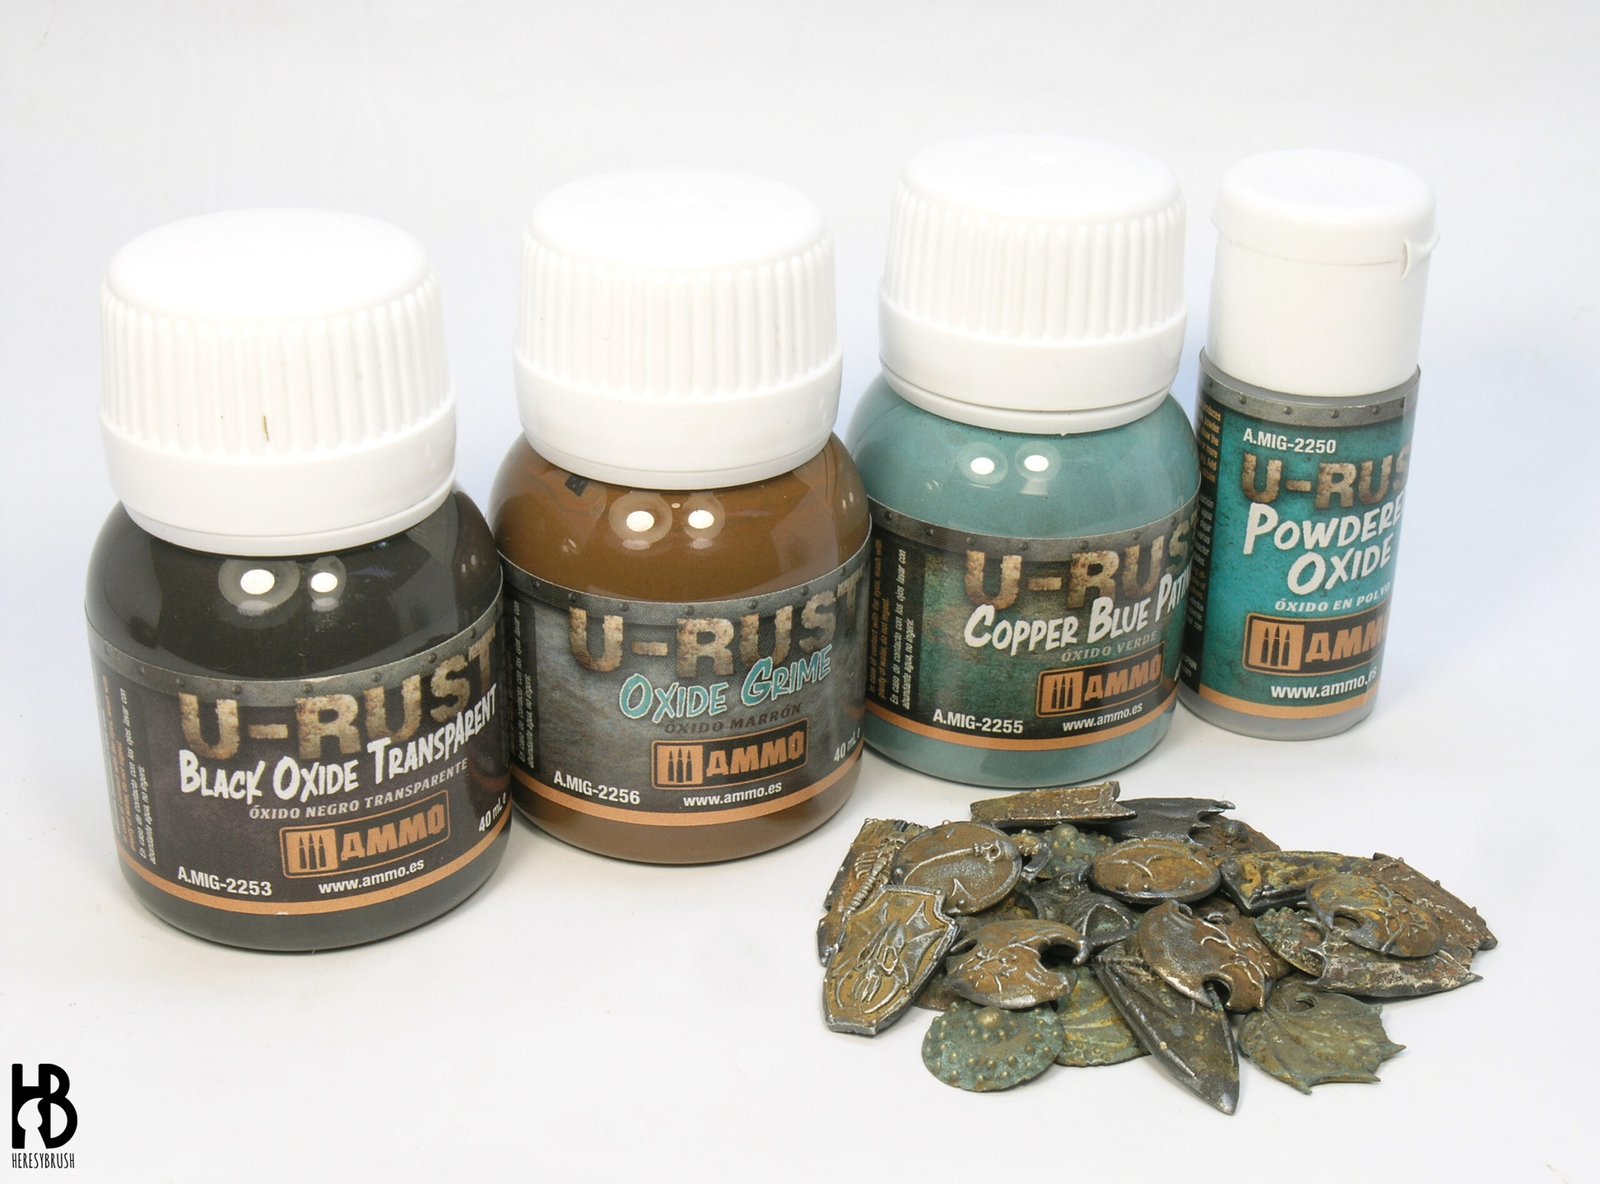
The kit contains 8 different rust textures, from brown rust to bronze patina, one bottle with powdered oxide and two different reactors. Note that the latter are dangerous chemicals, and therefore you should wear gloves and protection glasses when using them. The reactors can be used individually or combined on top of the rust textures to induce a chemical reaction that will create stunning and realistic rust effects (these simply cannot be painted).
The box also contains a small booklet with a few tutorials that are very useful to get a general idea about how the kit works (note that the first tutorial is wrongly featuring Deep Oxide A.MIG-2251 when in fact it utilizes Oxide Grime A.MIG-2256; but this typo has been corrected in the newly printed booklets). AMMO also released this useful youtube video. But there are many more options or combinations that the booklet and the videotutorial show since we can combine and apply the rust products and textures in multiple ways. For example, we can mix different rust textures to get new colors, we can change the thickness of the rust layer (perhaps, even dilute the rust texture with water?) or play with the dilution of the reactors. This means that this kit has a huge potential, but some initial testing is recommended to find the optimal conditions for our purpose.
In my case I wanted to use this kit to paint the shields, armor plates and weapons of my undead warriors. These are very small surfaces compared with any of the examples featured in the booklet and video, and therefore, I had no idea about the possible outcome. Although the results shown in the book or video are amazing, they might be too striking for a 30mm miniature. Therefore, I decided to do an initial test with a few rust textures based on the booklet, but as I said many other combinations are possible -please, share your results if you try others-. I also tested how the two reactors work (alone or combined) depending on how they are applied (generously with a brush or randomly as splashes). Next, I did some further tests based on the initial results. And finally, I applied the most promising approach to a real miniature. I really enjoyed this “wet lab” experience.
How to apply the rust effects
Step 1 – Base color

In the most part of the tutorials (booklet and video) a solid and neutral primer color is used as a starting point, such as grey or brown. This makes sense when next you cover the whole surface with the rust texture to create a general rust effect. However, in my case I was looking for a more subtle rust effect, accumulated on the recesses. Something like the bronze rust patina tutorial explained in the book.
Therefore, I begun painting the whole shield with a metallic paint so that the raised areas will keep the metallic shine at the end. I did it quickly by dry-brushing Light Metal A.MIG-0621 or Brass A.MIG-0623 over a black undercoat for iron or bronze elements respectively. Note that these paints are specially designed for the drybrush technique.
Step 2 – Rust texture

Next, we apply the rust texture directly from the bottle using and old or synthetic brush. Remember to shake the bottle well before use. This applies to all rust textures with one exception, the Powdered Rust A.MIG-2250, which is a powder. We need to dissolve it with tap water and then it can be applied as any other rust texture. The amount of water will depend on the effect we are looking for (more about this later).
We cover the whole shield with the texture using a stippling mode, trying to cover some areas more than others to create variation. Note that these “paints” are textures, meaning that if we apply too much, we can cover the details of the miniature. This is especially important in the case of the Deep Oxide A.MIG-2251 that contains small -but visible- iron spheres.
Step 3 – Remove the excess of rust texture
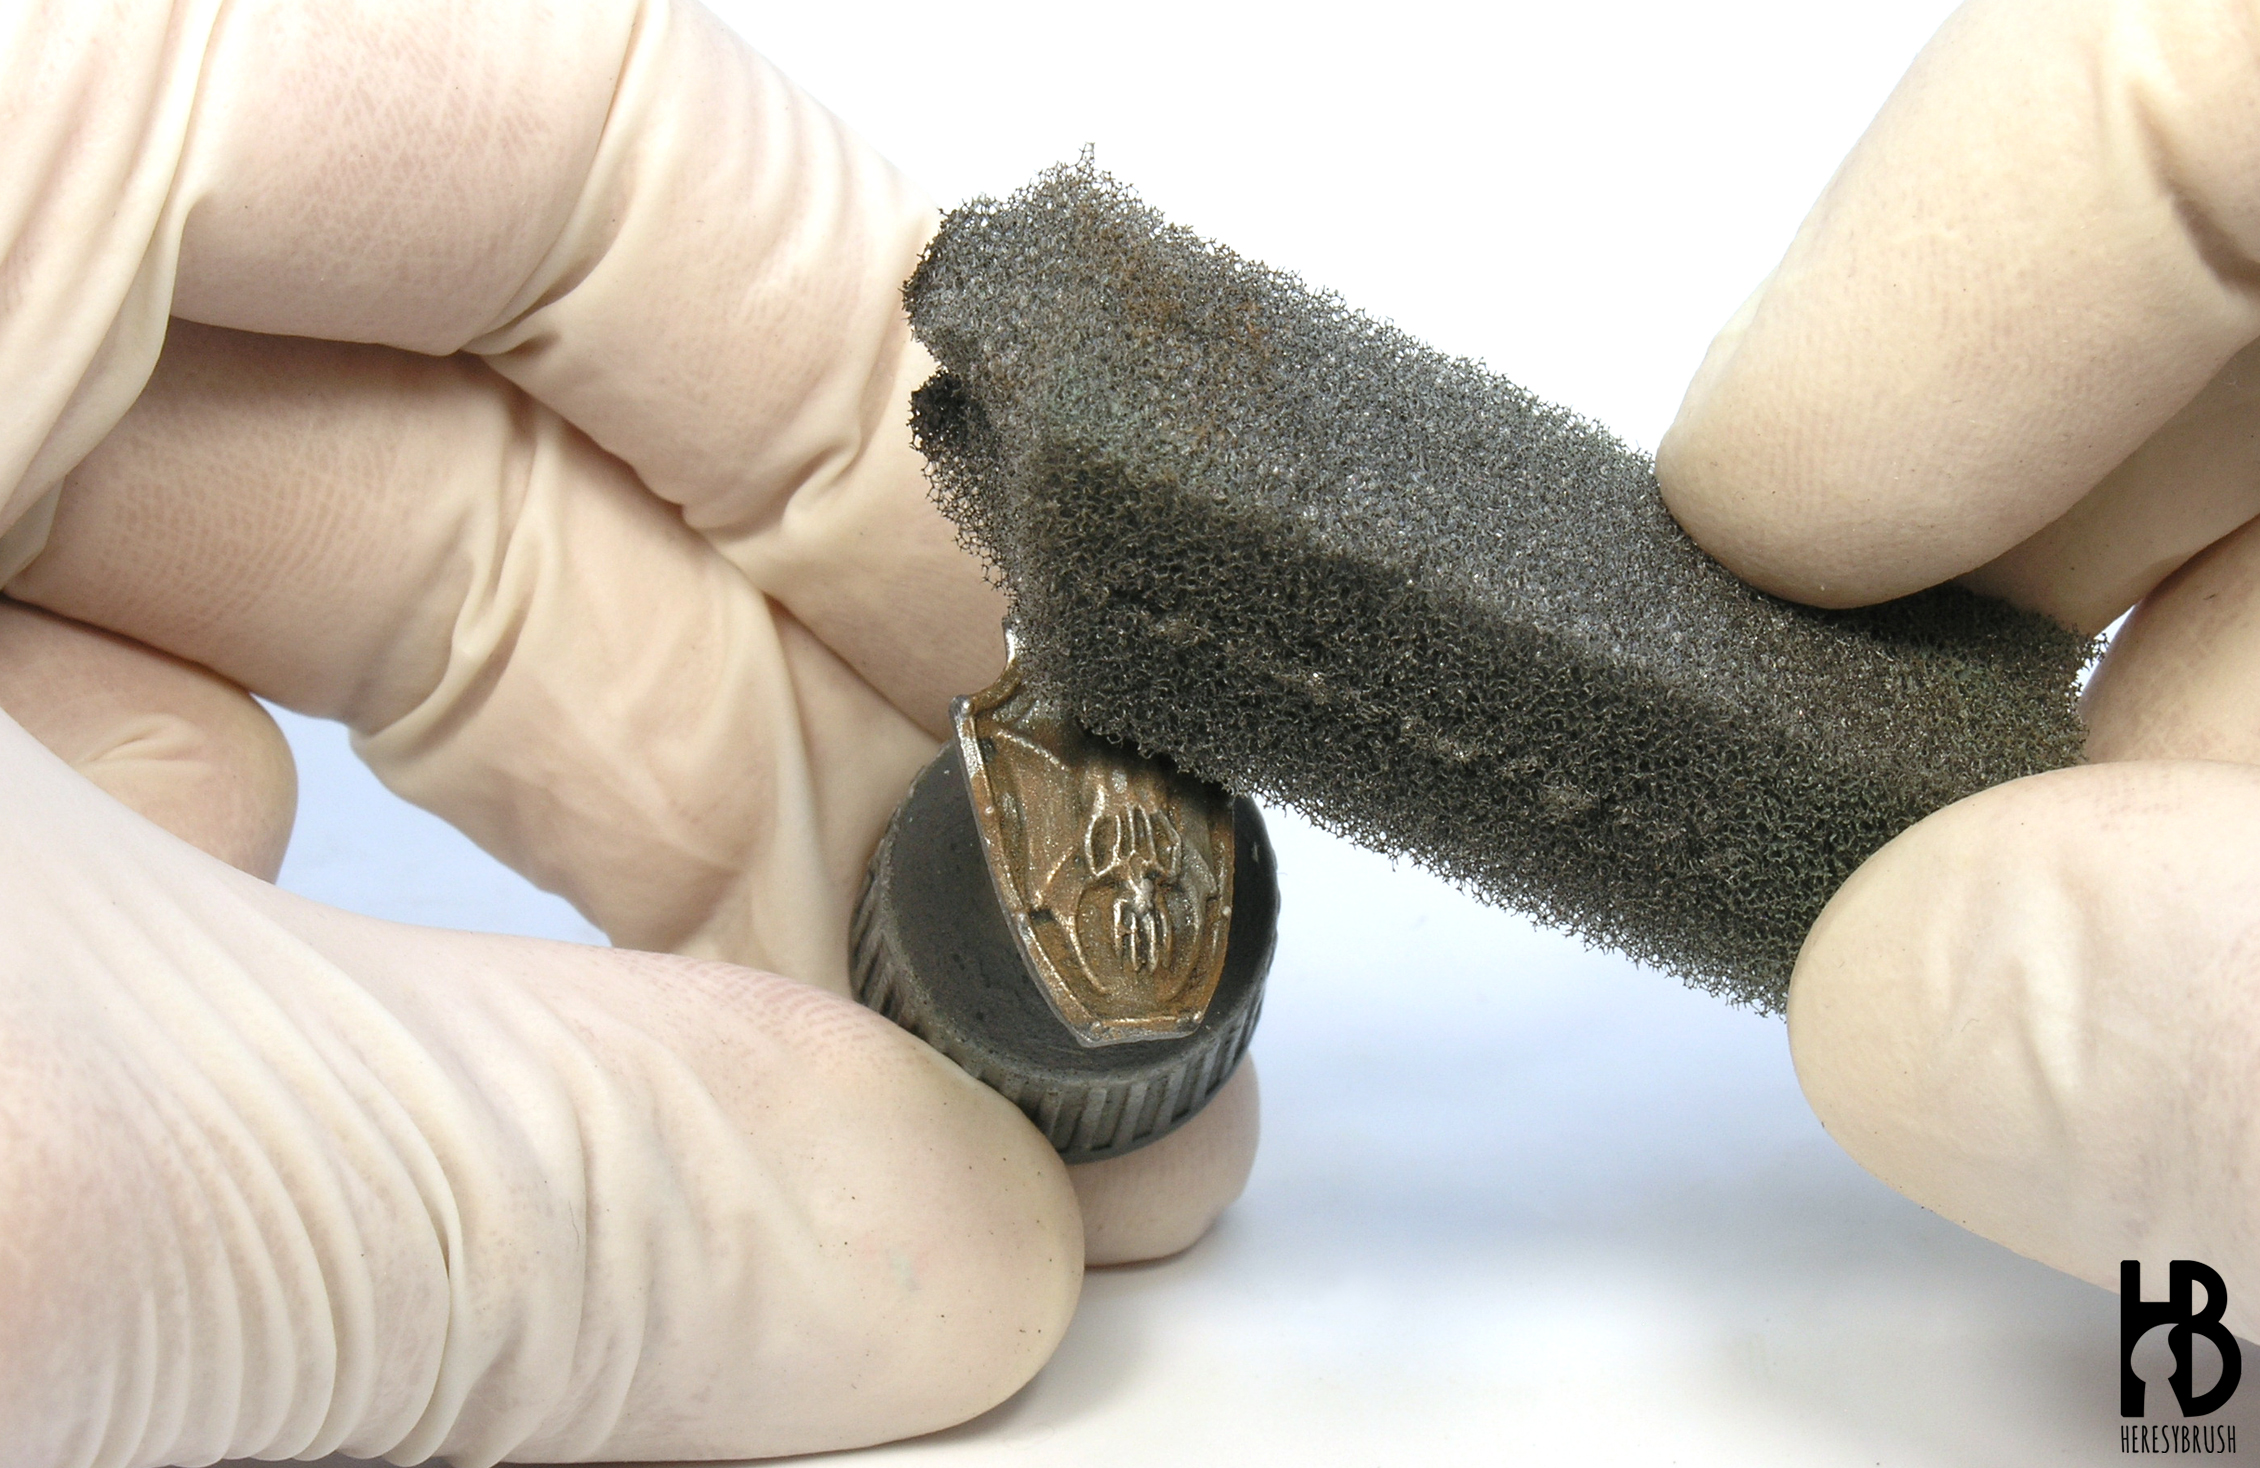
As we want to accumulate the rust effects only on the recesses, five minutes after applying the rust texture we remove the excess from the most exposed areas by gently rubbing the shield with a sponge or cloth. If we do this too quickly after applying the texture, we can remove too much rust texture; but if we do it too late, we will not be able to remove it. After this, we let it dry completely for 20 minutes. Some rust textures will already change the color, meanwhile others no. Note that here I could not remove as much rust texture as I wanted because it took me too long to take the photos.
Step 4 – Reactor Type 1
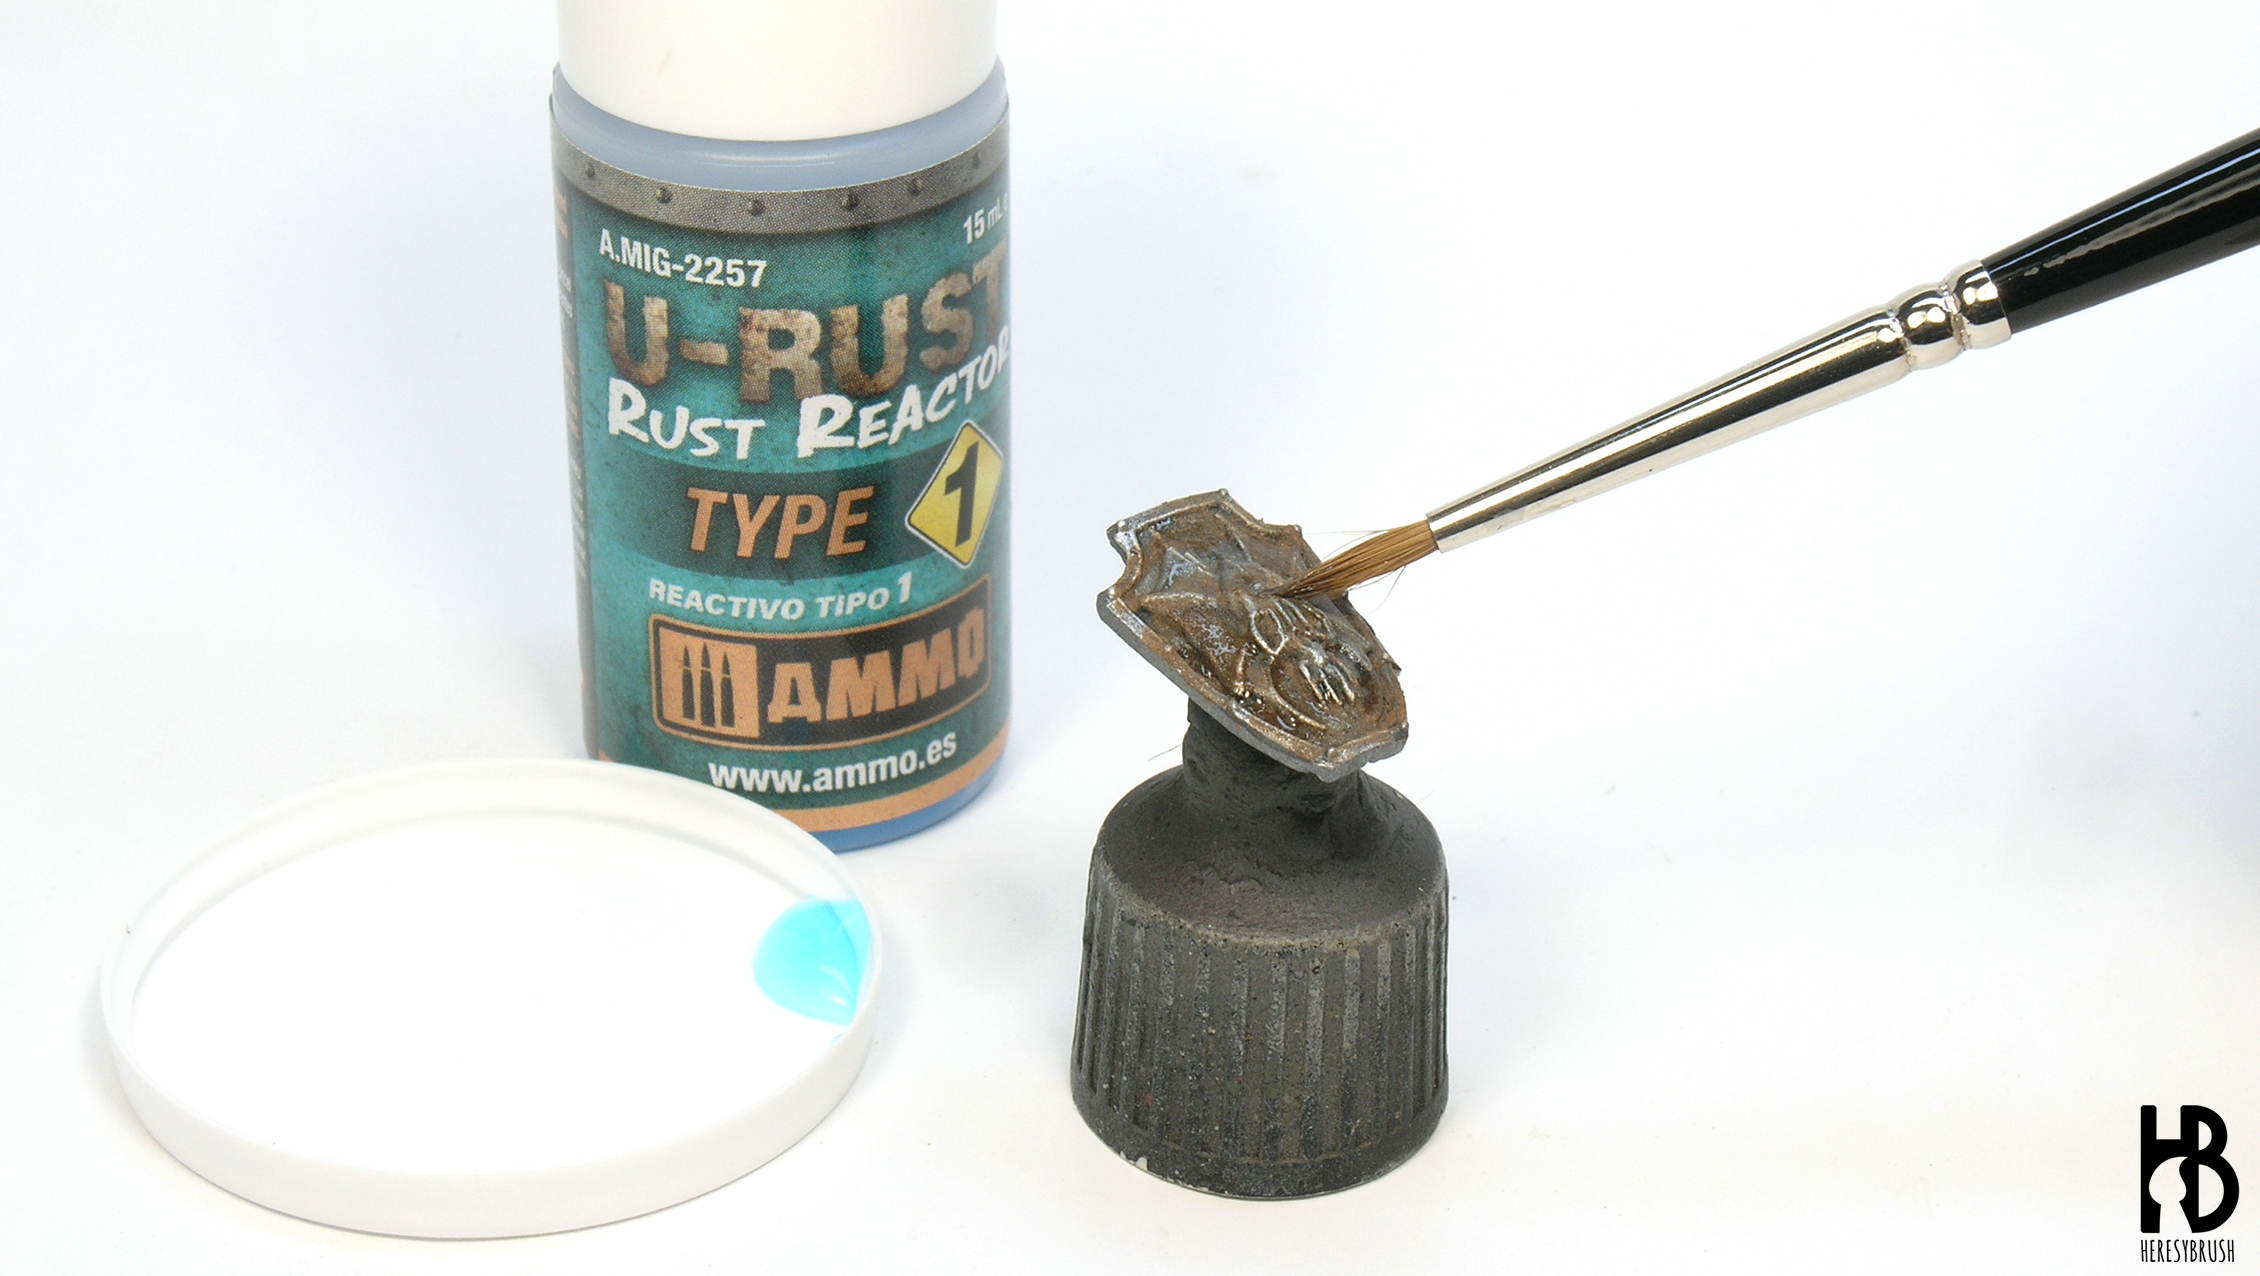
The kit contains two reactors (type 1 and 2) that can be used separately or combined to obtain different effects. In this example, we apply first the Reactor Type 1 with a brush, covering irregularly the surface to create more variation. Based on my experience, do not puddle the surface with the reactor or the resulting effect will be exaggerated.
Step 5 – Reactor Type 2
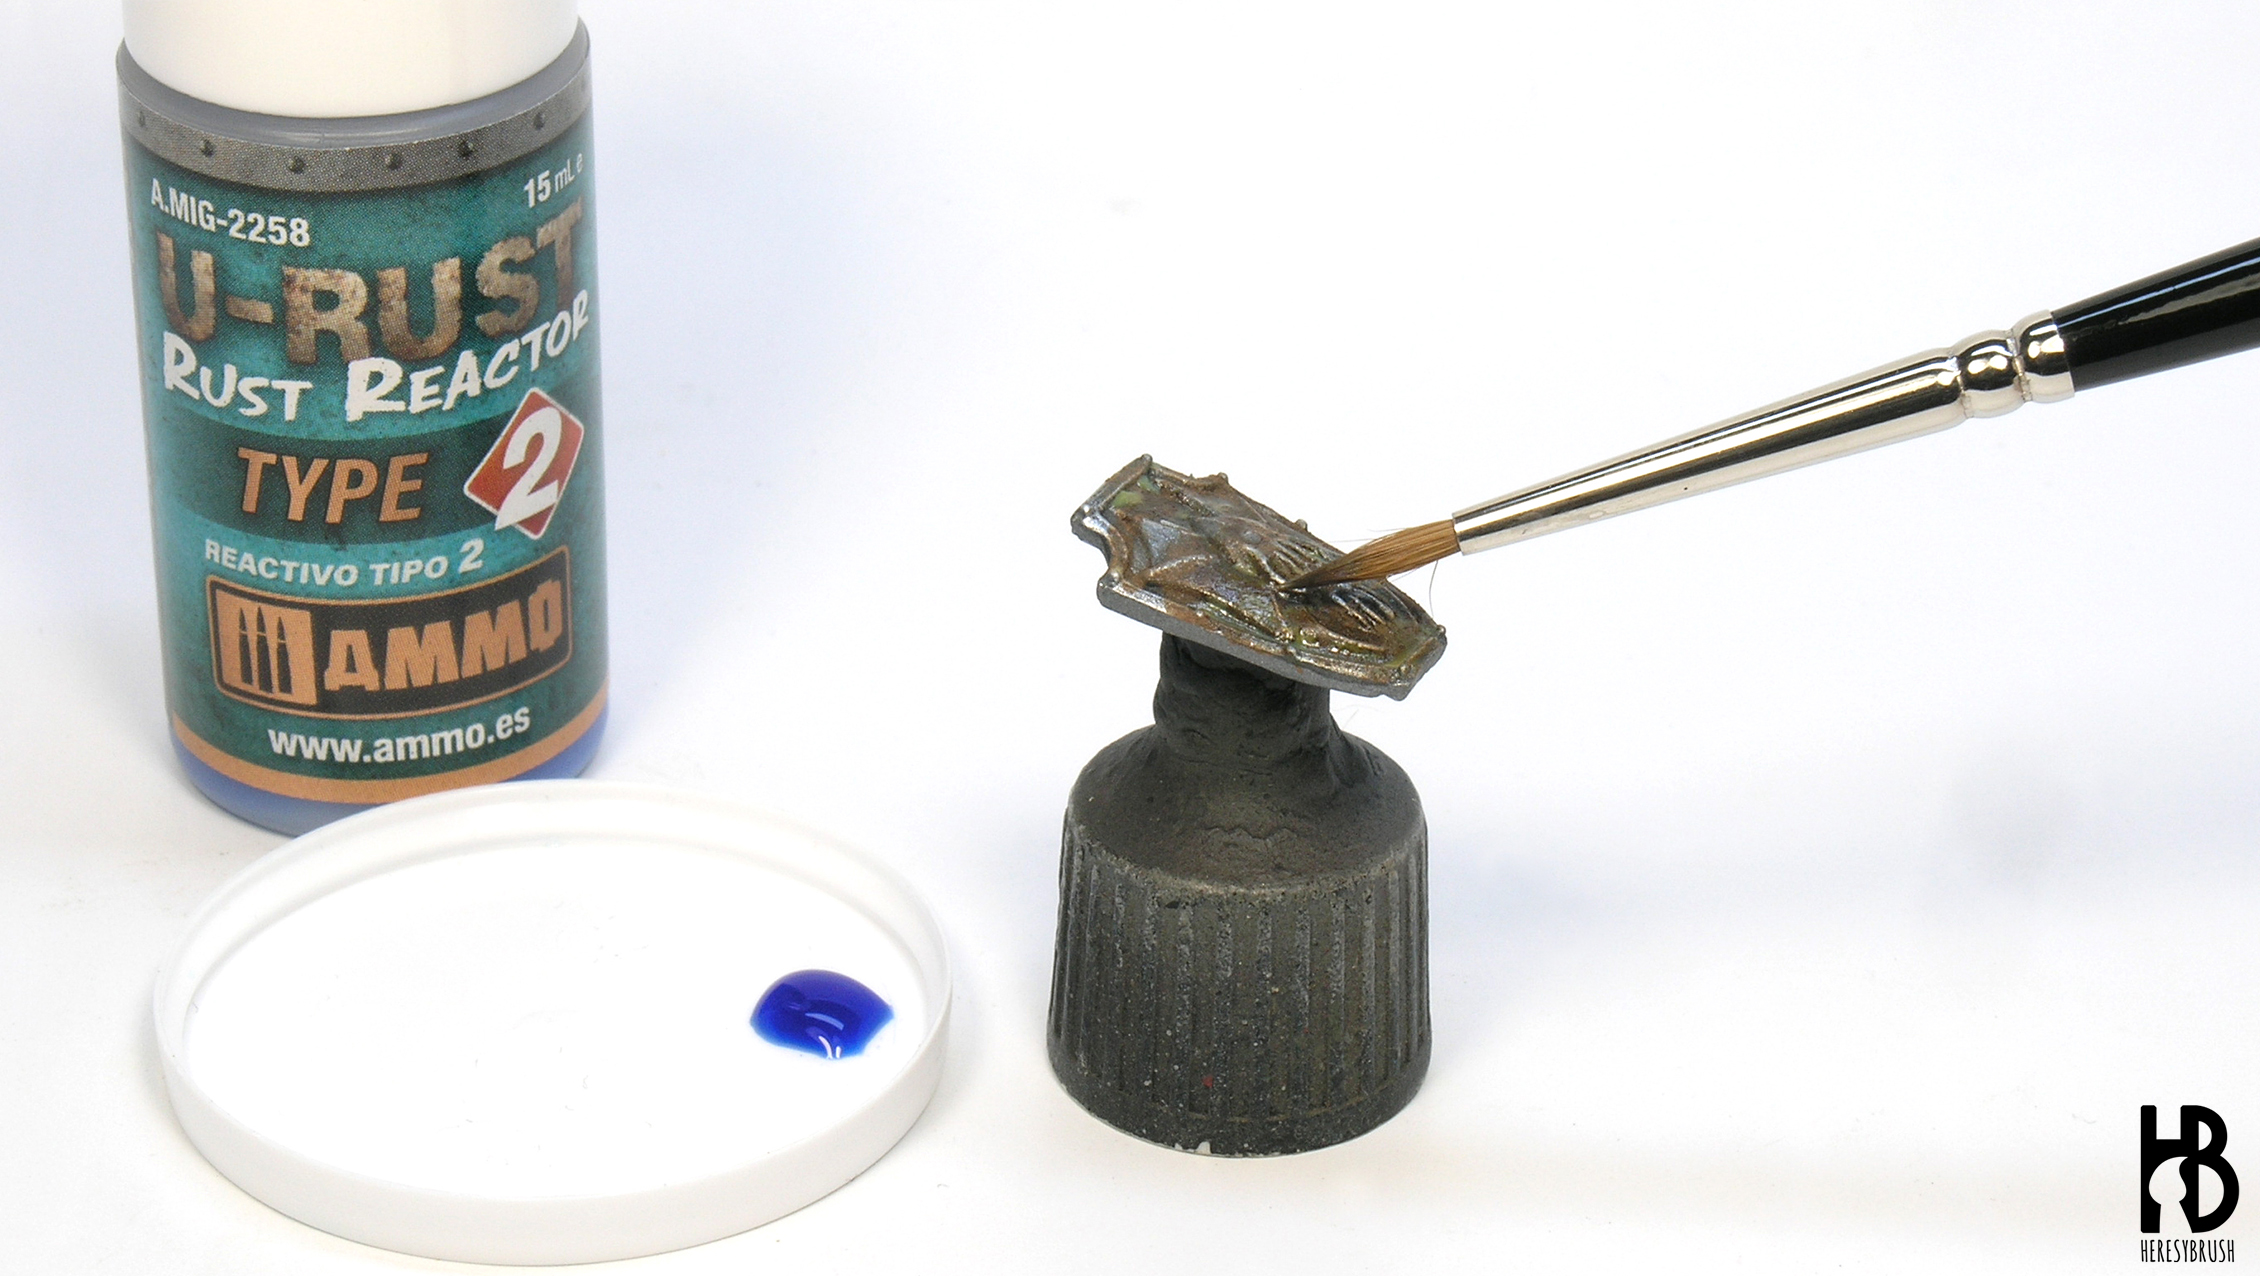
While the Reactor Type 1 is still wet, we apply the Reactor Type 2 using a brush. We do it randomly, on top of the first reactor but also on other uncovered areas to create more variation.
Step 6 – The magic works
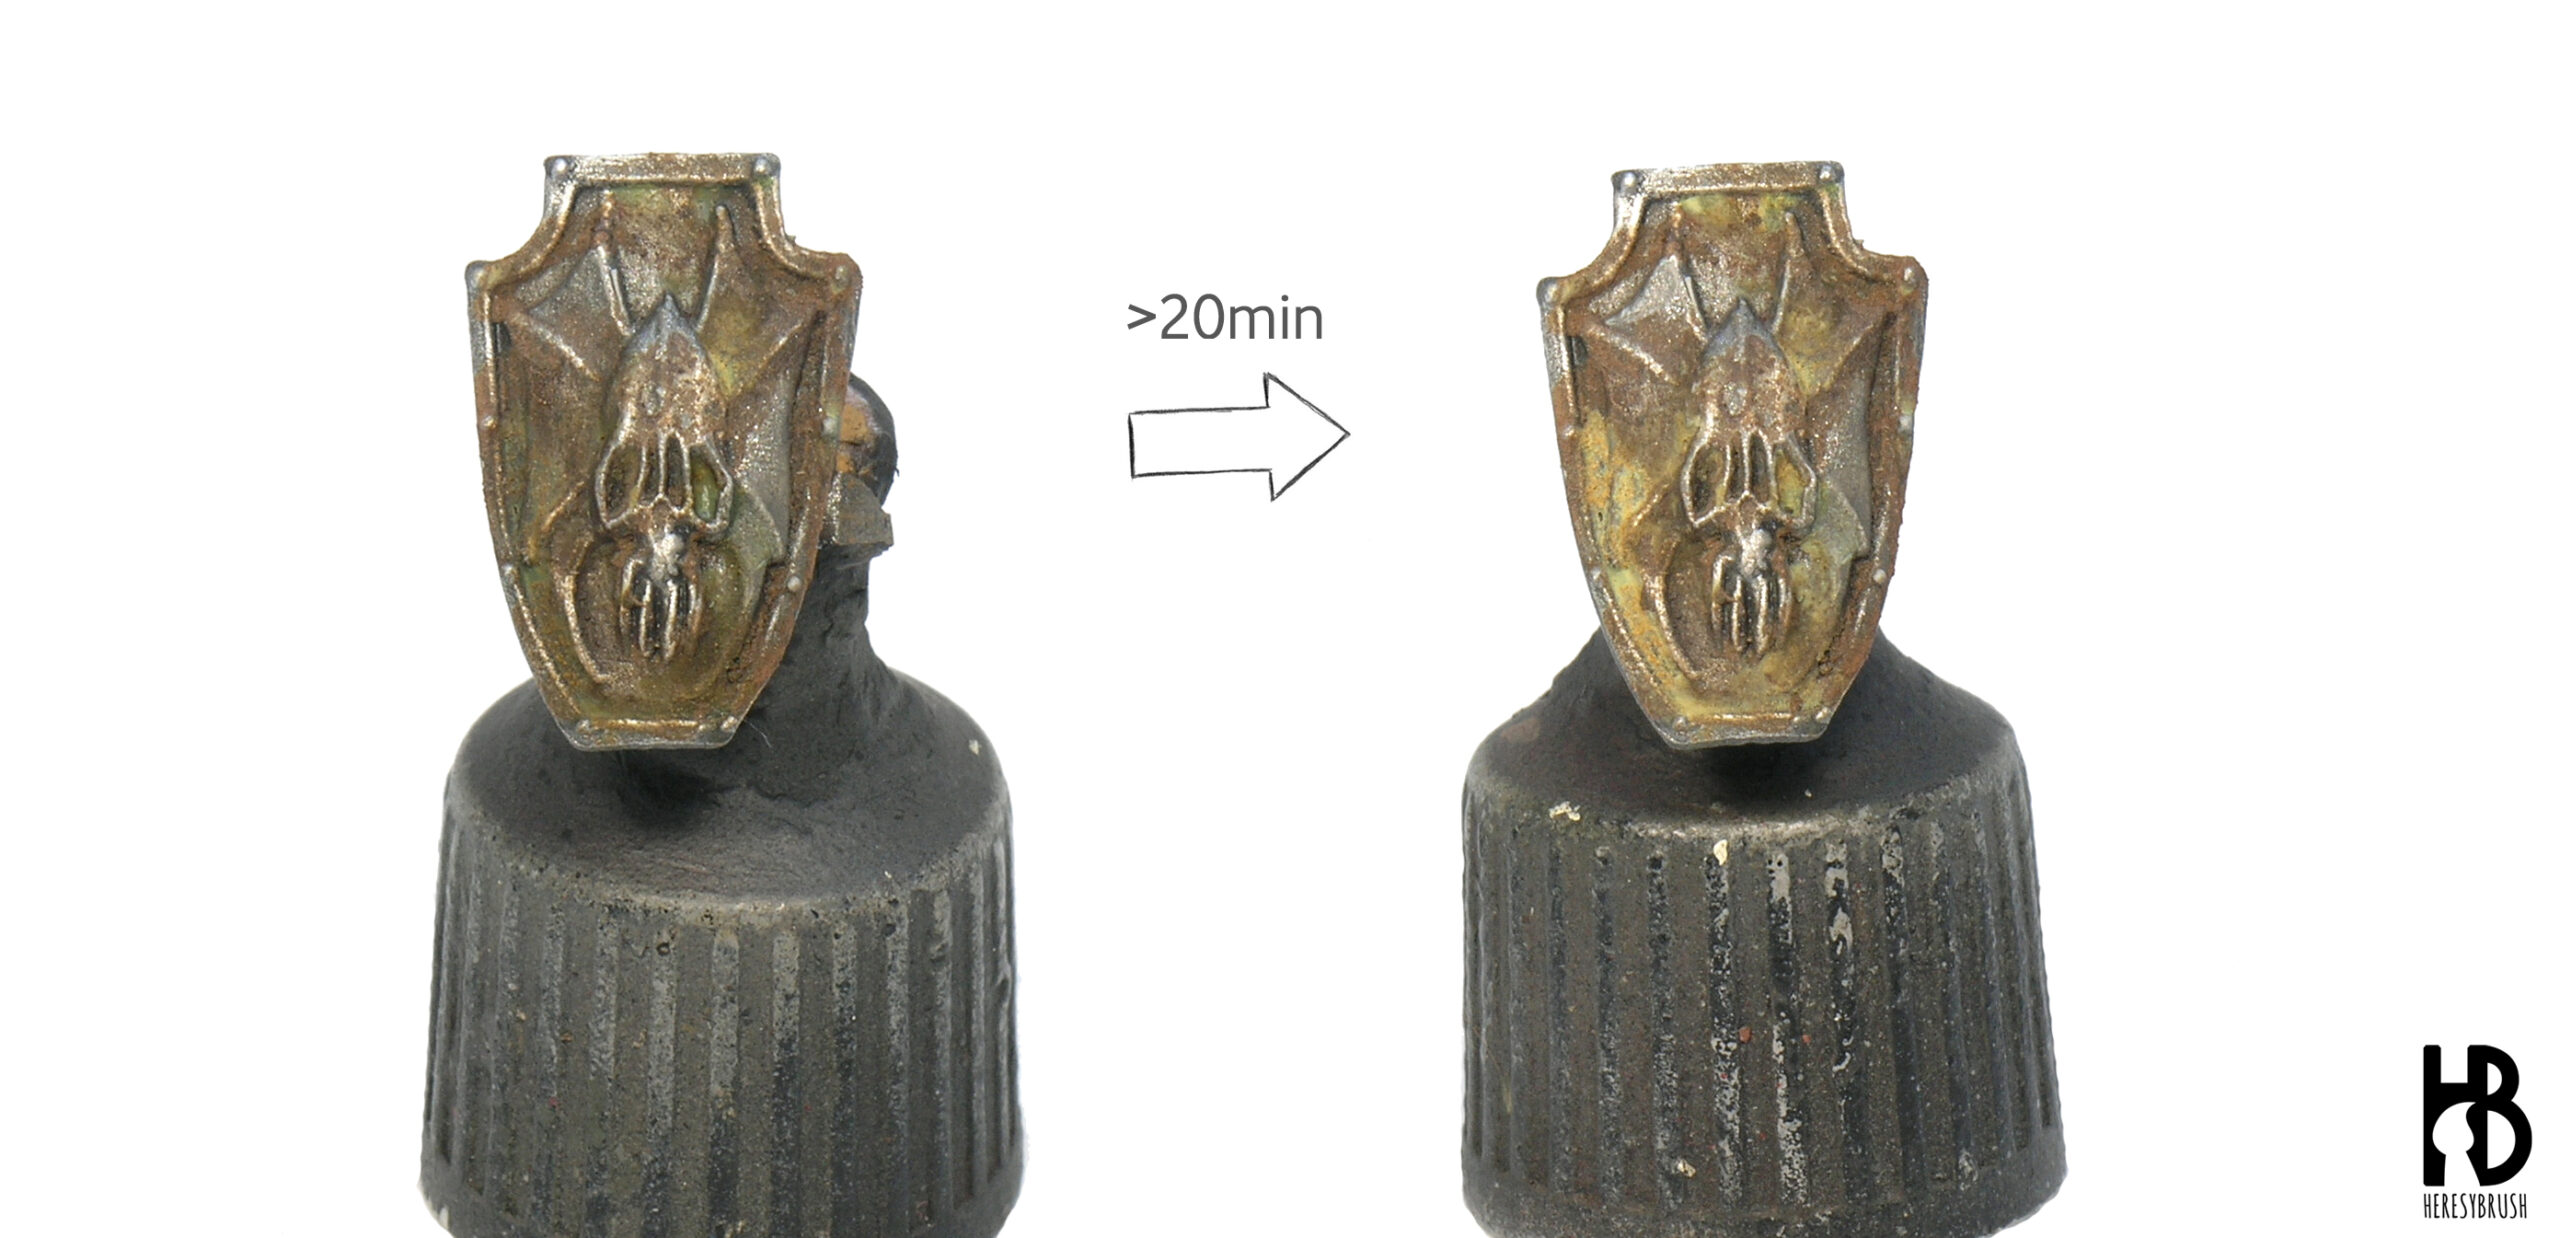
After 20 minutes or so we can start to see how a corrosion effect emerges, changing the color of the original rust texture. The colors will change depending on the reactors applied on top (one or both combined) and the quantity. The appearance can still change hours later, and it is also possible to add a new layer of reactors to activate again the texture and create additional effects.
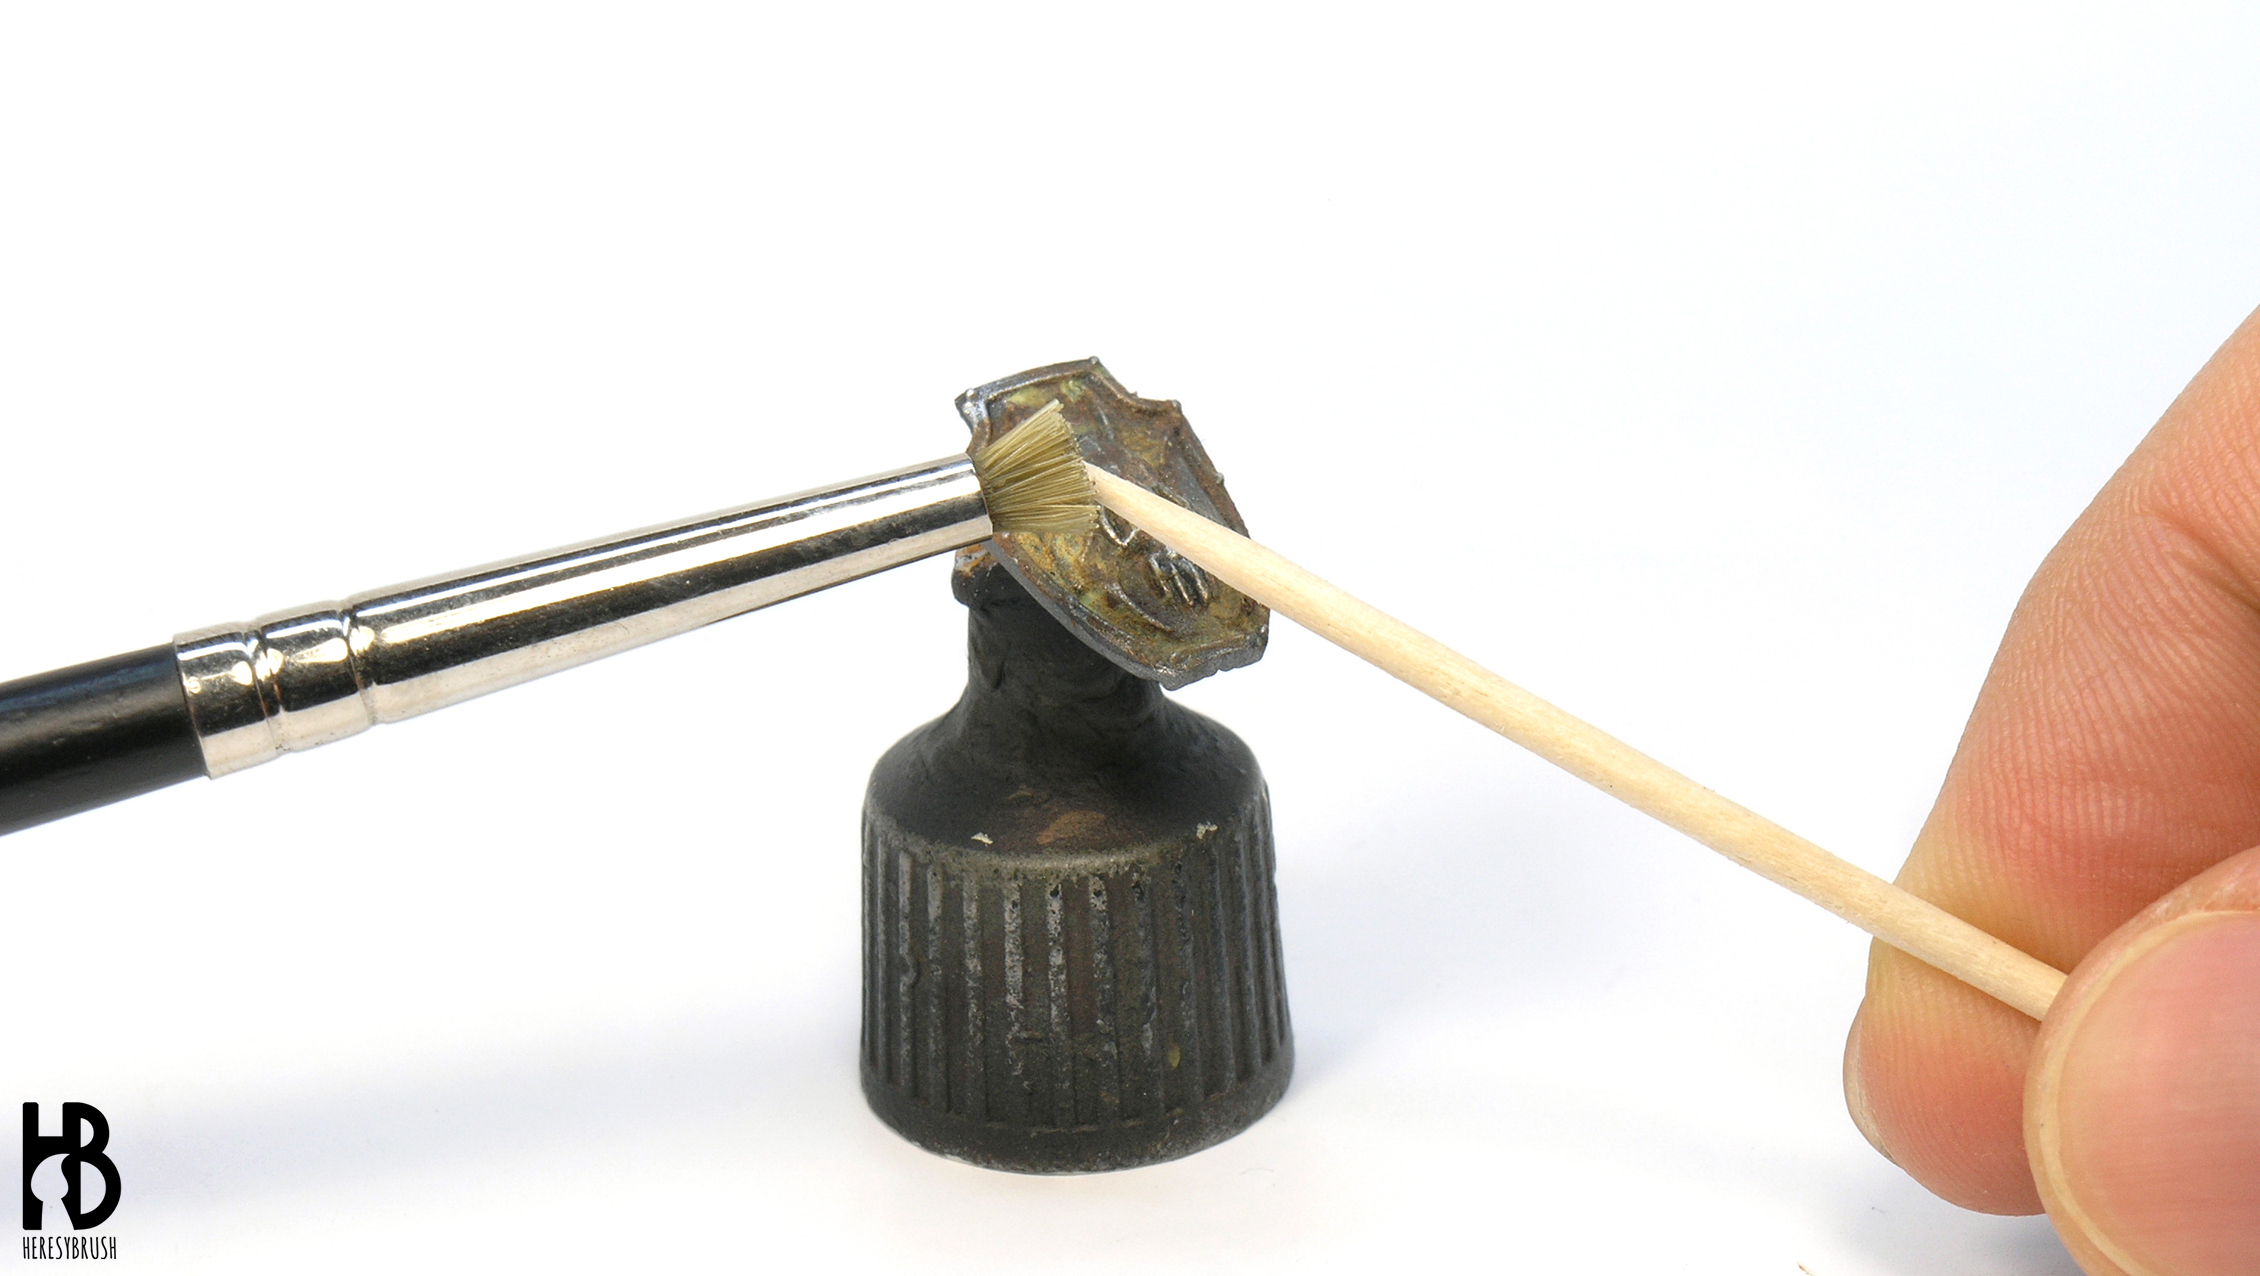
Furthermore, we can apply the reactors as splashes. For this we can use a stippling brush with plastic and thick bristles (mine is from Citadel): after loading the reactor, we tense and then release the bristles using a toothpick. If we apply these on top of the initial layer of reactors applied with a brush, we can homogenize a little bit the effect, obtaining a more consistent -but still random- looking. Alternatively, we can directly apply the reactors as splashes. I personally like a lot this option, since we apply less reactor and more randomly, creating more suitable effects for 30mm miniatures.
Test 1
Said this, next I tested a few products of the corrosion set in different ways (see the image below). In columns 2 to 4, I applied the Reactors randomly using a brush, meanwhile in the last column I did as splashes (no brush). In the second row, the Powdered Oxide was mixed 50%/50% with tap water. In the last row I aimed to create a heavier rust effect by combining two different rust textures, Deep Oxide (containing iron spheres) and Powdered Oxide mixed with 25% of water.
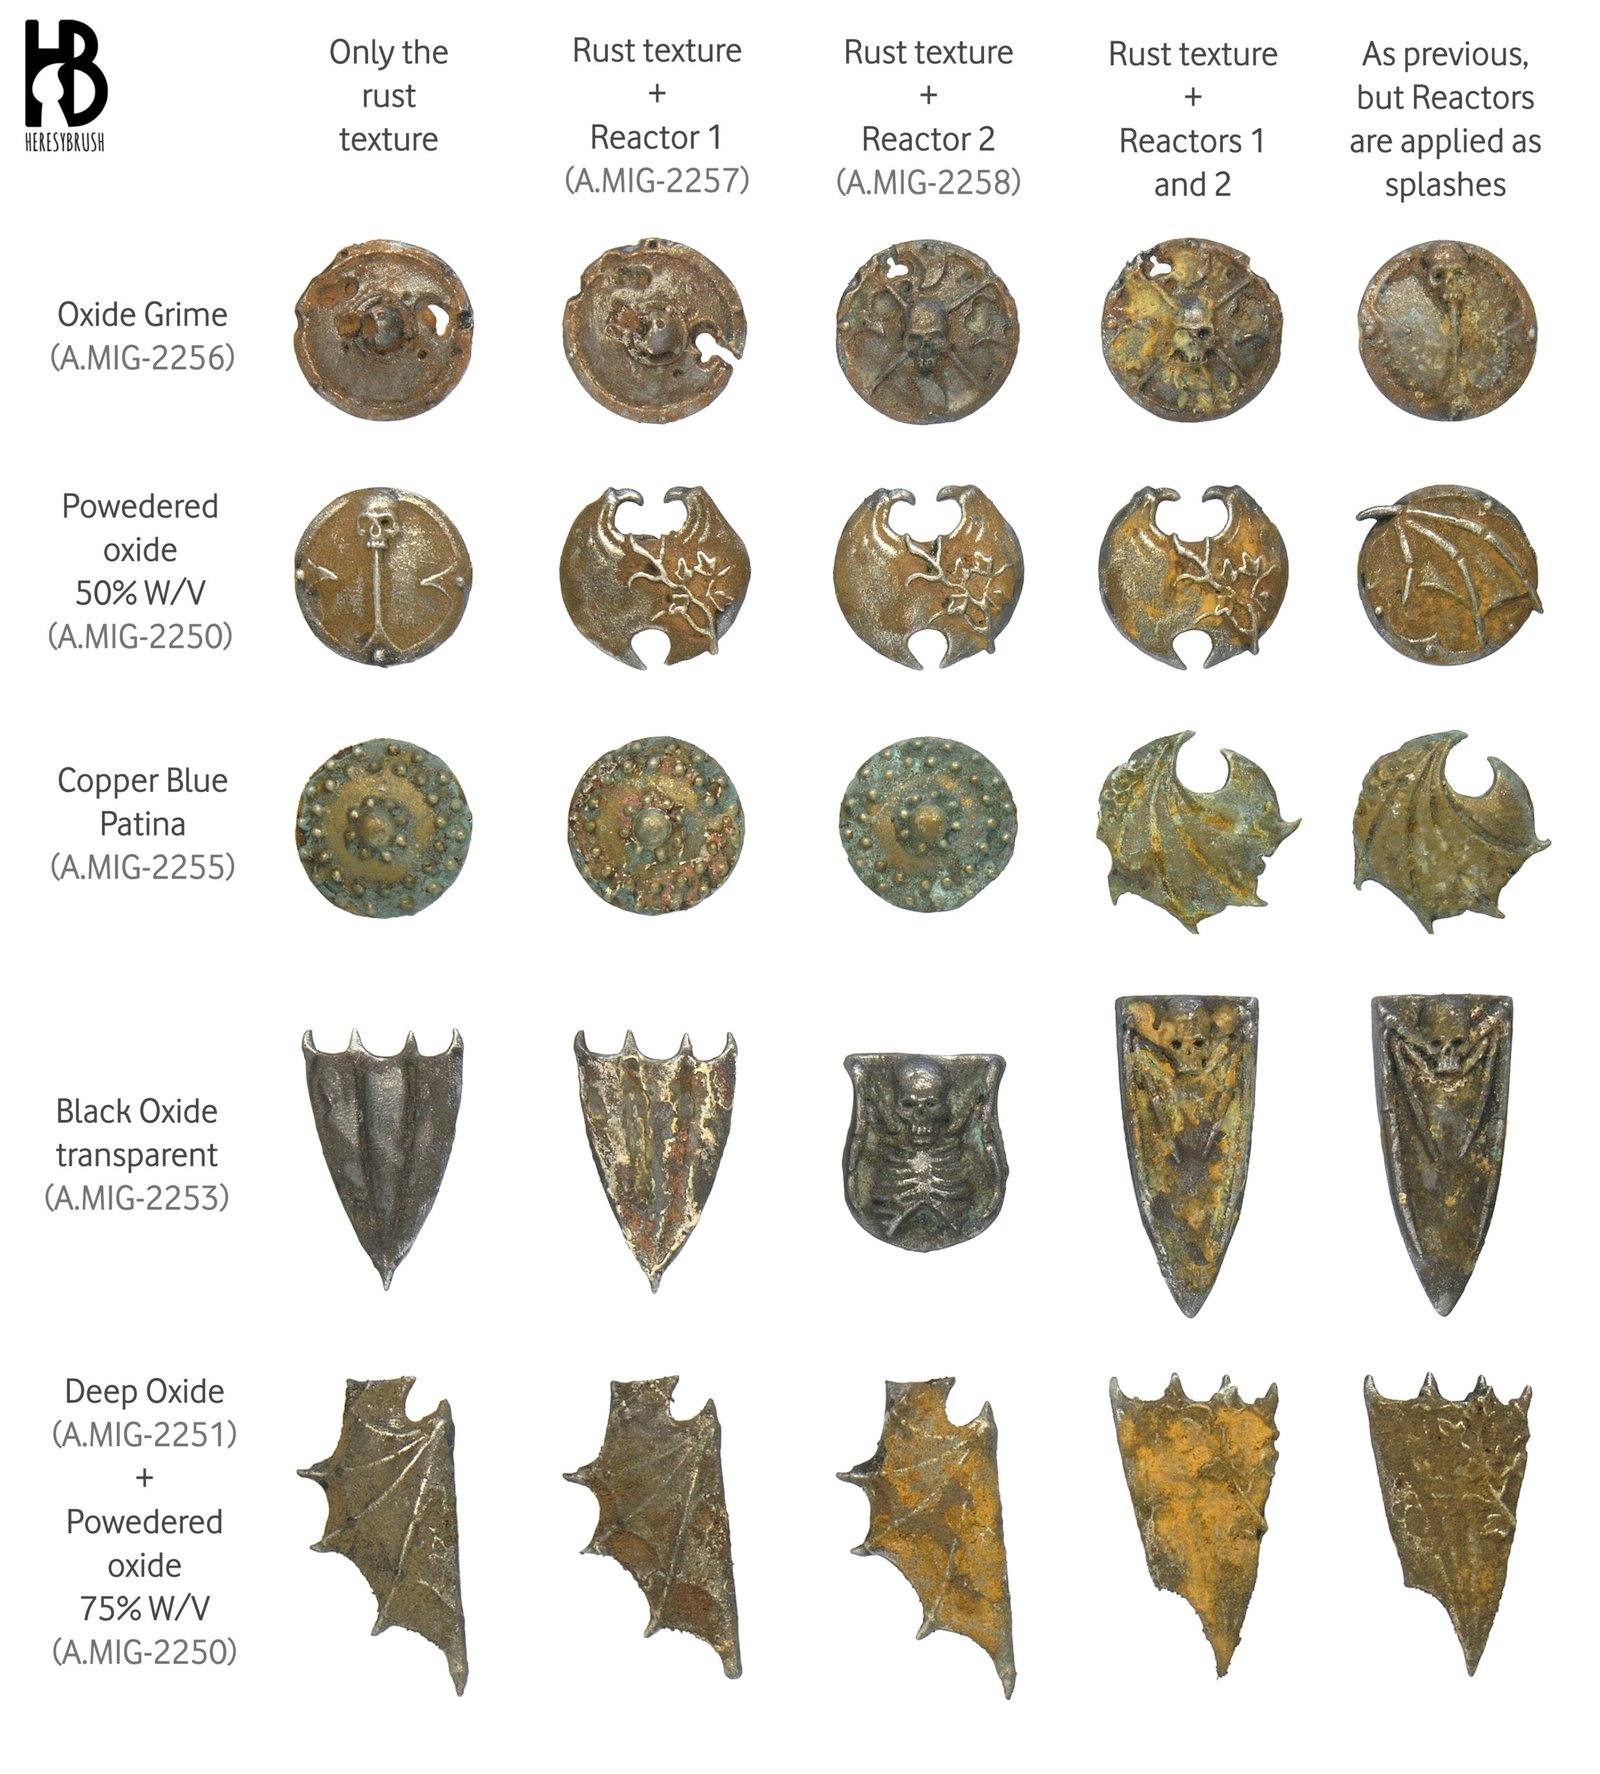
As you can see, the results are diverse. Some combinations worked amazingly good, whereas others were little bit odd for my purpose (a subtle rust effect). My main conclusions are:
- The rust texture alone creates very interesting effects, specially Oxide Grime, Powdered Oxide and Copper Blue Patina.
- The results of each Reactor are very different, and their combination often offers the more interesting effects. If I have to chose one Reactor, the Type 2 generated the most interesting results for my purpose. Reactor Type 1 sometimes creates a whitish precipitate that although awkward at first, it might work in some cases depending on your project.
- In some cases I did not like much the results when both the Reactors were applied with the brush. I guess that I applied too much liquid. Instead, I really like the subtle effects created when they were applied as splashes.
- I found too exaggerated the effect obtained in the last row (Deep Oxide + Powdered Oxide). This could work if you aim to have a heavy rust effect, but this was not my case. Note that I accidentally covered part of the details of the shield because I applied a thick layer of the rust texture.
Based on this, my favorites combinations were:
- Copper Blue patina combined with only Reactor Type 2 applied with the brush around some details to create bronze corrosion.
- Oxide Grime and Black Oxide Transparent combined with only Reactor Type 1 applied with the brush around some details to resemble old and battered metal.
- Powdered Oxide combined with both Reactors applied as splashes. It nicely created different tones of orange / red (or just ochre), generating a lot of contrast and a very realistic rust effect.
Test 2
Next, I tried to find whether I could get more interesting results with two of the most promising rust textures to obtain a subtle iron rust effect: Powdered Oxide and Oxide Grime. For the former I wonder what happens if I use a more diluted mix (30% of powder + 70% of water instead of 50%/50%), whereas for the latter I wanted to test what happens if I apply a thicker layer (just skipping the step with the sponge to remove the excess of the texture). In the image below you can see the results. On the left we have the initial observation based on the first test, and on the right, you can see the results of the new test.

Regarding the Powdered Oxide, I applied both Reactors as splashes. From left to right, I reduced the number of splashes although I did not find any significant different except for the first attempt. Overall, I liked all of them and I think that the 30% W/V worked much better than 50% W/V when aiming to create a subtle rust effect.
Regarding the Oxide Grime, as expected, the thicker layer of rust texture resulted in a heavier effect. Using either combination of Reactors, the results look nice (both the color and texture), but I think that they are too striking for my Undead warriors. But this option might work very nicely for some decoration on the bases or scenery elements, for example
As a conclusion, I think that the best results were obtained using Powdered Oxide diluted with 70% of water combined with both Reactors applied as splashes.
Test 3
Finally, for the last test, I decided to see what happens when these different textures are applied on other surfaces than shields, such as a helmet and weapons. Here I checked again a few options based on the most interesting results I observed in the test 1 and 2, plus a couple of new things.
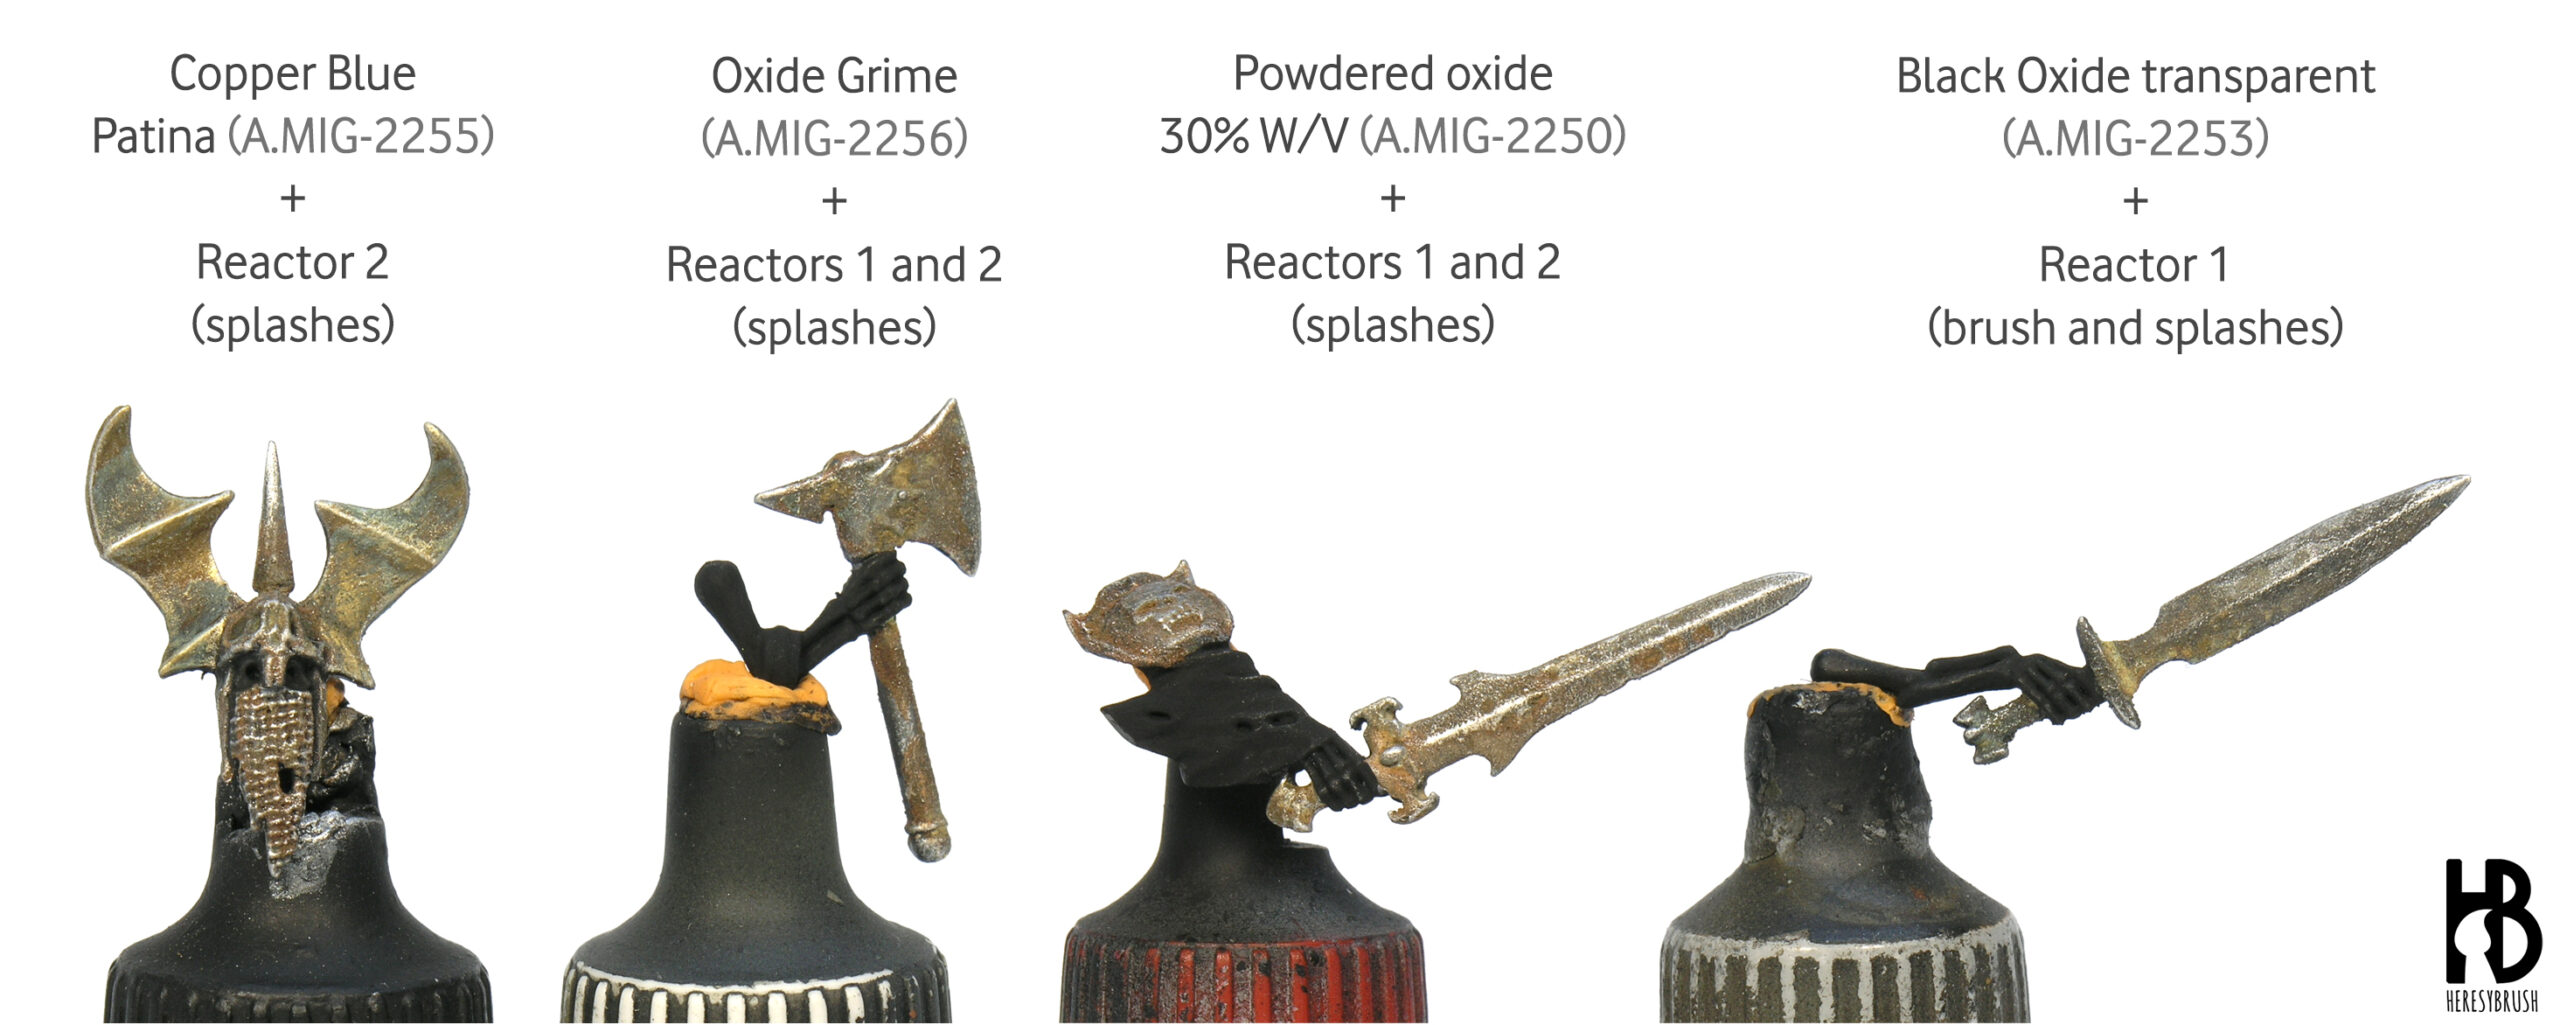
One of the new things I added was an additional controlled drybrush with the metallic paint only on the edges to gain a more evident metallic shine. This also increased the definition and contrast. However, we need to do it carefully and apply it only on the edges, since if we apply a general drybrush we will also highlight the rust texture.
Furthermore, after applying first the Reactors as splashes randomly over the whole element, I applied them again with a brush in some recesses or around some details to create additional points of interest. For example, in the last sword I applied the Reactor Type 2 with a brush only around the hand guard to create a more intense rust effect.
Overall, I liked a lot these two improvements and how the rust effects look like in the helmet and swords. I specially love the bronze helmet and the two last swords.
Final conclusions
To sum up, these are my favorite combinations to paint small elements such as shields, weapons and metallic amours of 30mm miniatures:
- Iron: after painting the element with a metallic drybrush:
-
- Option 1: Powered Oxide 30% W/V (dissolved with 70% of water) combined with both Reactors applied as splashes.
- Option 3: Oxide Grime combined with both Reactors applied as splashes.
- Option 2: Black Oxide Transparent combined with only Reactor Type 2 applied as splashes.
-
- Bronze: after painting the element with a bronze/brass/gold drybrush, apply Copper Blue Patina combined with only the Reactor Type 2 applied with a brush around details.
- In general: recover the metallic shine with a controlled drybrush at the end and apply selectively one or both reactors around some details to create a more intense effect. Remember that these are textures that can cover the details when applied as a thick layer, and therefore, we should apply them carefully.
Furthermore, I noticed a rather poor reproducibility of the results. That is, we do not have a complete control over the results. Of course, this is the main point of this set in order to create realistic rust effects. But sometimes this might be a problem when painting wargames units. I think that the best option is to apply only a small amount of each Reactor (the splashes approach helps here) and wait for the results. We can always add more later to create a more intense effect. In addition, the price of the set is rather high compared with other modelling products and so far, the different products are not sold separately. However, we do not need much to create the rust effects on a model, and therefore a bottle can last for years or is enough to paint hundreds of miniatures! And, perhaps more importantly for a wargamer as me, I find this set very useful to create super realistic rust effects very easily and quickly. In sum, I am very happy with the results and am looking forward to use it in several projects.
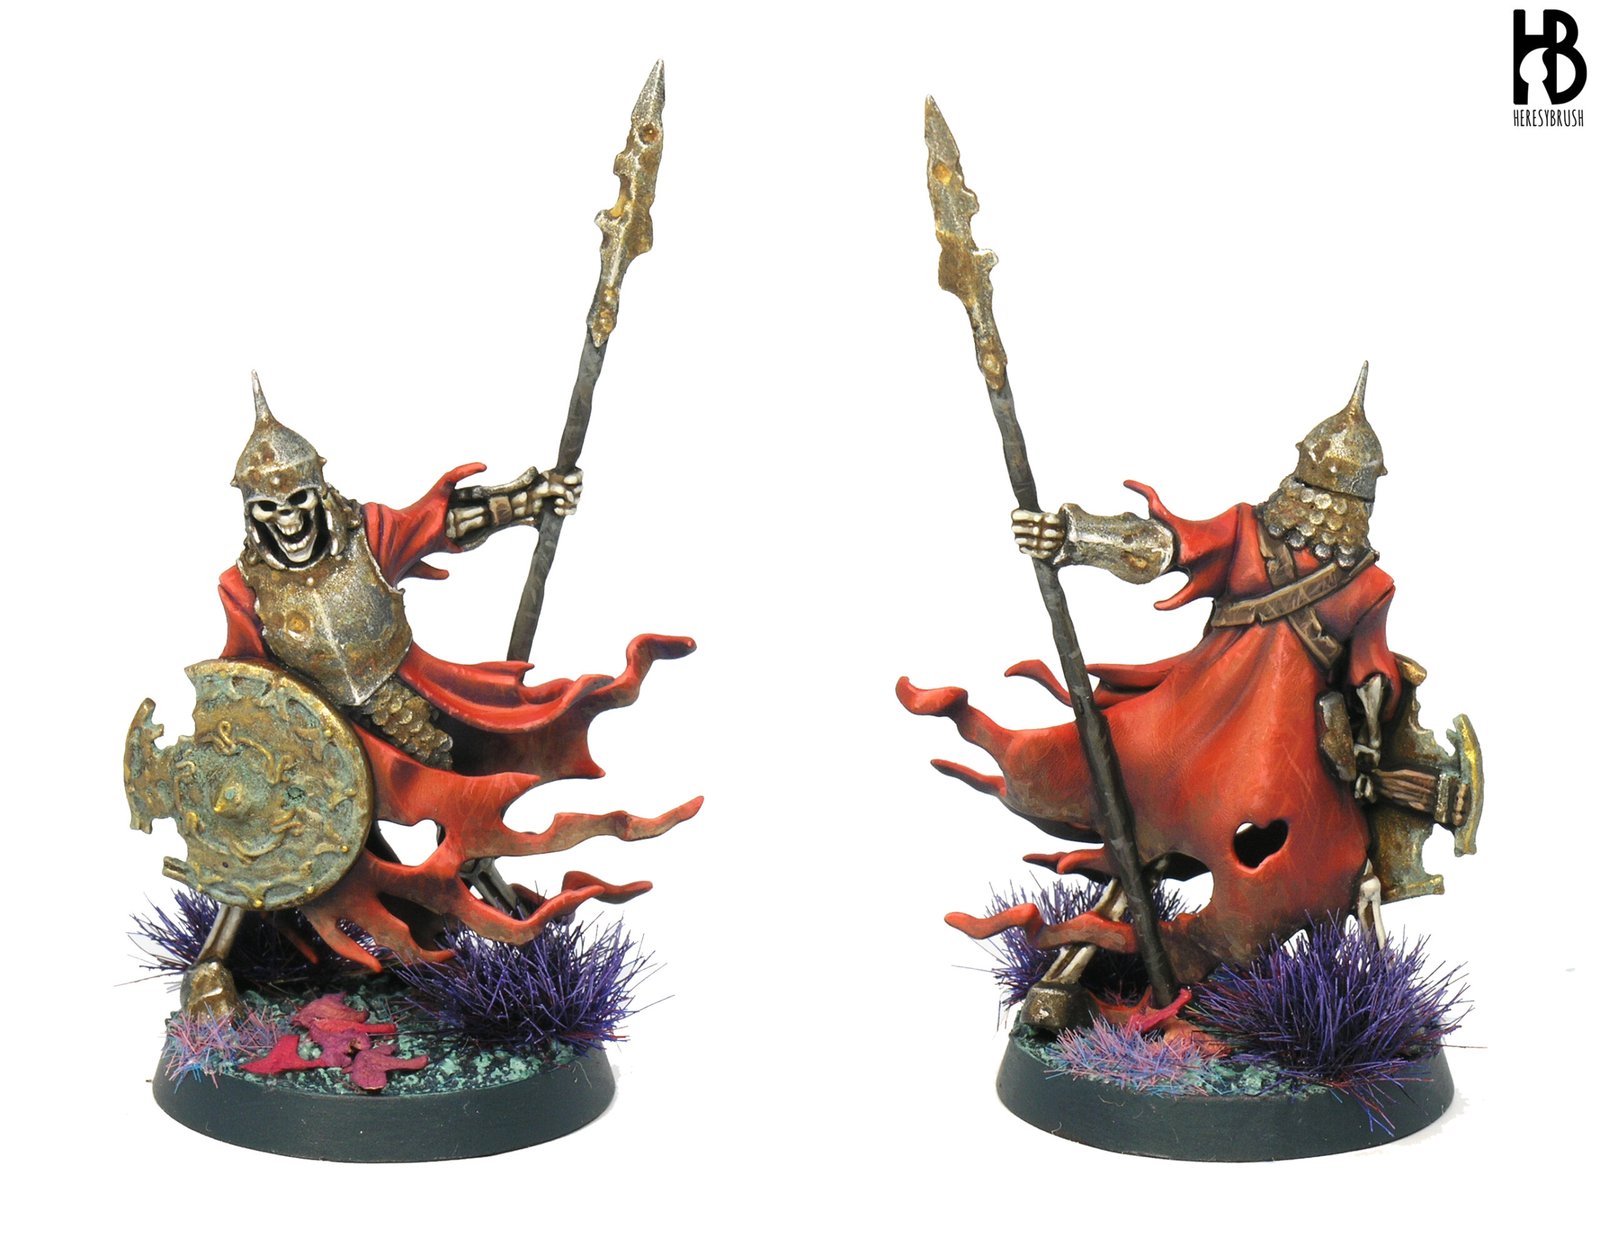
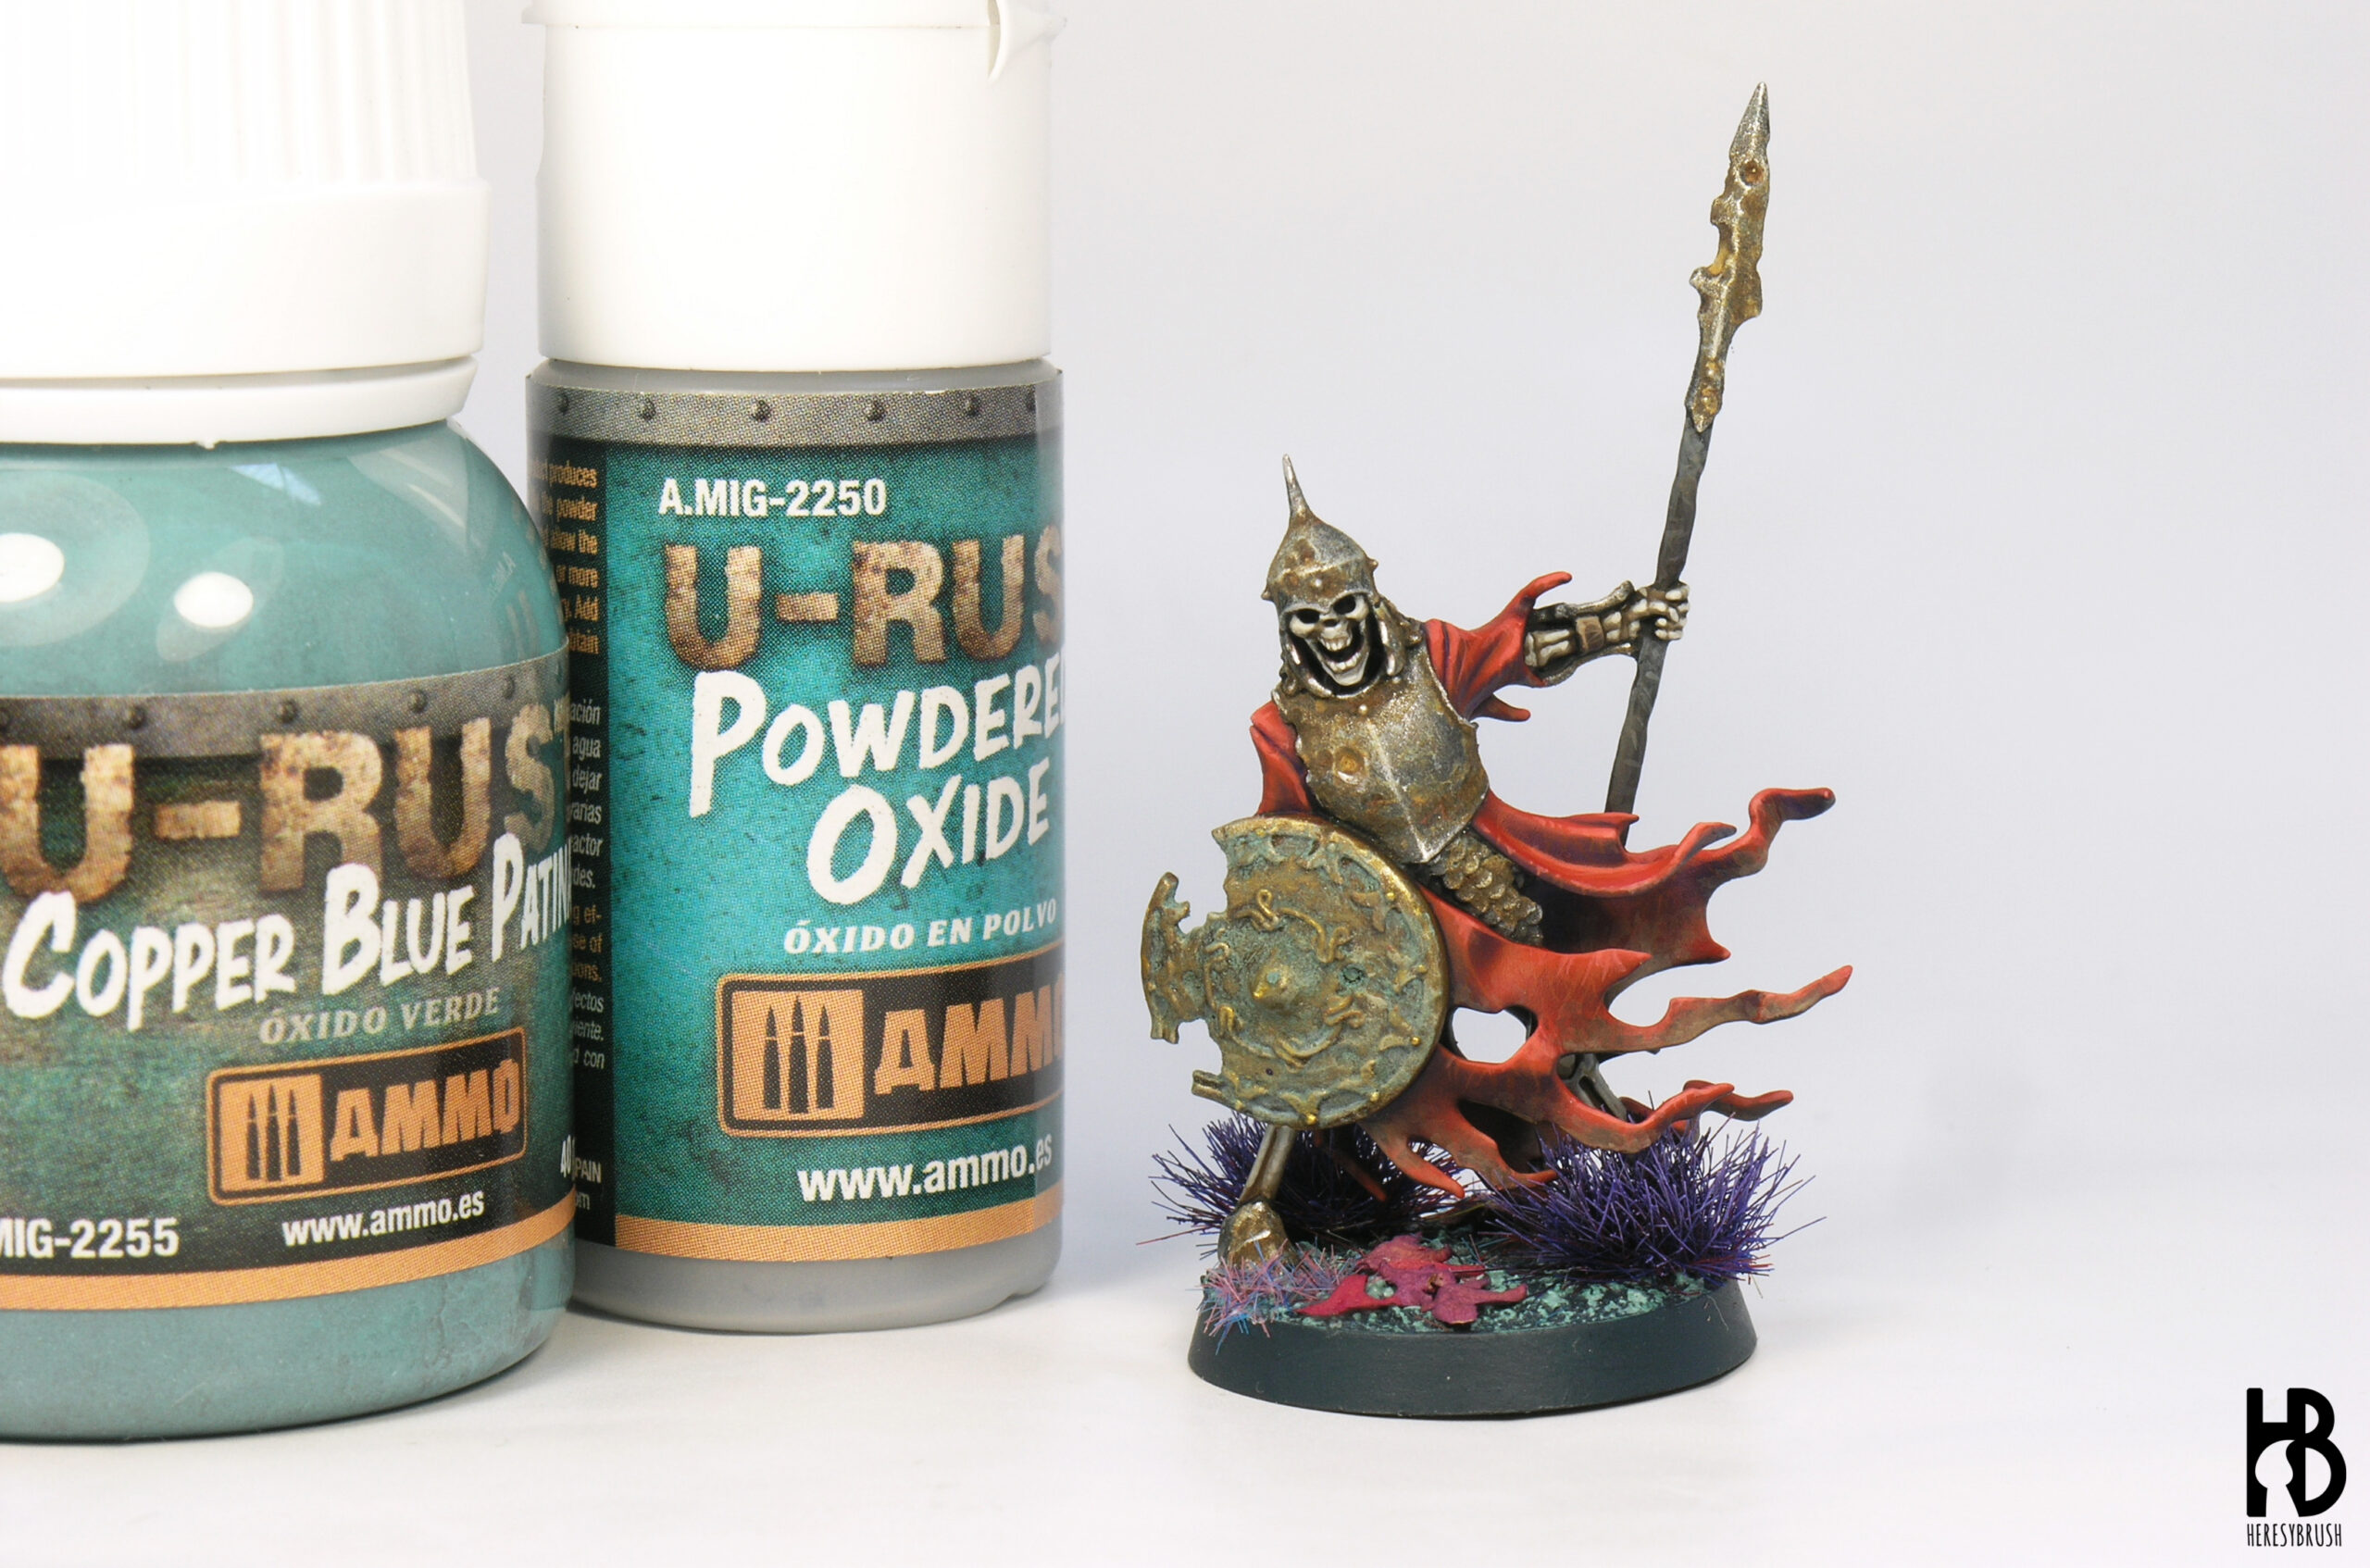
Finally, I applied what I learnt to a real model. I only used two rust textures, Copper Blue Patina for the bronze shield and the Powdered Oxide 30%V/W for the iron armor, helmet and spear as described in the conclusions. For the rest of the miniature I followed the fast painting techniques I described earlier here, although I paid more attention to the weathering effects. Since the metallic elements are full of rust, to be consistent the clothes should be also worn out. Accordingly, I applied the highlights as scratches here and there and I also created a layer of dust or dirt in the lower part by applying glazes with different brown colors. The base was decorated as the rest of my army using painted birch seeds (as described here) and purple grass tufts from Tajima1.
Great tutorial with a product I have not heard of until now. I think I will use this when I finally start painting the undead models I have been gathering.
Did you varnish the model?
Nope, no llegué a barnizar ni antes ni después. Pero sí, puede ser recomendable hacerlo antes de aplicar los efectos de óxido para evitar posibles sorpresas.