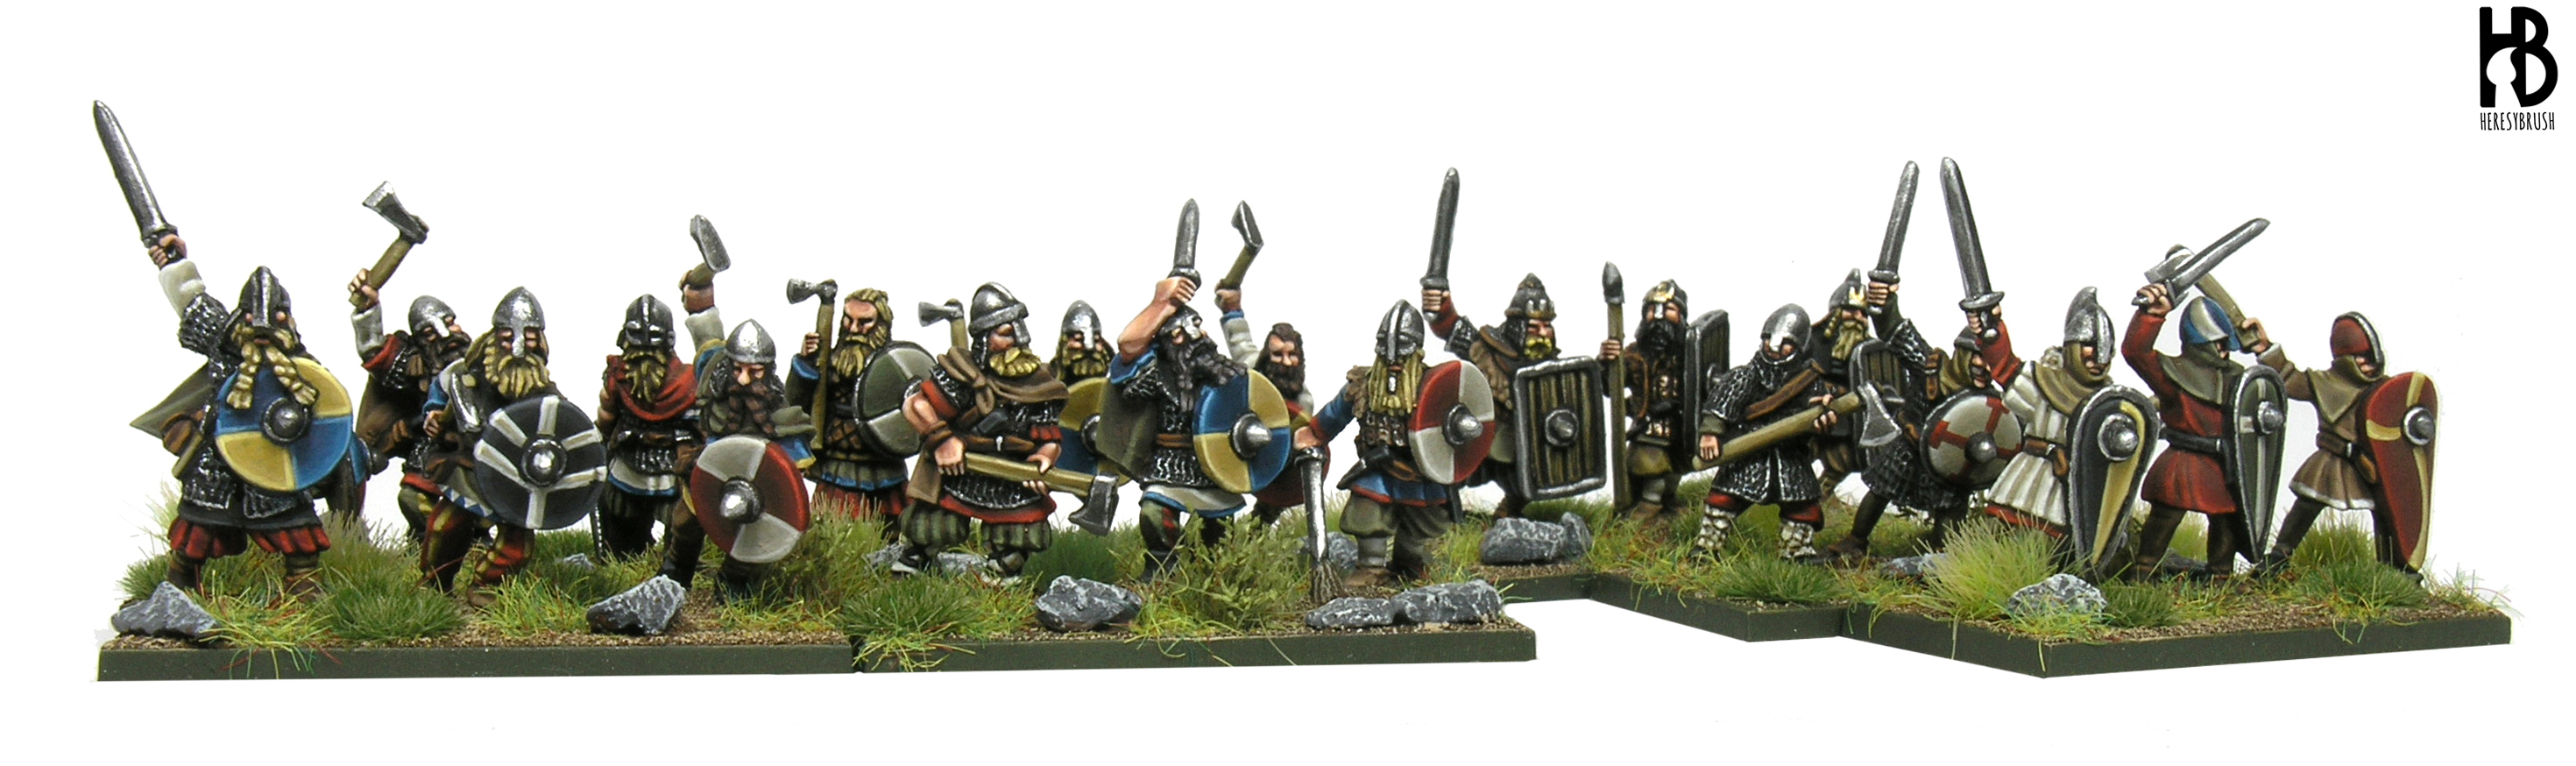
In the last weeks we saw how to paint different materials in 28mm miniatures: metals and leather. This time, we will change the scale and will learn a few things about how to bring to life 15mm miniatures using the layering method. For this porpoise I am going to use a Viking model from one my favourite 15mm miniatures brand, Forged in Battle. You can see a second article with more insights published in the issue 103 of WSS.
This is not the first time that I have discussed how to paint 15mm miniatures here (you can check this or this). But this time I would like to explain more details about my painting style, based on the layering method. First of all, it is important to highlight that painting miniatures for wargames is not the same as painting miniatures for competitions or displaying. Wargamers do not paint just one or two models. We need to paint dozens and sometimes even hundred of models for our armies in miniature. This means that we do not have much time to paint each model as a unique master piece. Instead, we need to employ quick methods, but still our miniatures should be striking on the battlefield. We achieve this by enhancing the contrast. That is, the difference between colors. In our case, the difference between the darkest and lightest tone of the same color. One of the most classical methods to gain contrast in wargaming models is the well-known triad system, extended by Kevin Dallimore using the Foundry system.
The triad system only requires three paints or colors: shade (or dark), base and light. For example, dark blue > flat blue > light blue. For your knowledge, Foundry Miniatures sells ready-to-use triads with three paint pots, although you can always mix your own colors. And the idea is very simple: first we paint the whole surface with the shade color. Then we apply a first light with the base color, which should cover the prominent parts. And finally, we mark the most prominent parts with the light. The difference that we create between the shade and the light color using this method is striking enough to catch our attention when the model is on the battlefield. However, by using only three colors the difference between each layer might be a little bit too sharp. Here is where the layering method enters into action.
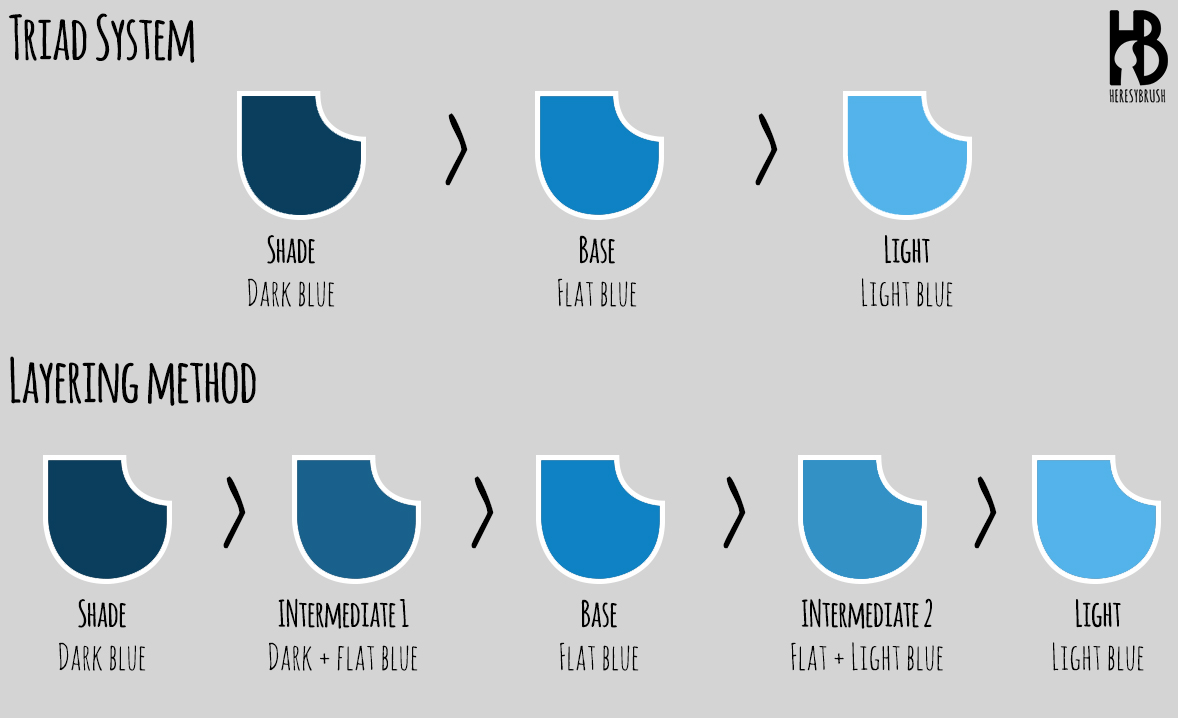
The layering method is based on the triad method, but it adds additional layers to create soften transitions between each color of the triad. Note that we do not touch the final contrast (difference between the darkest and lightest color), but we create a smooth gradient. To do it, we only need to mix two colors of the triad to create an “intermediate” color. For example, we mix dark and flat blue to create an intermediate layer between these two colors. And if we do the same between the base and light, we create a second intermediate layer. Therefore, the layering method implies in theory 5 layers: shade > intermediate 1 > base > intermediate 2 > light. The triad was only 3. However, this is just the theory. We can add more layers if we wish, or even reduce them. It depends on the color we are painting and the effect we are trying to achieve.
On top of this, another important factor in the layering method is the water. As you know, we should basically always thin our acrylic paints with water before using them. In this case, this is extremely important. Thinned paints are partially transparent, which will facilitate the creation of smooth transitions. This also means that we can play around with the intensity of the layer: if we apply several times the same semi-transparent layer, the resulting color will be more intense. Therefore, once you are familiarized with this method you can skip some intermediate mixes and play with lightest colors thinned with water.
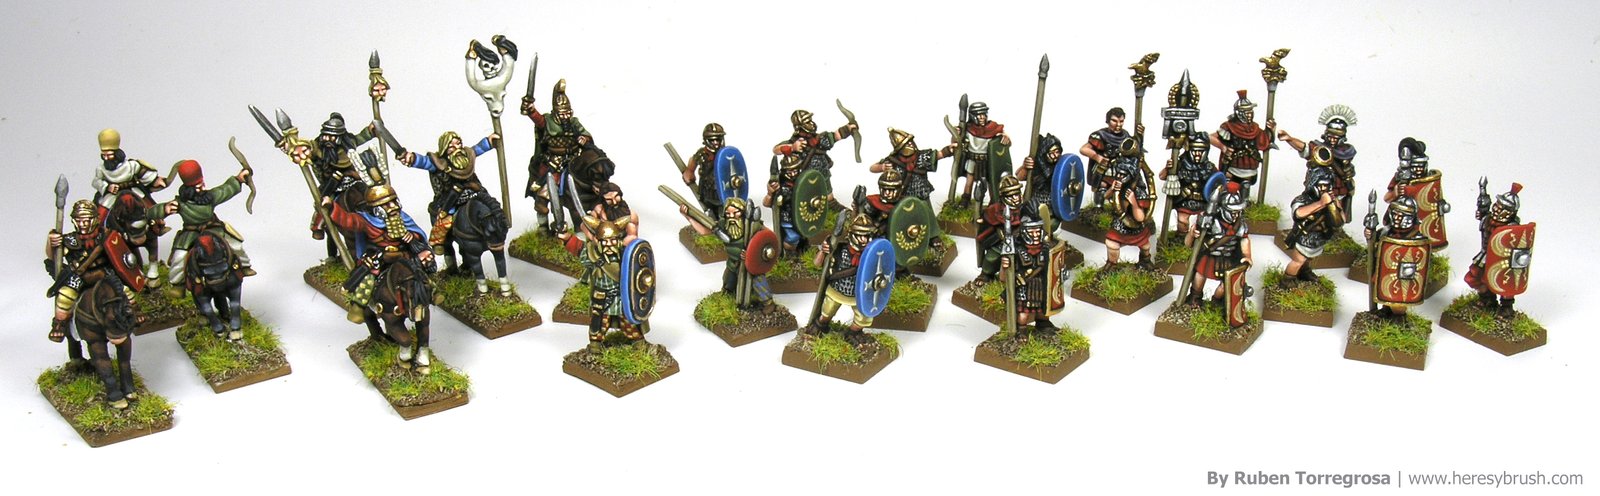
This is the method that I normally use in 28mm miniatures, where the surfaces are big and we can easily play with the different layers. Although we can also do it in 15mm models, here the surfaces are smaller, which in fact will limit our possibilities. We need to sacrifice a little bit the “clean effect” of the gradient in favor of the contrast. Remember that the final highlight should be striking enough but at the same time not too sharp. To do it, soften the transition from the shade with intermediates color, and obviously, thin the paints with water.
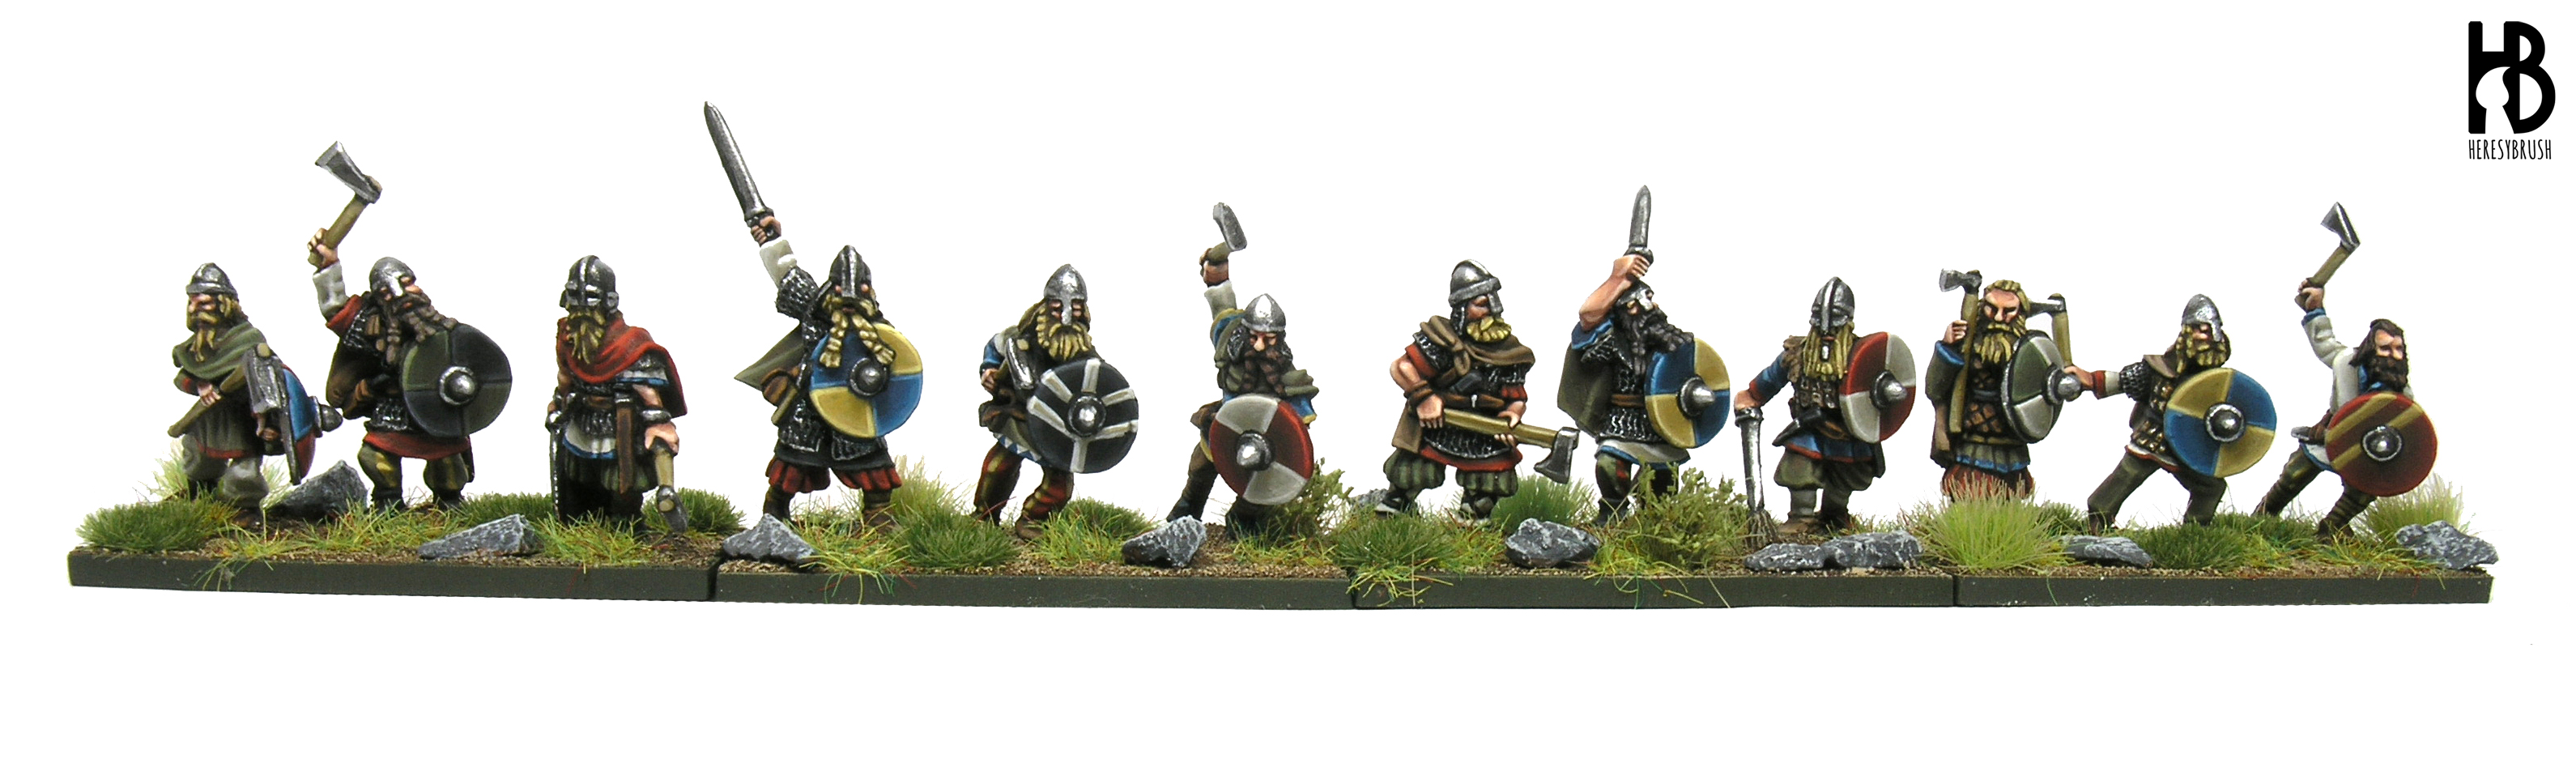
Said this, let’s start with the step by step guide of this tiny Viking from Forged in battle.
Painting Vikings in 15mm
I normally use black primer for 15mm models, since I can use the black color in the next steps as a “black profiling”. That is, I usually paint a black line between elements of the miniature, which will clearly stand them out. Having a black coat at the beginning, will make this task easier.
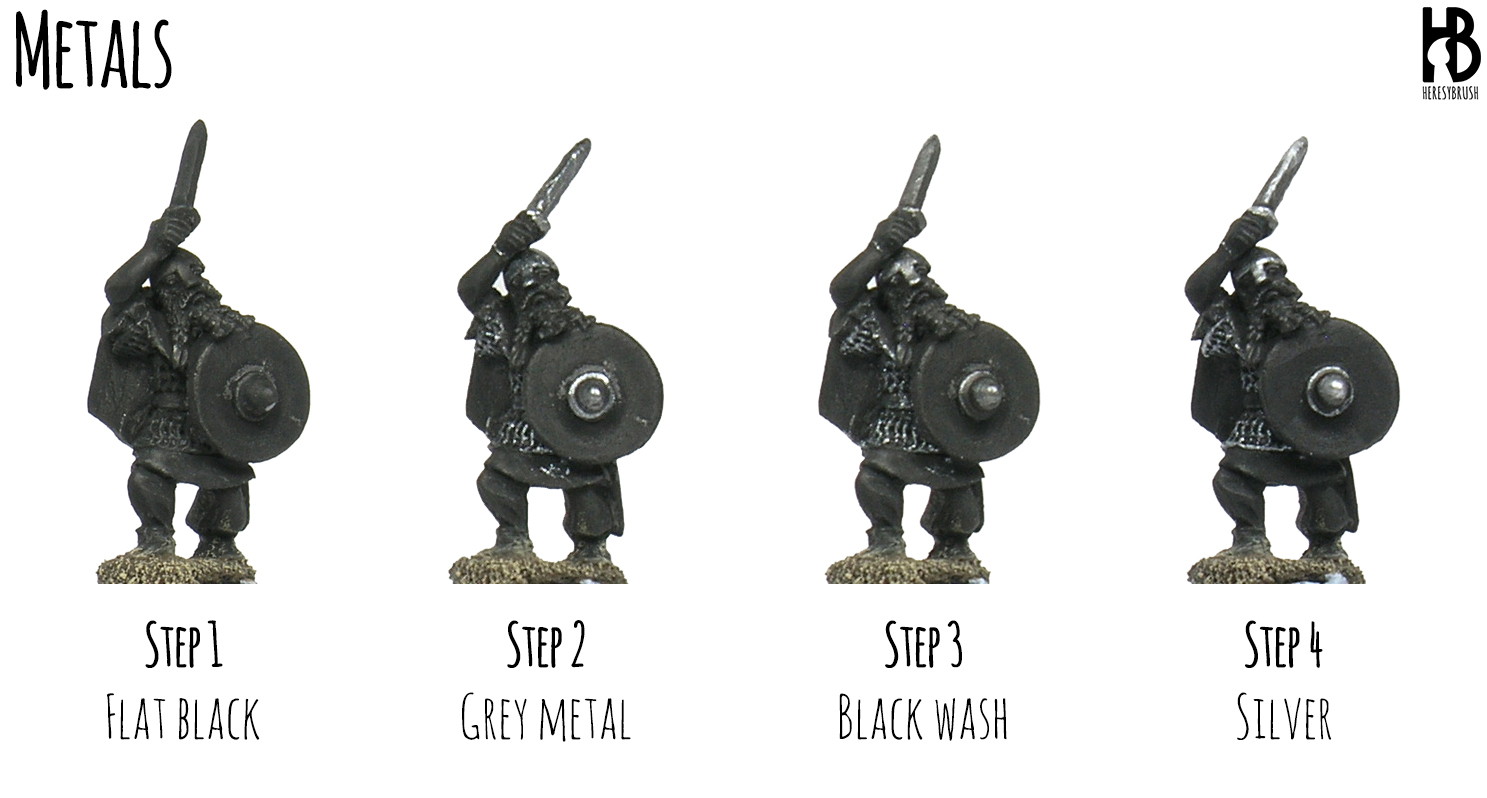
Step 1 – Metals
This is a simplified version of this. First, I used a grey metal paint such as Oily steel (865, Vallejo) to paint the metal parts, such as the helmet, shield boss and sword. I used the drybrush method to paint the mail coat. Then, I used a black wash from Citadel, the magic Nuln oil shade, to highlight the recesses and darken the metal color. Finally, I apply a single highlight with Silver (063, Vallejo) using a fine brush. The highlights were painted on the edges the sword and helmet, and edges of the chain coat.
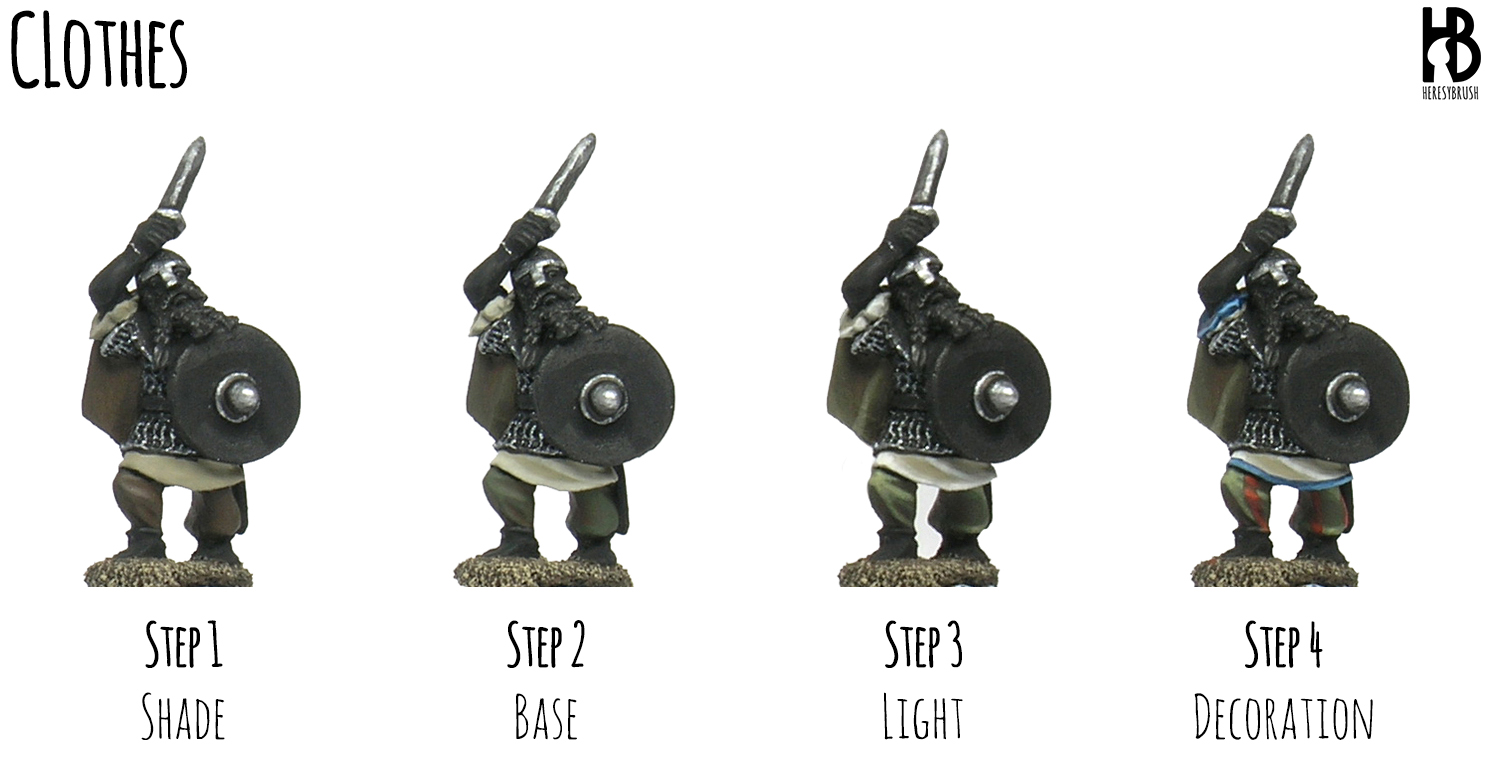
Step 2 – Clothes
Here, I used the layering method that I have explained before. In each case I started using a dark color, which was mixed with lighter colors progressively. For example, for the green color of the trousers I created the shade with a mix of Chocolate brown (964, Vallejo) and USA uniform (922, Vallejo) in the same proportion. Then, I started to move toward the base adding more USA uniform. For the base, I used USA uniform mixed with a little bit of light yellow. Finally, I applied couple of lights by adding even more and more light yellow to this mix. Note that each layer should not cover the previous one (otherwise we loss the gradient effect). And also note that the last highlights are not painted all around, but they are limited only to the most prominent parts, such as the knees. For the cloak I used a similar approach, but with Russian uniform (924, Vallejo) instead of USA uniform. For the white tunic I used Beige WWII German cam (821, Vallejo) as a shade. Then I added progesively Ivory (918, Vallejo), until the last layer, which was done only with Ivory.
In addition, I painted some decoration to the plain clothes to add a little bit more of variation. For example, I painted red stripes in the trousers. To do it, I first used Flat brown (984, Vallejo) to paint the whole stripe. Then using flat red, I marked the prominent areas. Finally, I used vermillion to paint the final highlight in the knees. Similarly, I used blue in the white tunic.
Regarding the colors of viking clothes, you can check this article.
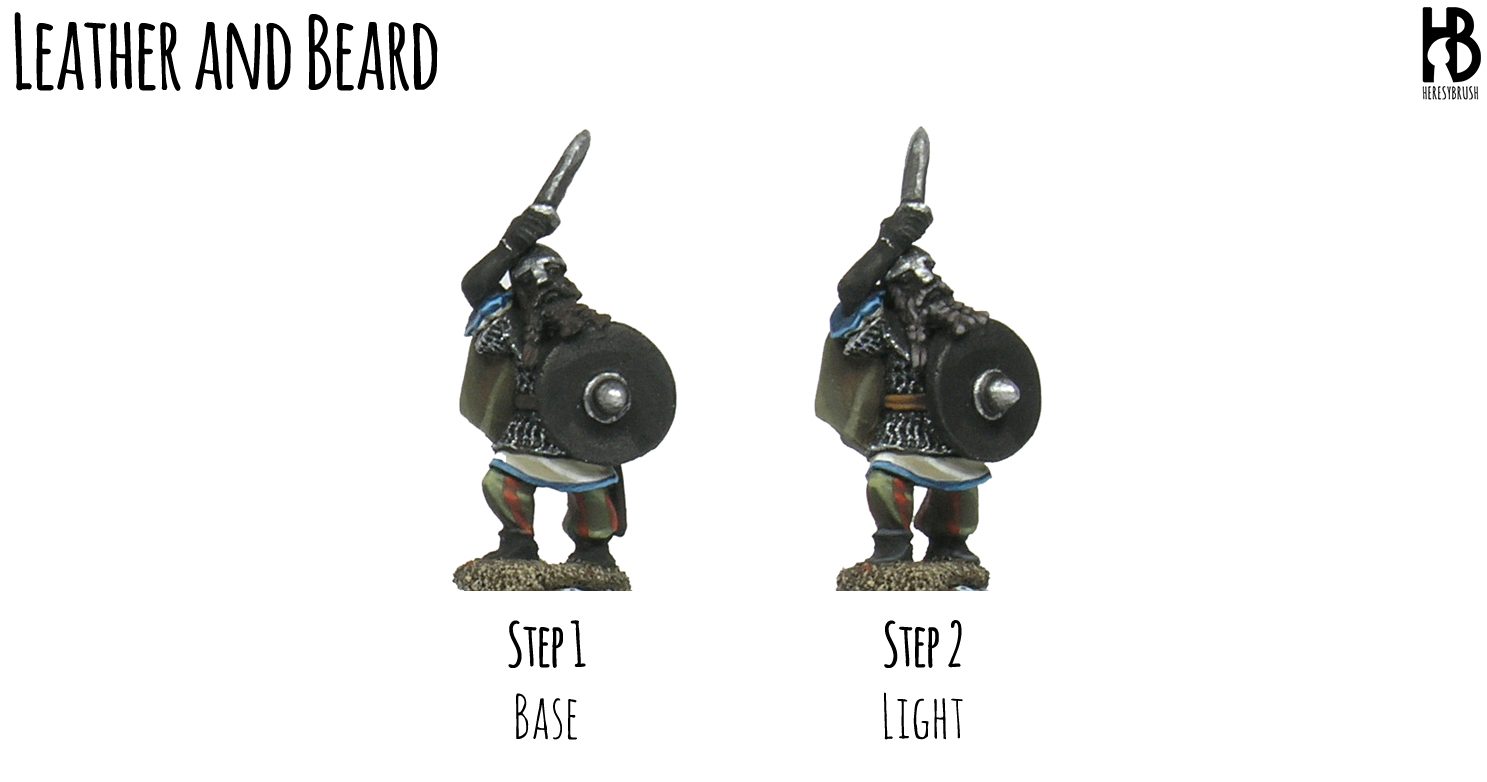
Step 3 – Leather
I painted the boots in black leather and the belt in brown leather following exactly the same recipes described here, although I simplified the method. I did not painted scratches, but I focused on the edges of each element.
In addition, I painted the beard with a dark brown color highlighted with white. Note that I paint the bear following the strands of hair sculpted in the miniature. This detail generates a lot of contrast! It is advisable to spend a few minutes in this kind of details when the element -the beard in this case- is an important part of the model.
Step 4 – Skin
To paint the skin in 15mm I first paint the skin parts with Flat brown (984, Vallejo). I will use this color as a “black profiling” to mark the lines between fingers and eyes. It also helps to cover the black coat with the light skin color.
Next, using Tan (066, Vallejo Game Color) we paint the again the skin. But this time we try not to cover the space between finger, eyes and mouth (you can always repaint it with Flat brown, so do not worry if you miss this). This is our shade color for the skin.
Next, we start mixing Tan with Dwarf skin (041, Vallejo Game Color) in the same proportion (the intermediate 1), and start highlighting the more prominent parts, such as the details of the face, fingers and elbow. Next, we use pure Dwarf skin (the base), followed by one or two highlights of Dwarf skin mixed with white or ivory. Each new highlight should cover a smaller area. And the last one should just mark the tip of the nose and finger tips, for example.

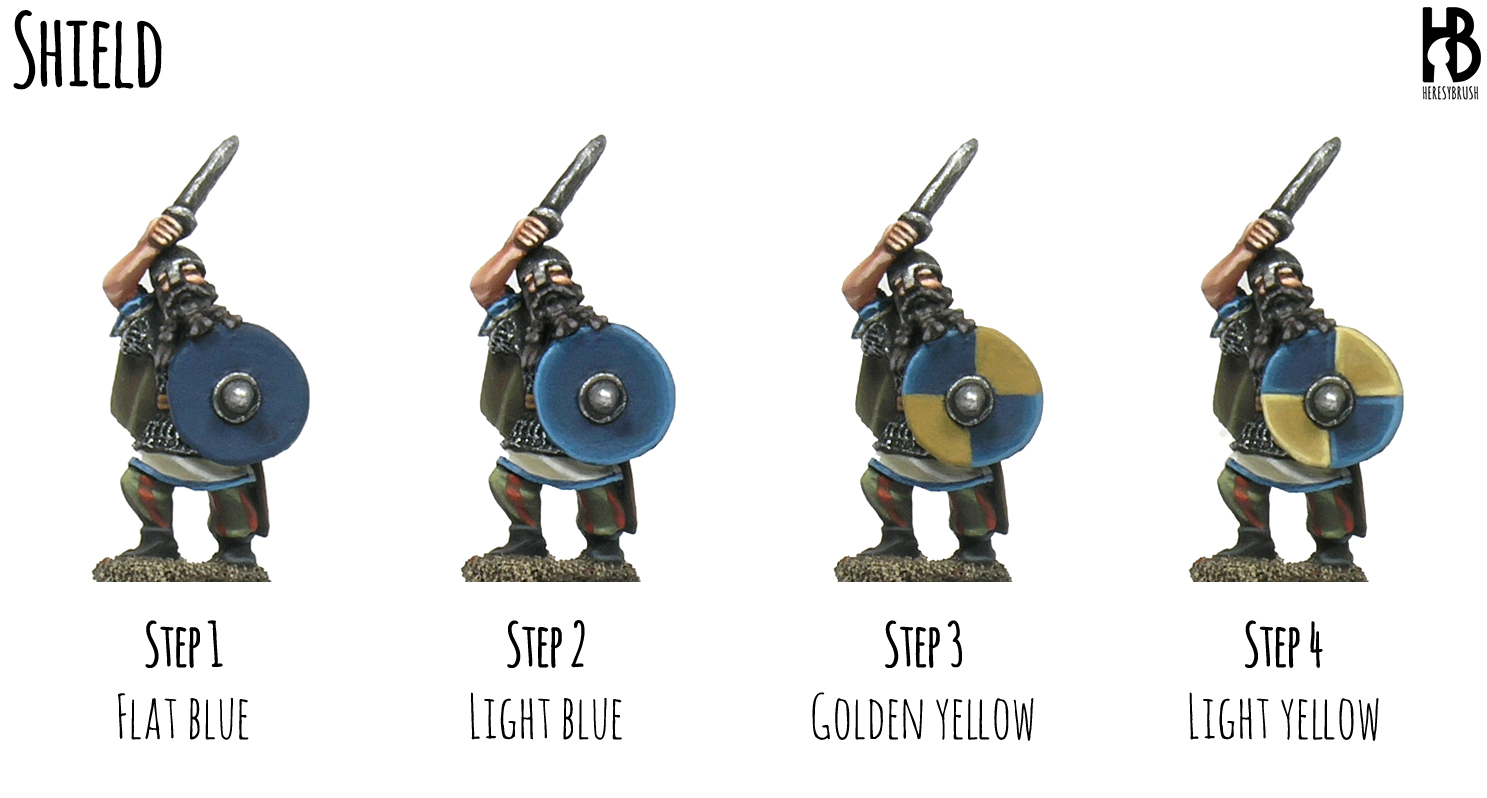
Step 5 – Shield
I already described how I usually paint shields here (it is only in Spanish). In any case, once you have chosen the scheme you want to paint, you start painting the dominant color. That is, the color that occupies the largest area. In my case this is irrelevant since blue and yellow occupy the same area. I started painting the blue using a mix of blue and black 2:1 (two parts of blue and one of black). Then I added more blue, and eventually, I continued adding white to the mix. I applied these consecutive layers so that the lightest color was directed to the edges of the shield by painting in circles. The final highlight was done using the brush horizontally all around the edge.
For the yellow color, I first used Golden yellow (948, Vallejo) to paint the corresponding area. Then I mixed it with light yellow and apply the light as described previously. I decided to add also some unreal lights between each color to increase the contrast.
And this is all!
One thought on “How to paint Vikings in 15mm”