 The bases for our wargames miniatures are as important as the miniatures themselves. A very nicely painted miniature based on a very simple base might affect negatively the visual impact of the model. And conversely, a simple painted miniature based on a very nicely decorated base might result in a very visual lay out. Therefore, I would suggest you to spend on the bases as much dedication as you do when painting the miniature.
There are many different ways to decorate our bases. It will mostly depend on what we want to simulate. We can go from a desert in Africa to a forest in Germany or the streets of a bombed city. First, think what you want to do, and then plan how to do it. I have brought this topic to my blog many times, specially featuring vegetation. For instance, here, here and here. But today I would like to replace the countryside by the city, and discuss how to create urban bases. Several years ago, I explained here how to do it using foamed PVC or forex. And today, I would like to show you another option using the textured pin rolls from Greenstuff World. I can already tell you that compared with the foamed PVC, the pin rolls offer a much quicker and easier way to create urban bases. Although in this tutorial I will prepare bases for 28mm miniatures, note that Greenstuff World have pin roll for both 15 and 28mm miniatures. The idea would be exactly the same.

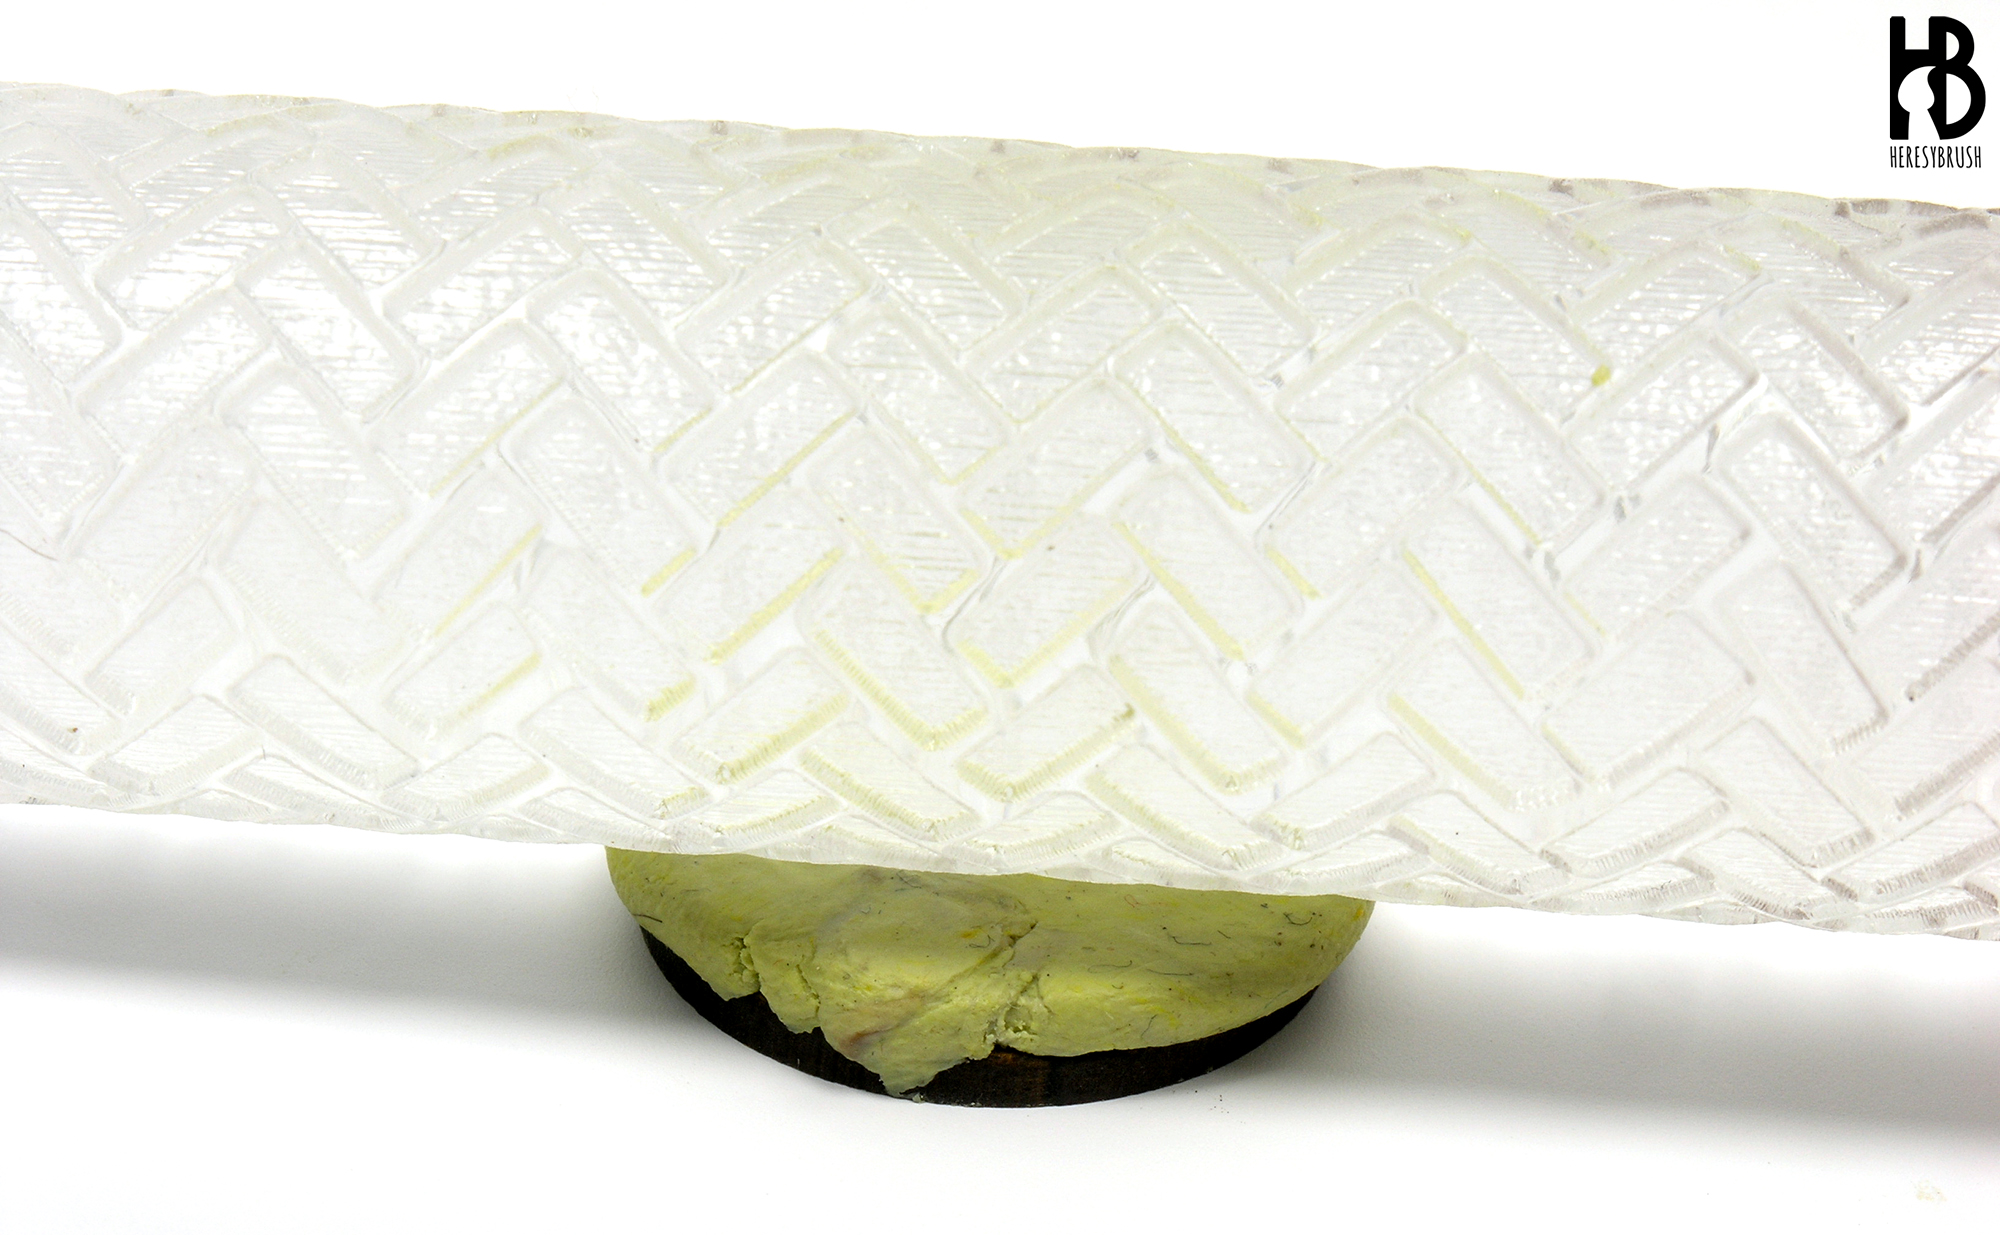
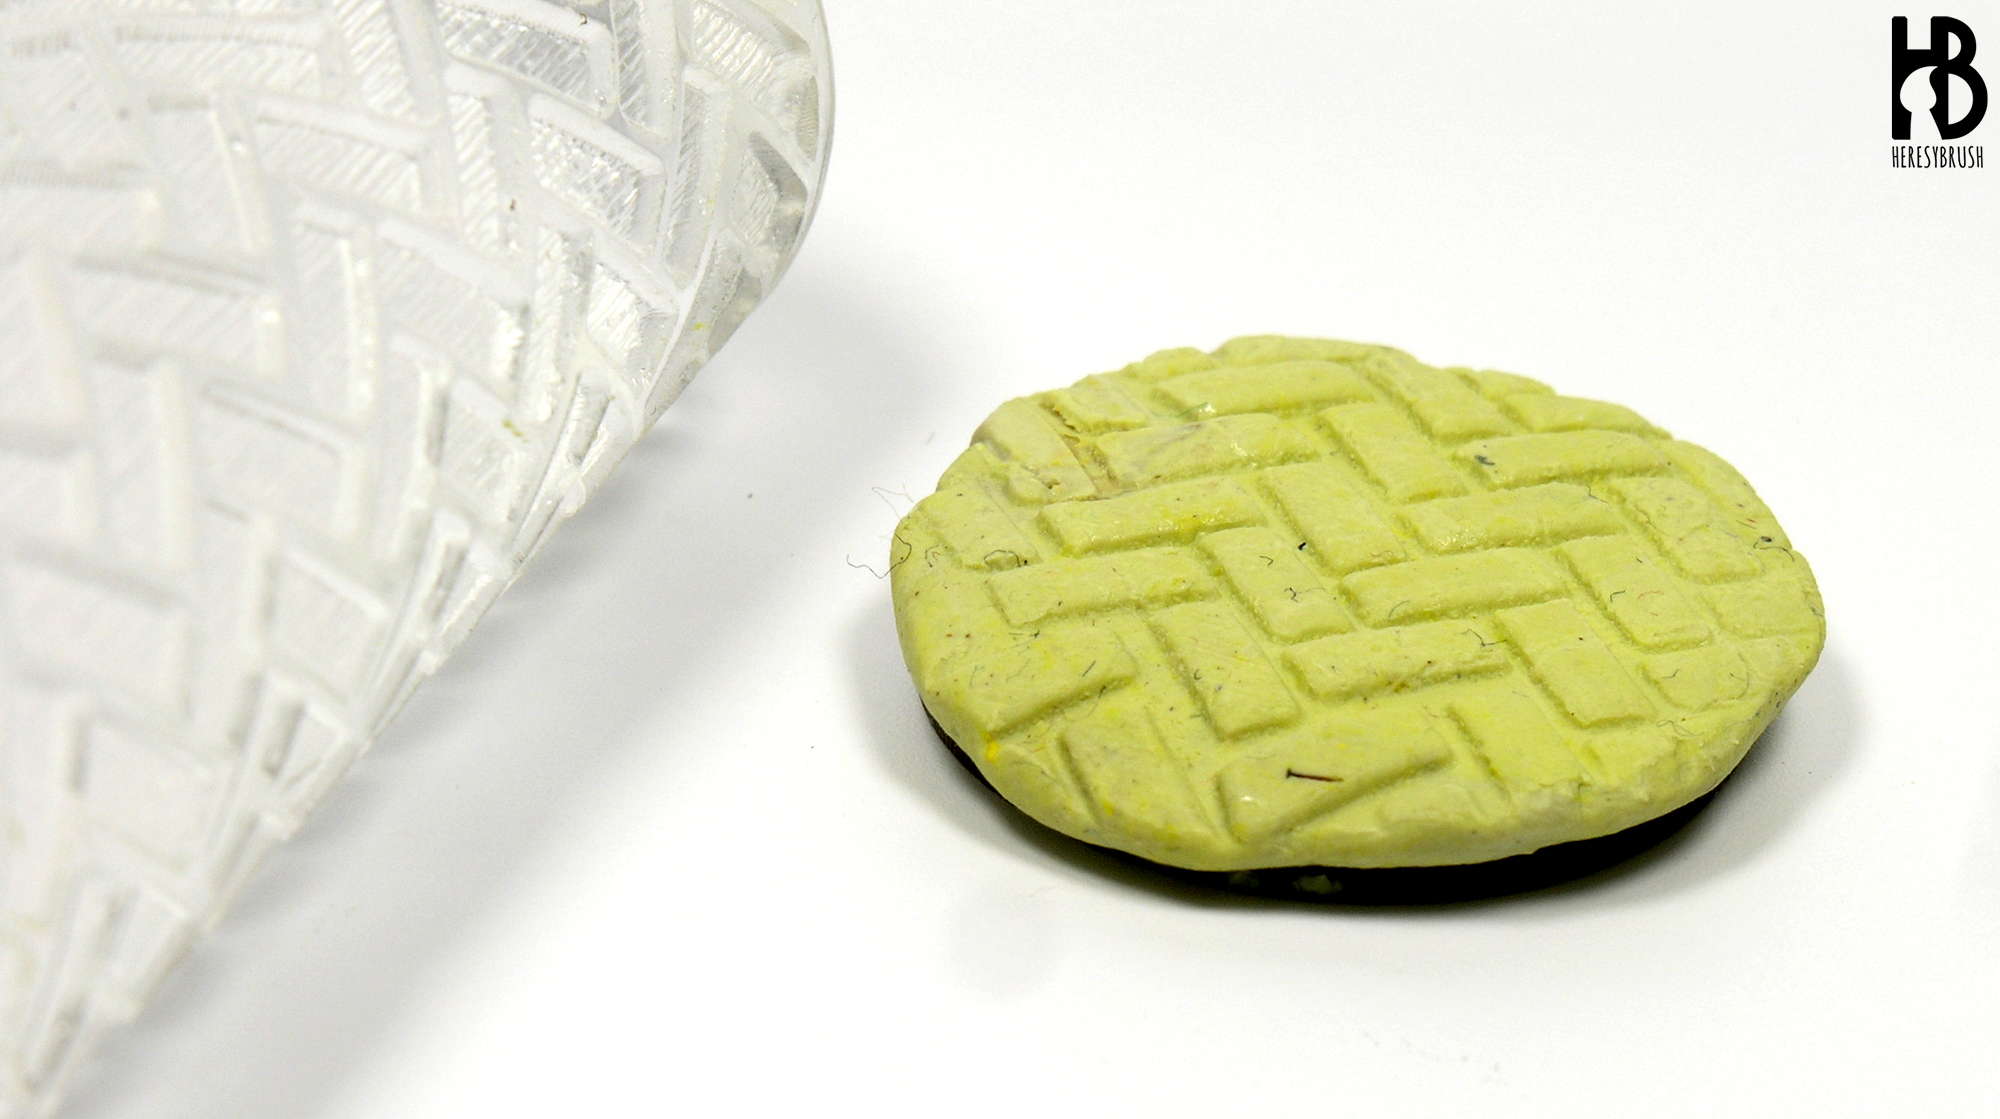
This was the first time that I have used such a tool, and therefore, what you will find below are the results of some experiments. First thing, I was not totally sure about which is the best modelling putty to use for the rolls, and I tried two epoxy modelling putties I had on hand: red Milliput and green stuff. The former cures rock-hard and can be sanded and carved but it is difficult to use during sculpting because can be brittle, while the latter is much easier to use for sculpting since it is more elastic although does not hold an edge because is not as hard as Milliput. On the other hand, I obtained several textured pin rolls from Greenstuff World: one for cobblestone and another one for tiles; and I wanted to combine them in different levels. That is, the first level would be the roadway, meanwhile the second level (elevated) would be the footpath.
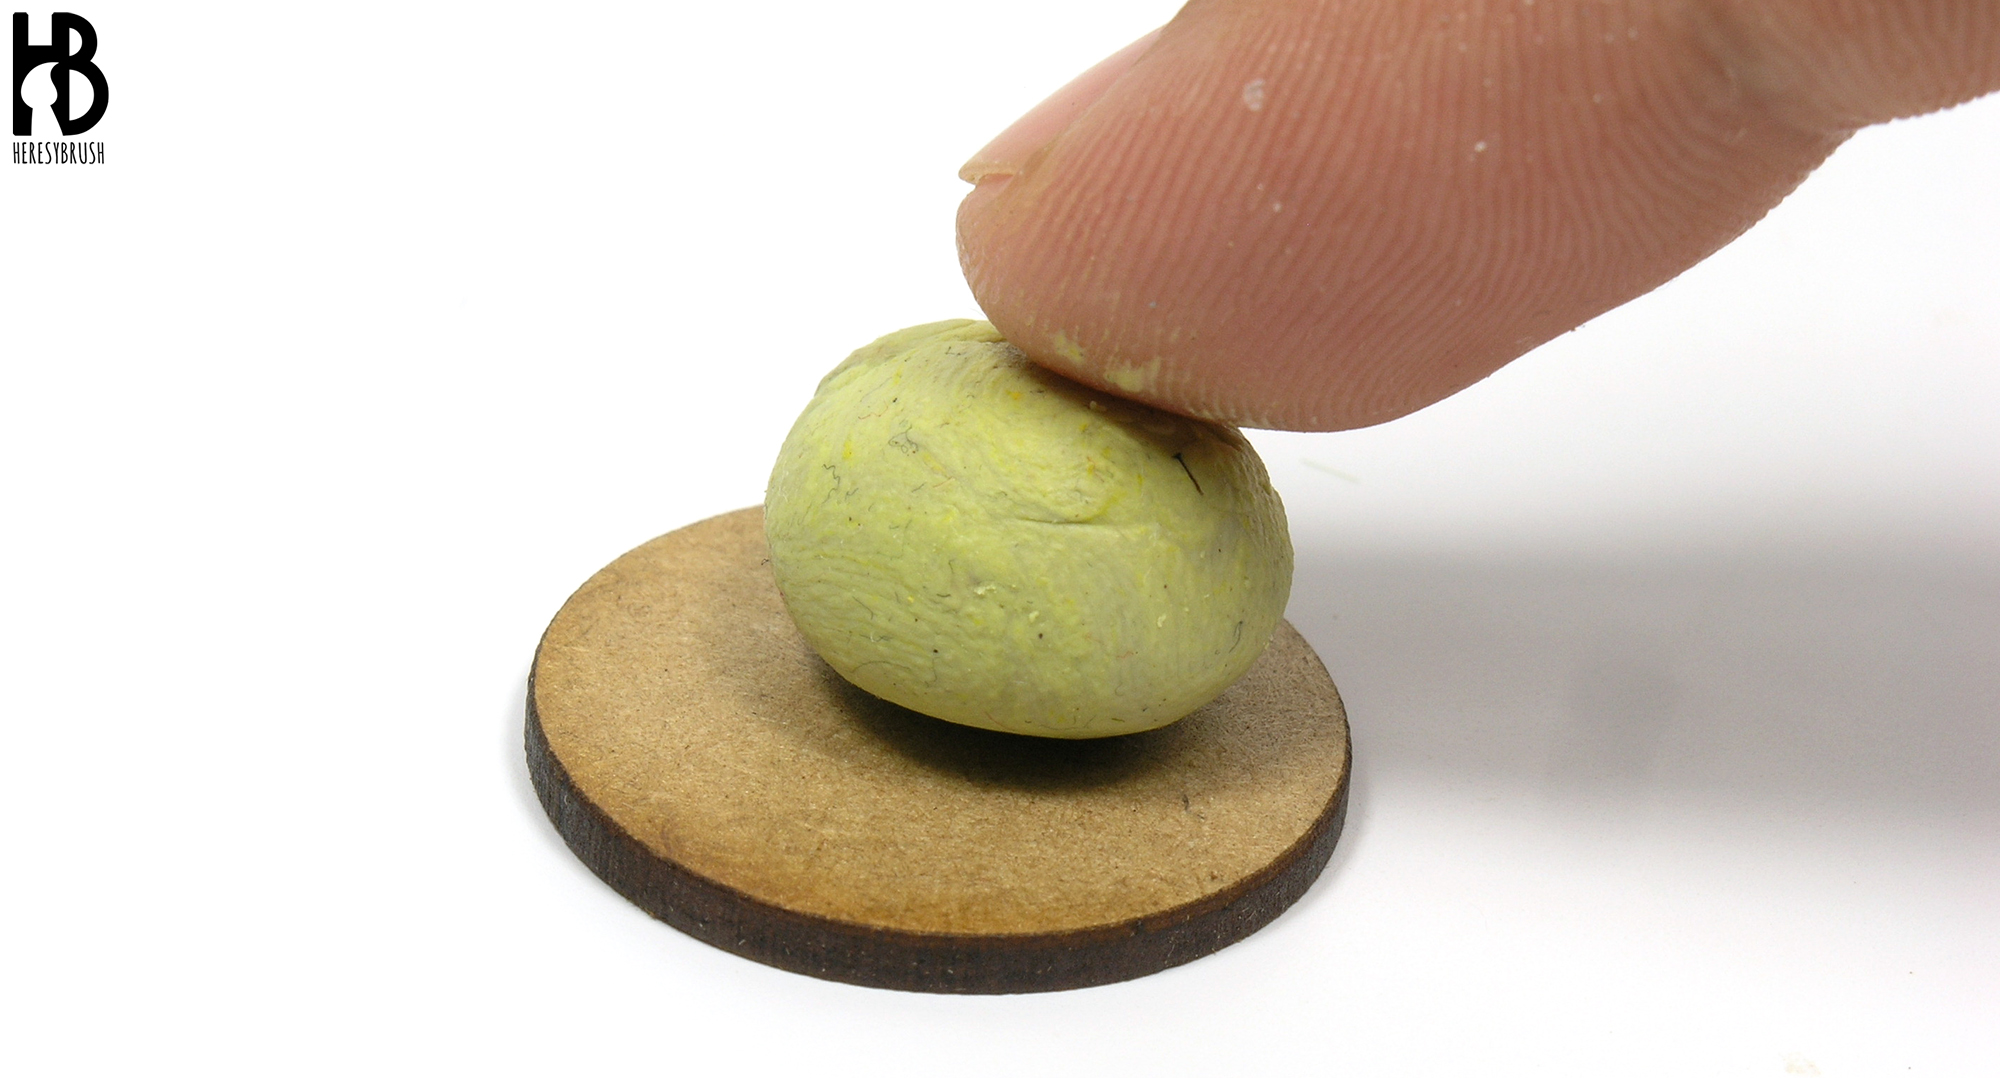
For the base, I decided to use a 1 inch rounded MDF base. But you could use anything else, regardless of the shape or material. To create the first level or roadway I decided to use Milliput, as this level did not require any further sculpting work (the footpath would need some extra work, and I prefer to use green stuff when sculpting details). First, I mixed the two components of Milliput and create a small ball that I placed on the base. Next, I press and extend the putty around the base, trying to get a homogeneous coverage and a flat surface.
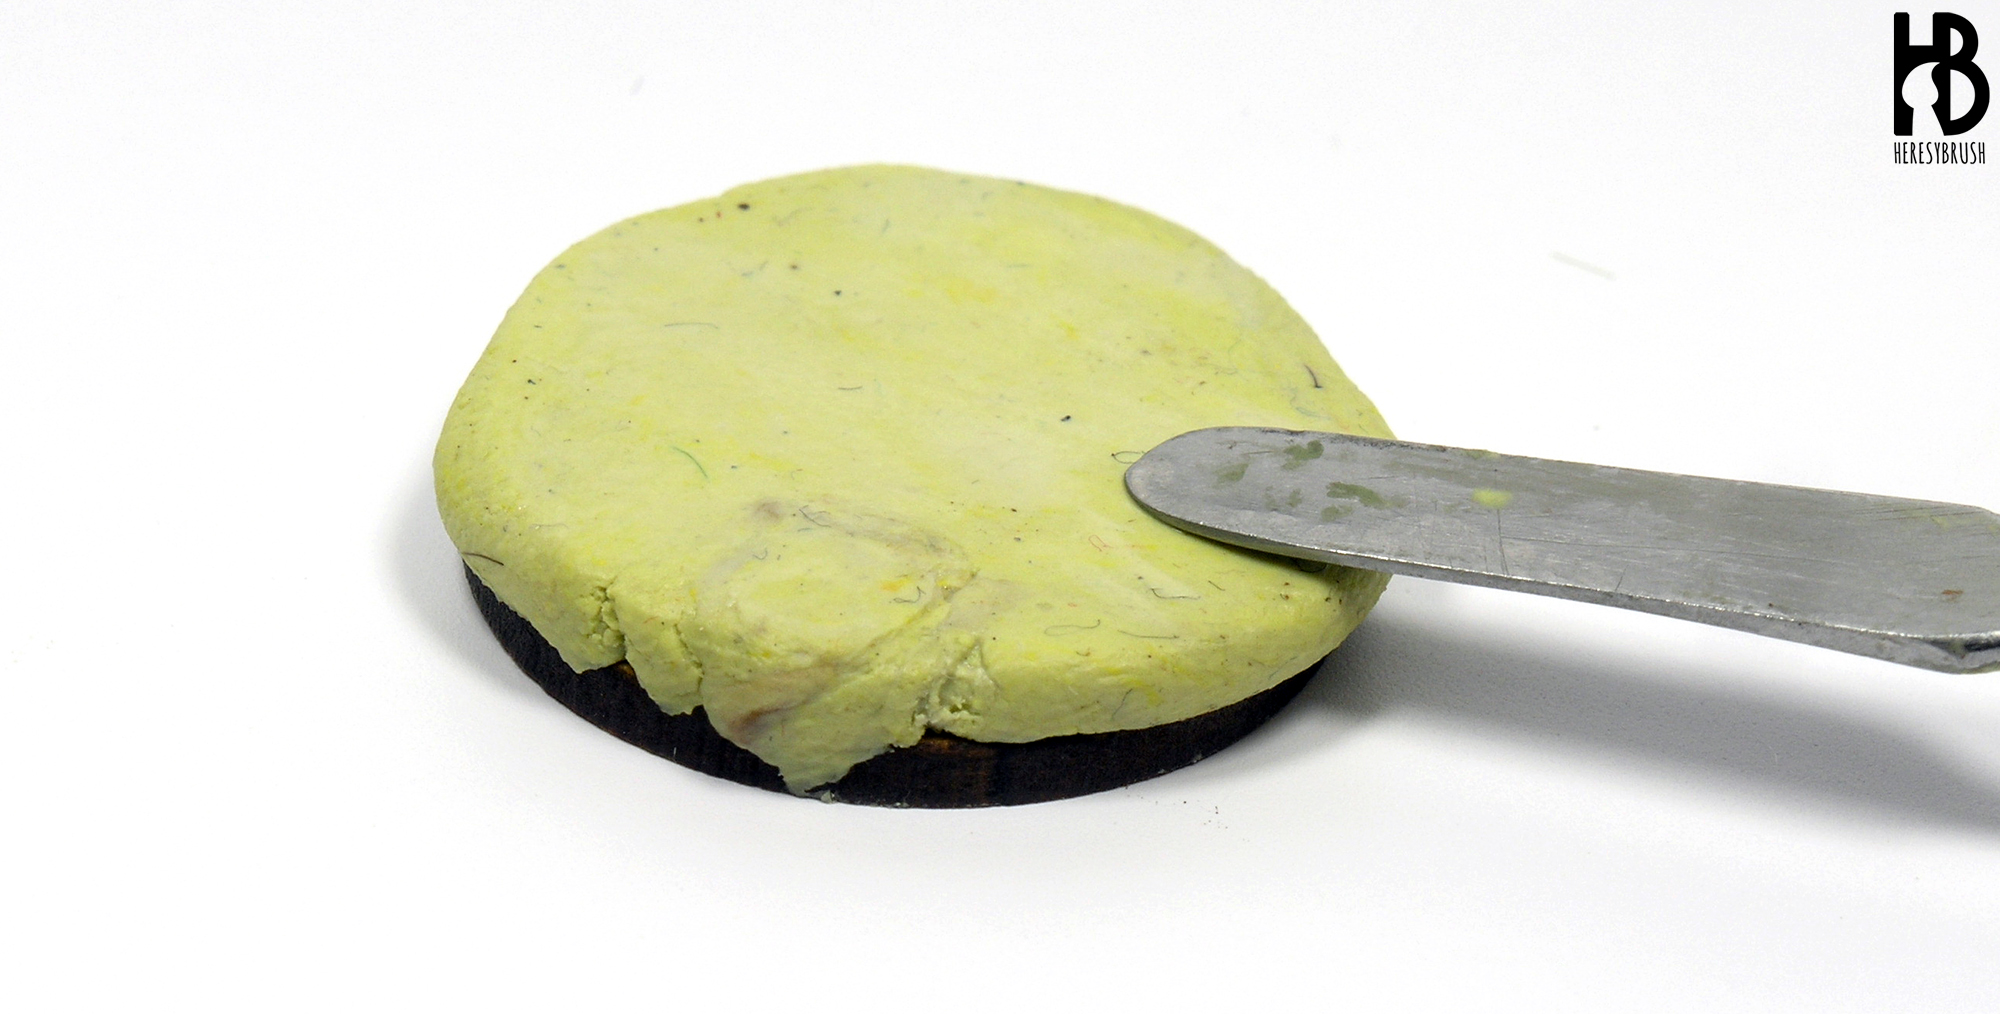
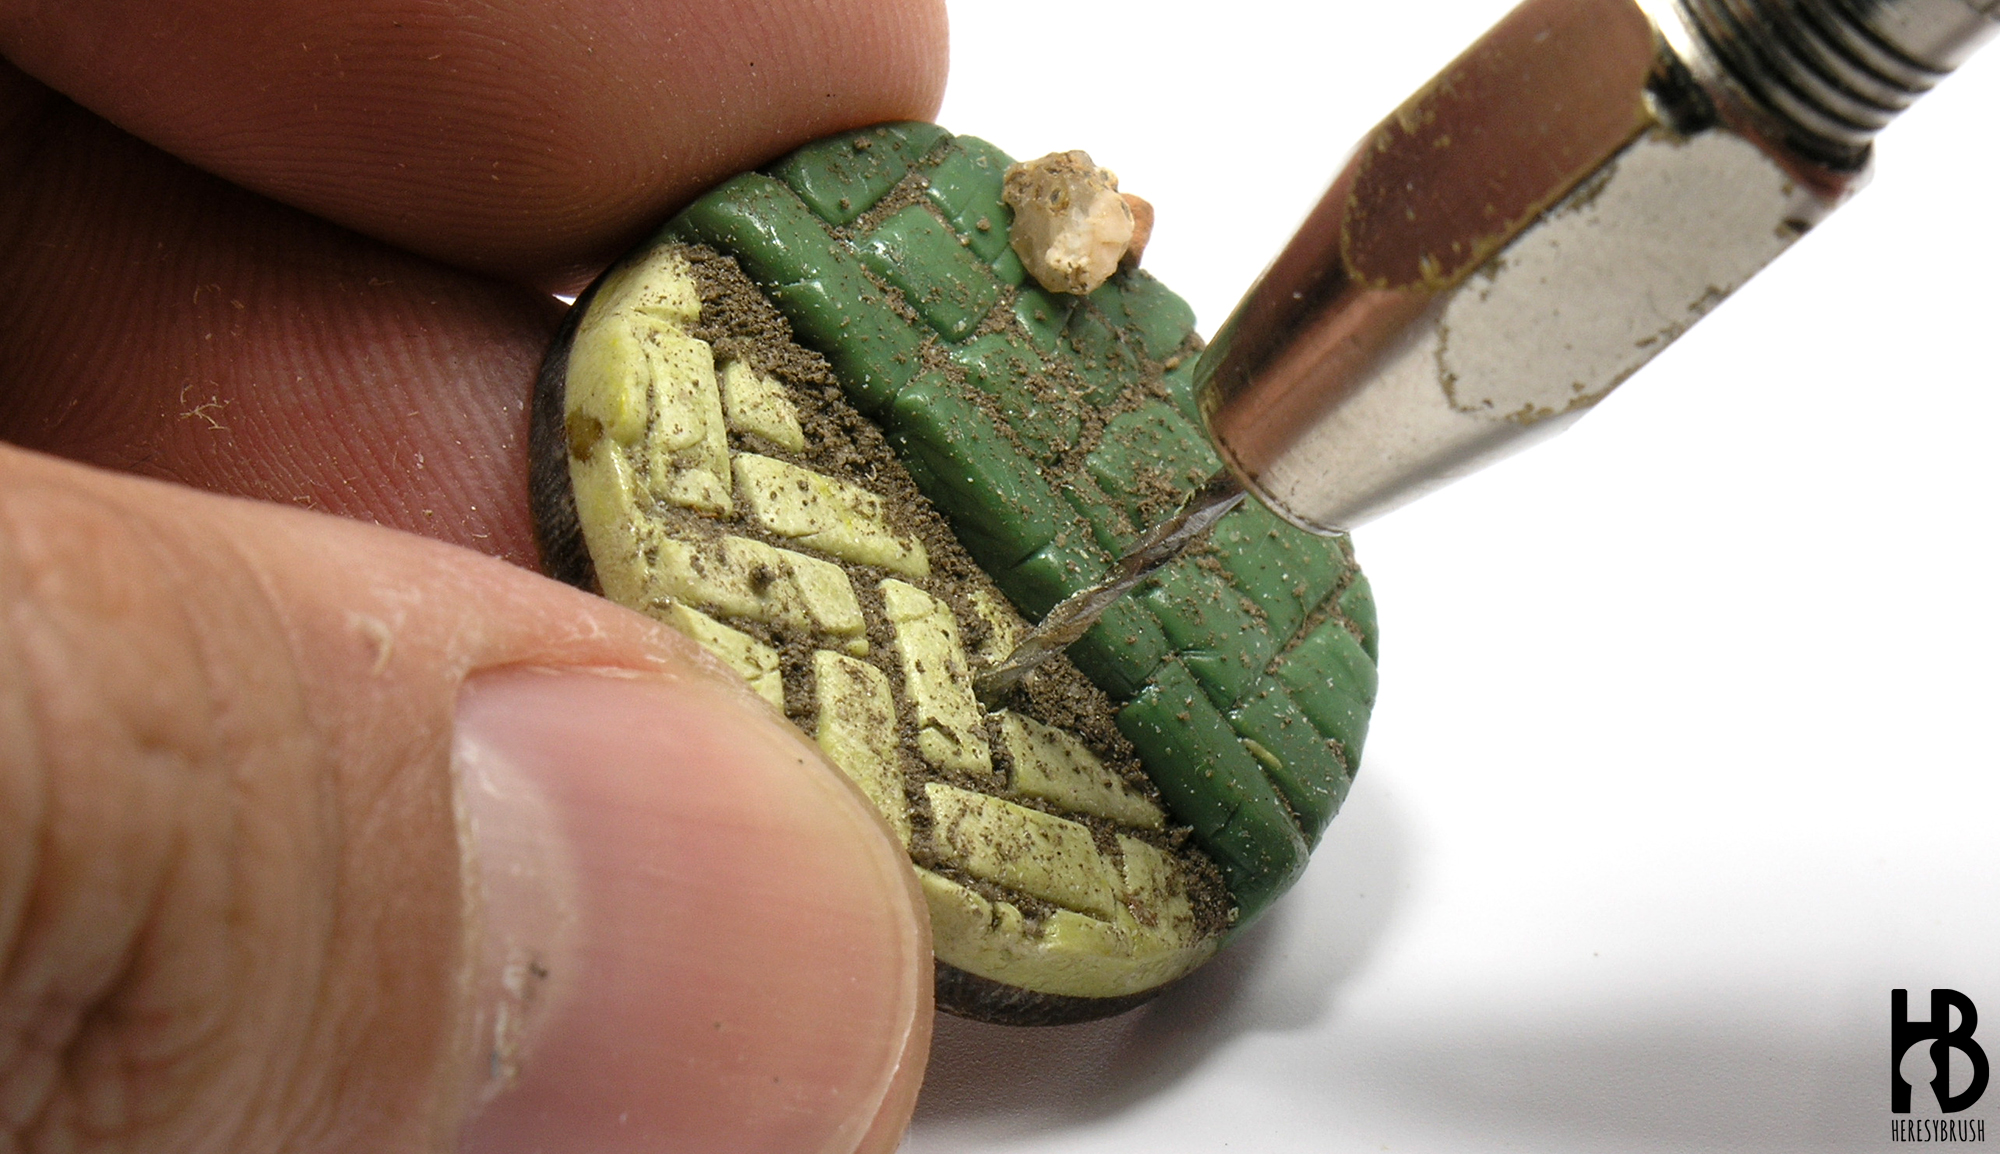
Next, I use one of the rolls (tiles) and starting from the back and moving forward I press the roll against the base. Not too hard but not too soft. I had to tried this couple in of times before I found the exact amount of pressure needed. If you do not press enough, you will not carve the texture all around the base. And if you press too much, you will smash the layer of putty. I recommend you to try couple of times until you get familiarized with this, as I did. I noticed that some tiles were “broken” due to the Milliput’s lack of flexibility. Still, this was a nice texture. The Milliput takes a few hours to cure. After one hour, it starts to be hard. At this moment is when I cut off the excess of putty from the edges using a modelling knife. Greenstuff World also sells some cutting tools for the most common base sizes and shapes that are very helpful for this task. Then, I left it overnight to cure properly. It is very important to wash properly the pin roll with water and a brush to remove any left overs of the modelling putty. Otherwise, after a few uses the roll will be ruined. This will depend on the type of putty you used, since green stuff for example does not leave these residues.

Next day, I started working on the second level: the footpath. This time I used the green stuff and the second roll (cobblestone). After mixing the two components, I prepared another ball that I smashed and spread on top of the Milliput. In only covered half or one third of the base, and this was done in perpendicular in respect to the roadway texture. Then I used the pin roll in the same way as before and I cut off the excess with a knife. Finally, I sculpted long tiles on the edge of the sidewalk. In my hands, either green stuff or Milliput worked very nicely with the rolls, although green stuff does not fracture as Milliput does.
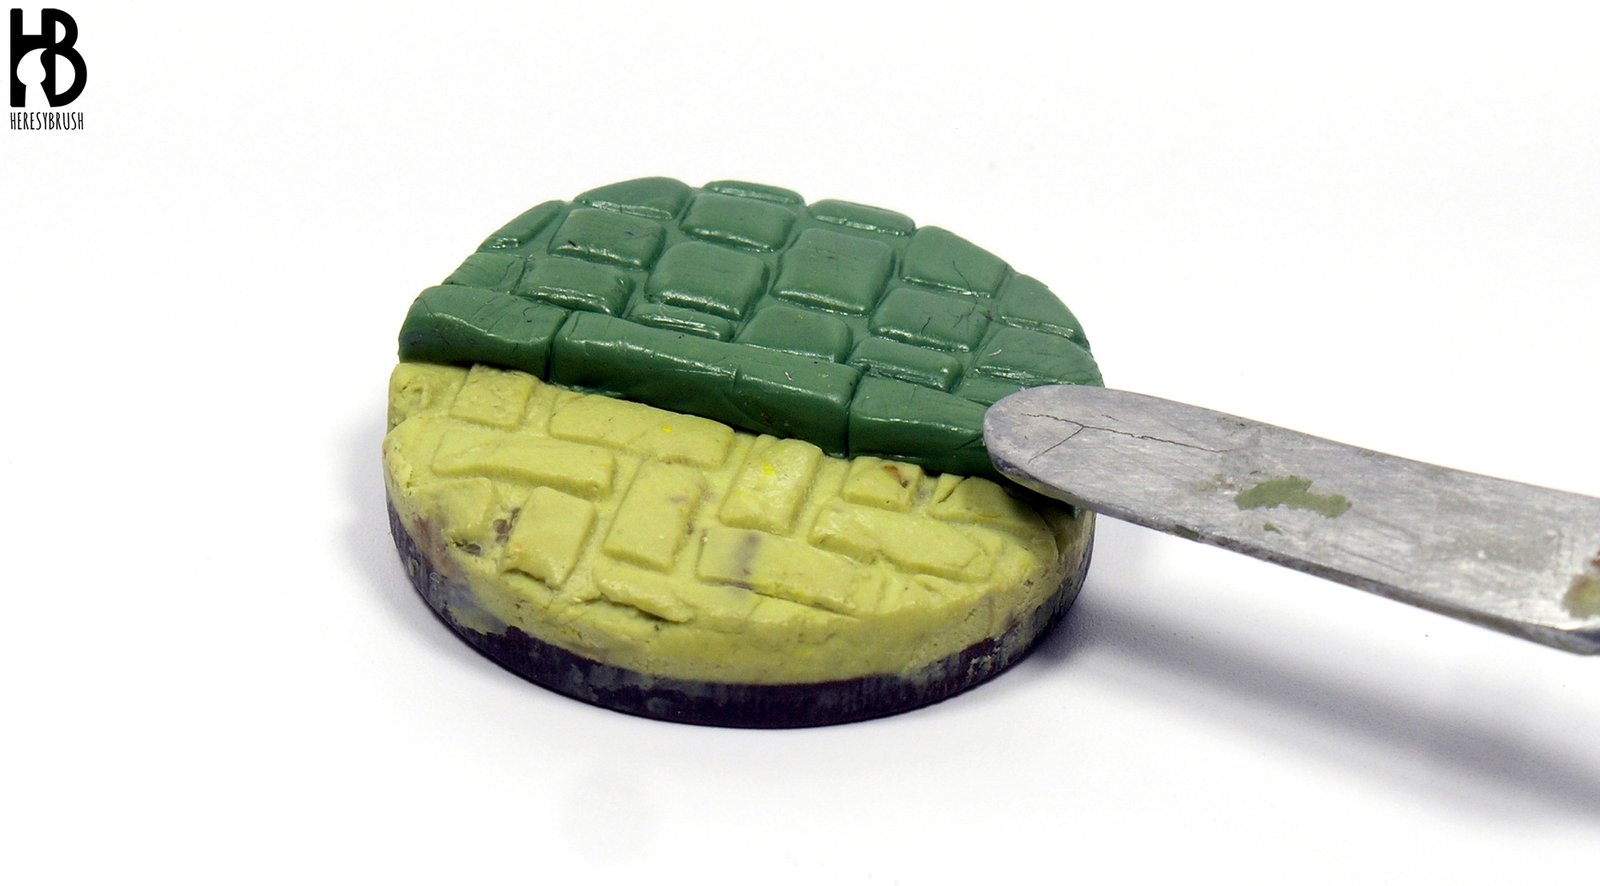

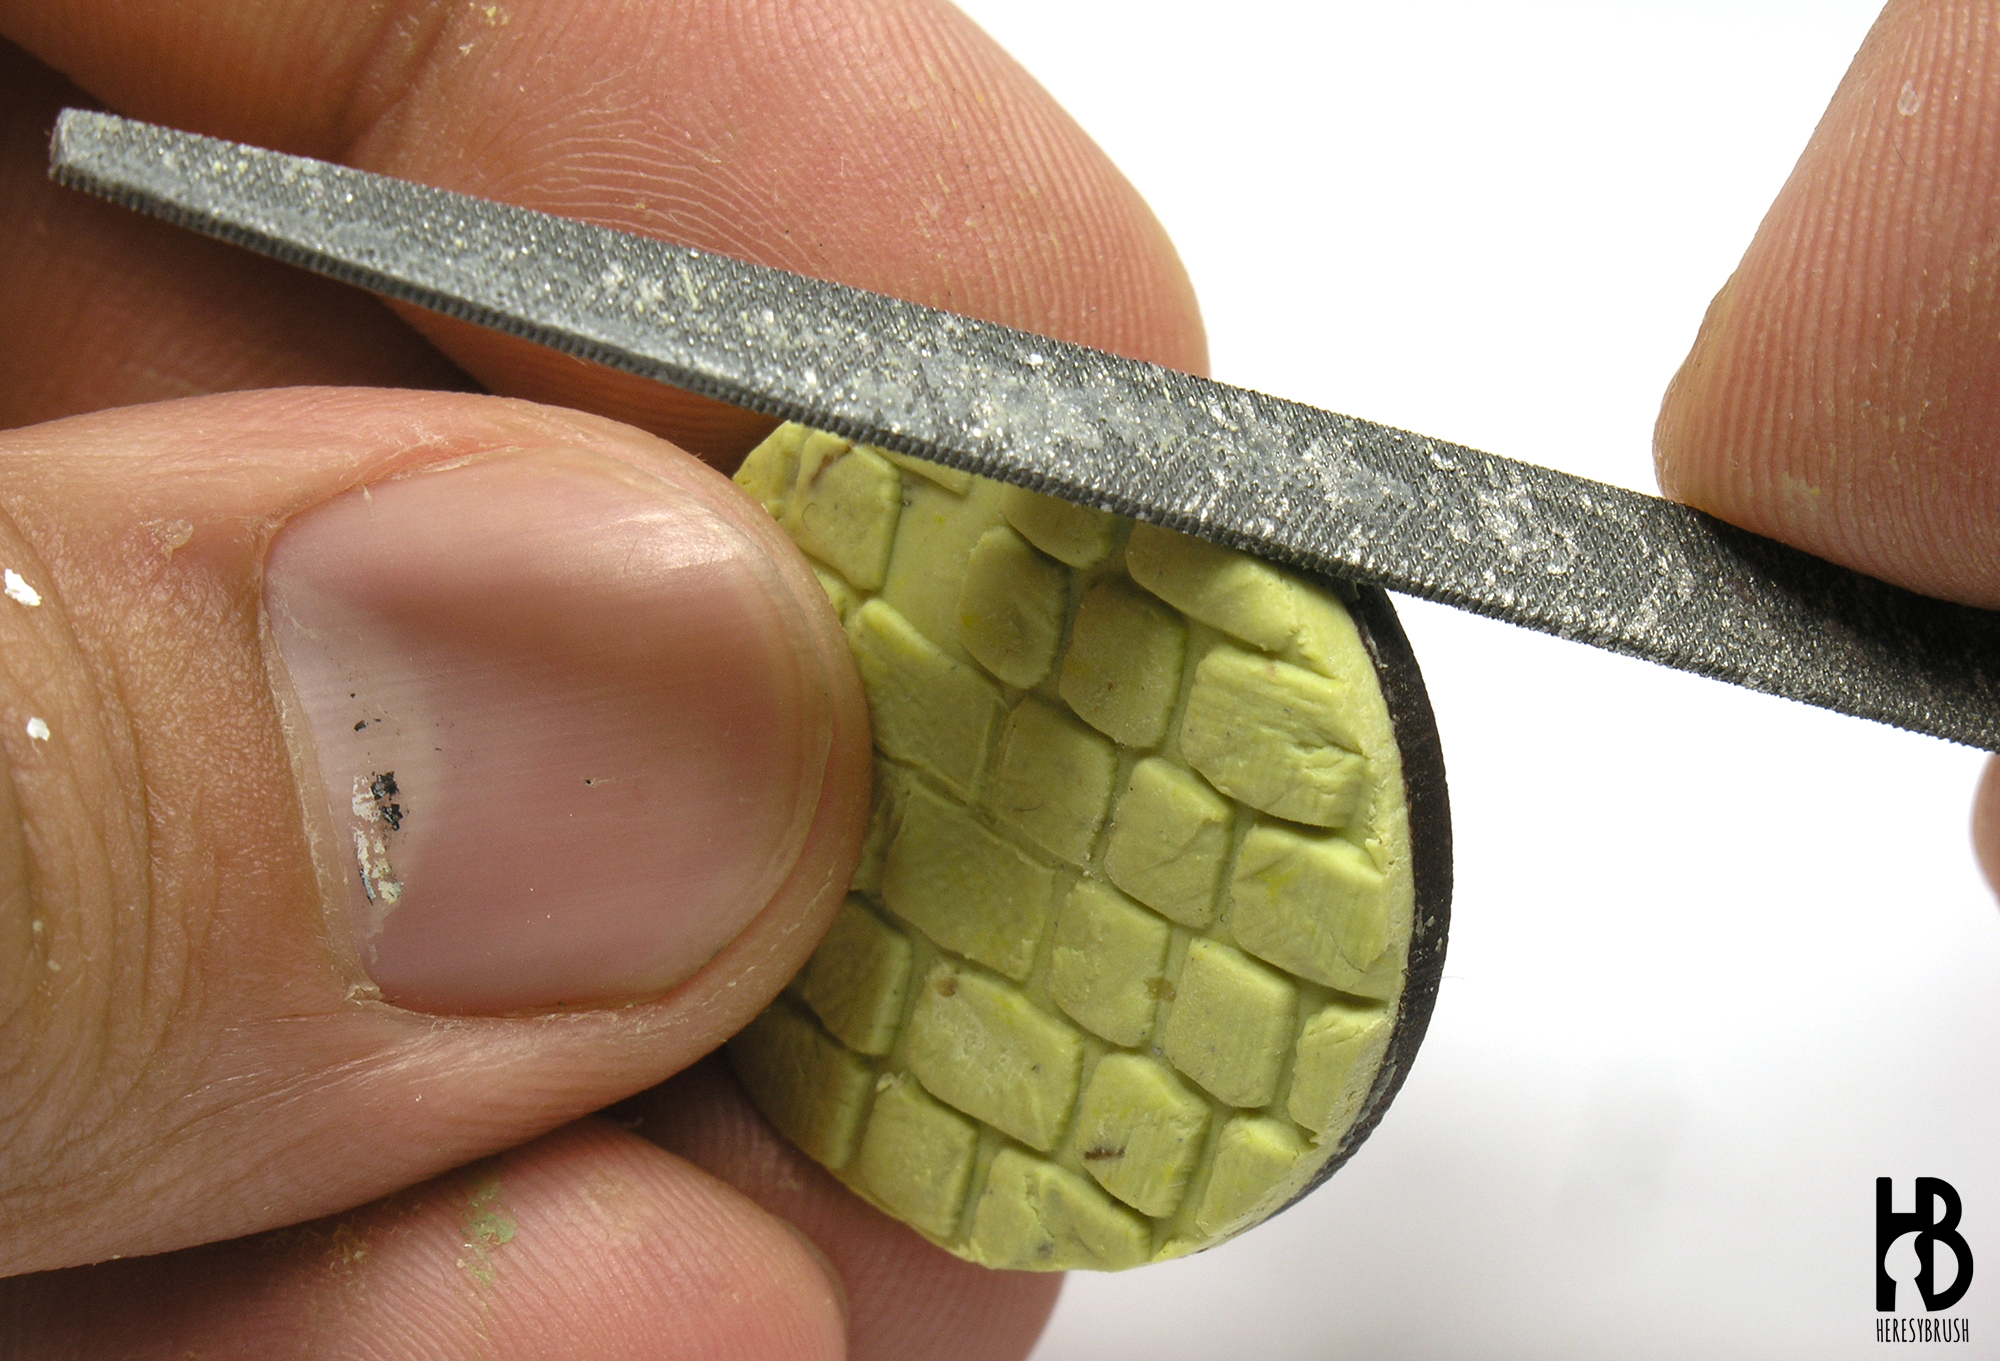
I let it cure again overnight, and next day I applied cyanoacrylate (superglue) on the vertical sides of the base with the help of a toothpick. Once the glue was dried, I used a modelling file to sand the sides and create an even surface all around the base. Note that the cyanoacrylate might have different formulations depending on the brand. For example, I used Loctite here. But I also have superglue from Army Painter at home, and this does not work in the same way for this purpose. I used the superglue here as a filling agent.
The bases are almost ready. In fact, we could paint them already. However, I wanted to add an additional texture to simulate a city at war: some debris. To achieve this effect, I used gravel glue from AMMO of Mig Jimenez to fix some sand and small rocks. First, I spread the sand with a brush, specially focusing on the lines between tiles and the joint between the roadway and footpath. And second, I added small rocks that in fact are fragments of bricks used to decorate your garden. Then, I used a plastic pipette to apply several drops of the gravel glue, trying not to touch the surface directly. After 20 minutes the glue is dry or evaporated, and sand and rocks are nicely fixed. If you do not want to simulate a debris texture, I would still recommend you to add some sand on the space between the tiles, since this effect will enhance the realism of the base. Just add the sand and clean the tiles so that the sand is only in the recesses. Regarding the sand, this is what I used.

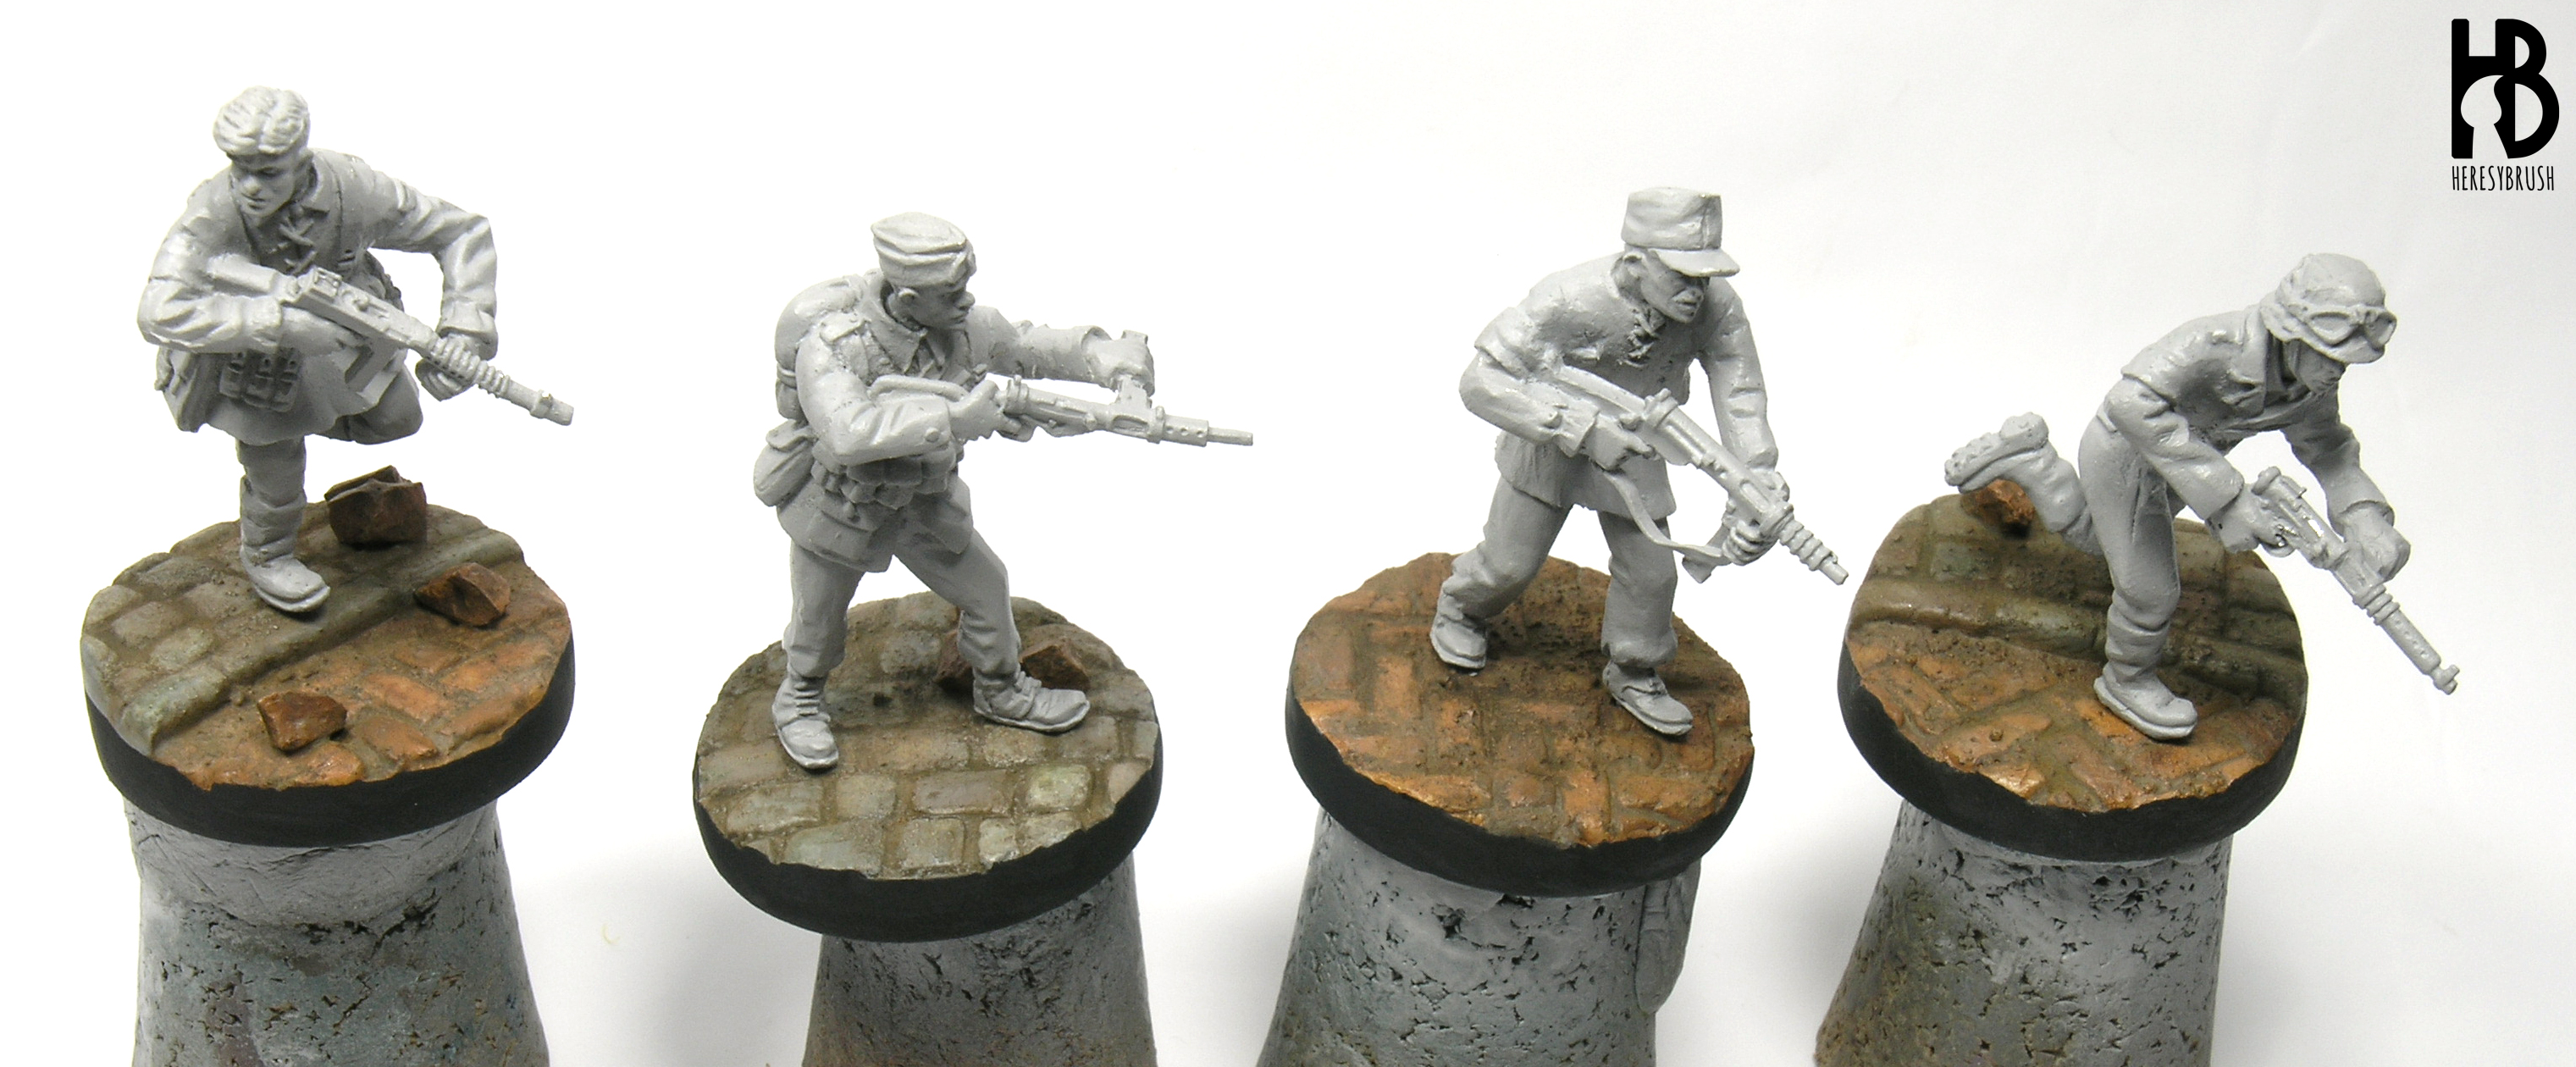
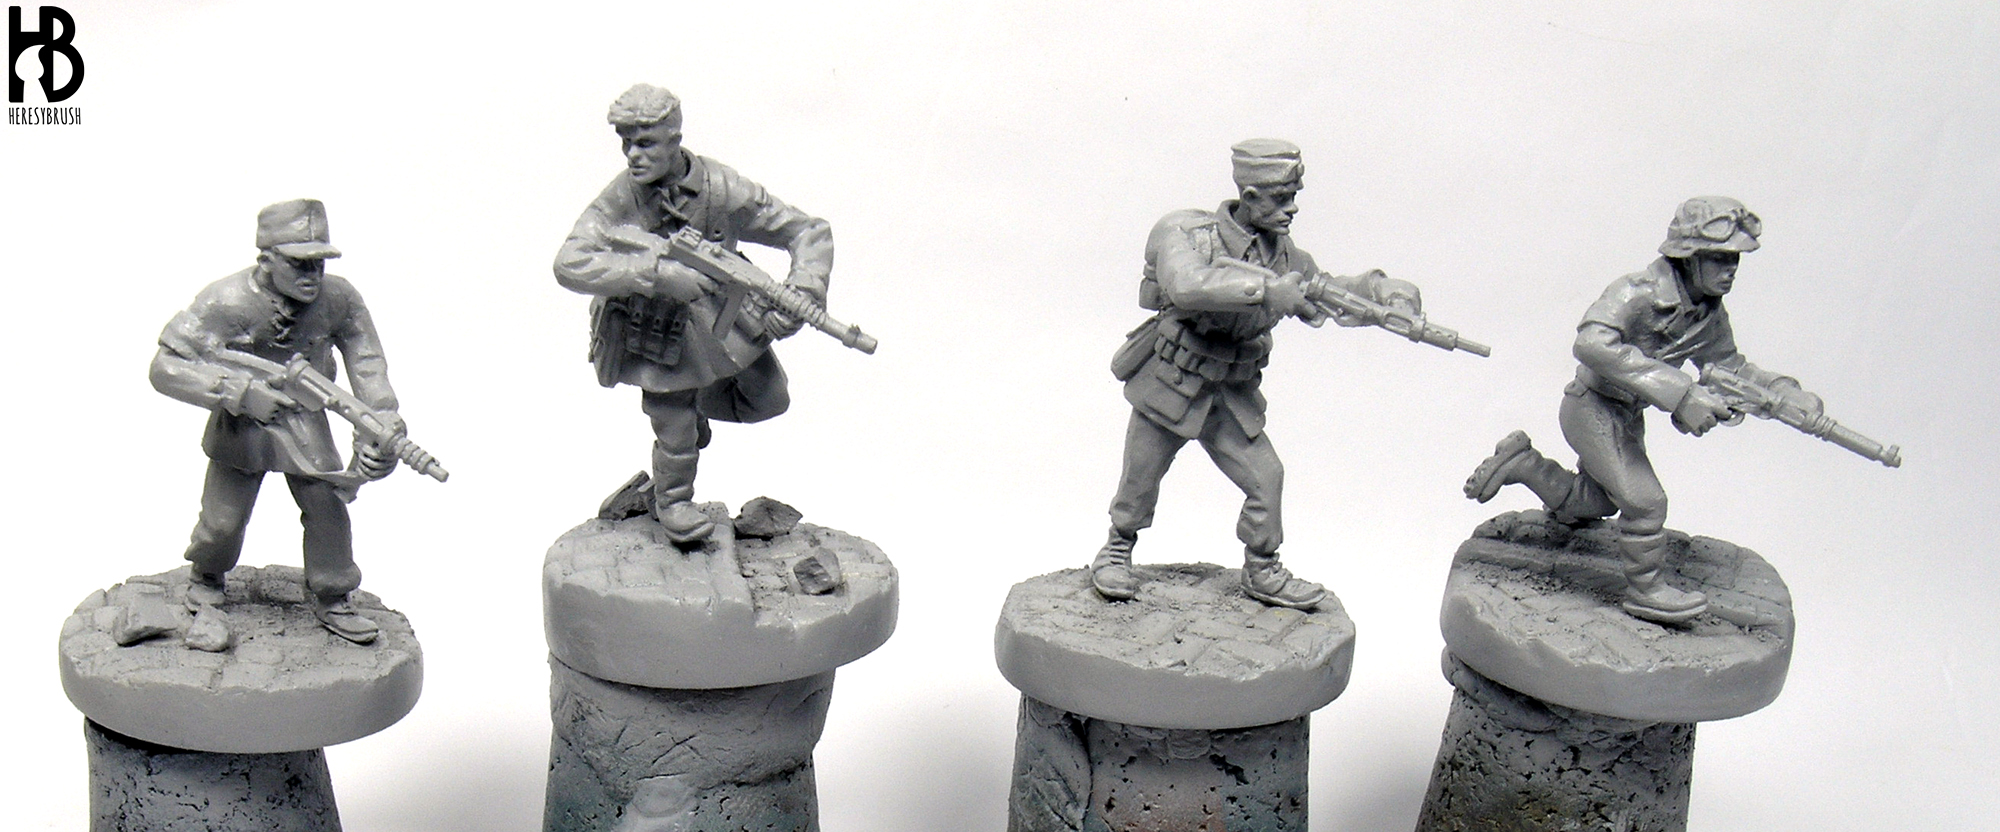
Finally, we need to anchor the miniatures to the base, but how? Normally, wargames miniatures came with small metal base. First thing we need to do is to remove this with pliers, modelling knife and files. Be careful! Do not cut the feet of the miniature. Then, we can use a manual drill to create a small hole in one foot of the miniature and in the base, and fix a metal rod between these. I normally first do the hole in the miniature and then fix a small metal rod in it. And then I placed the miniature on the base. Once I know where I want to have the miniature, I mark where I should do the hole on the base, and I drill it. I do not glue the miniature yet.


Now the bases are ready for painting. As always, we start applying a primer coat. Using an airbrush, I used grey primer from AMMO and paint both the miniature and the base at the same time. I normally let the primer to dry overnight.
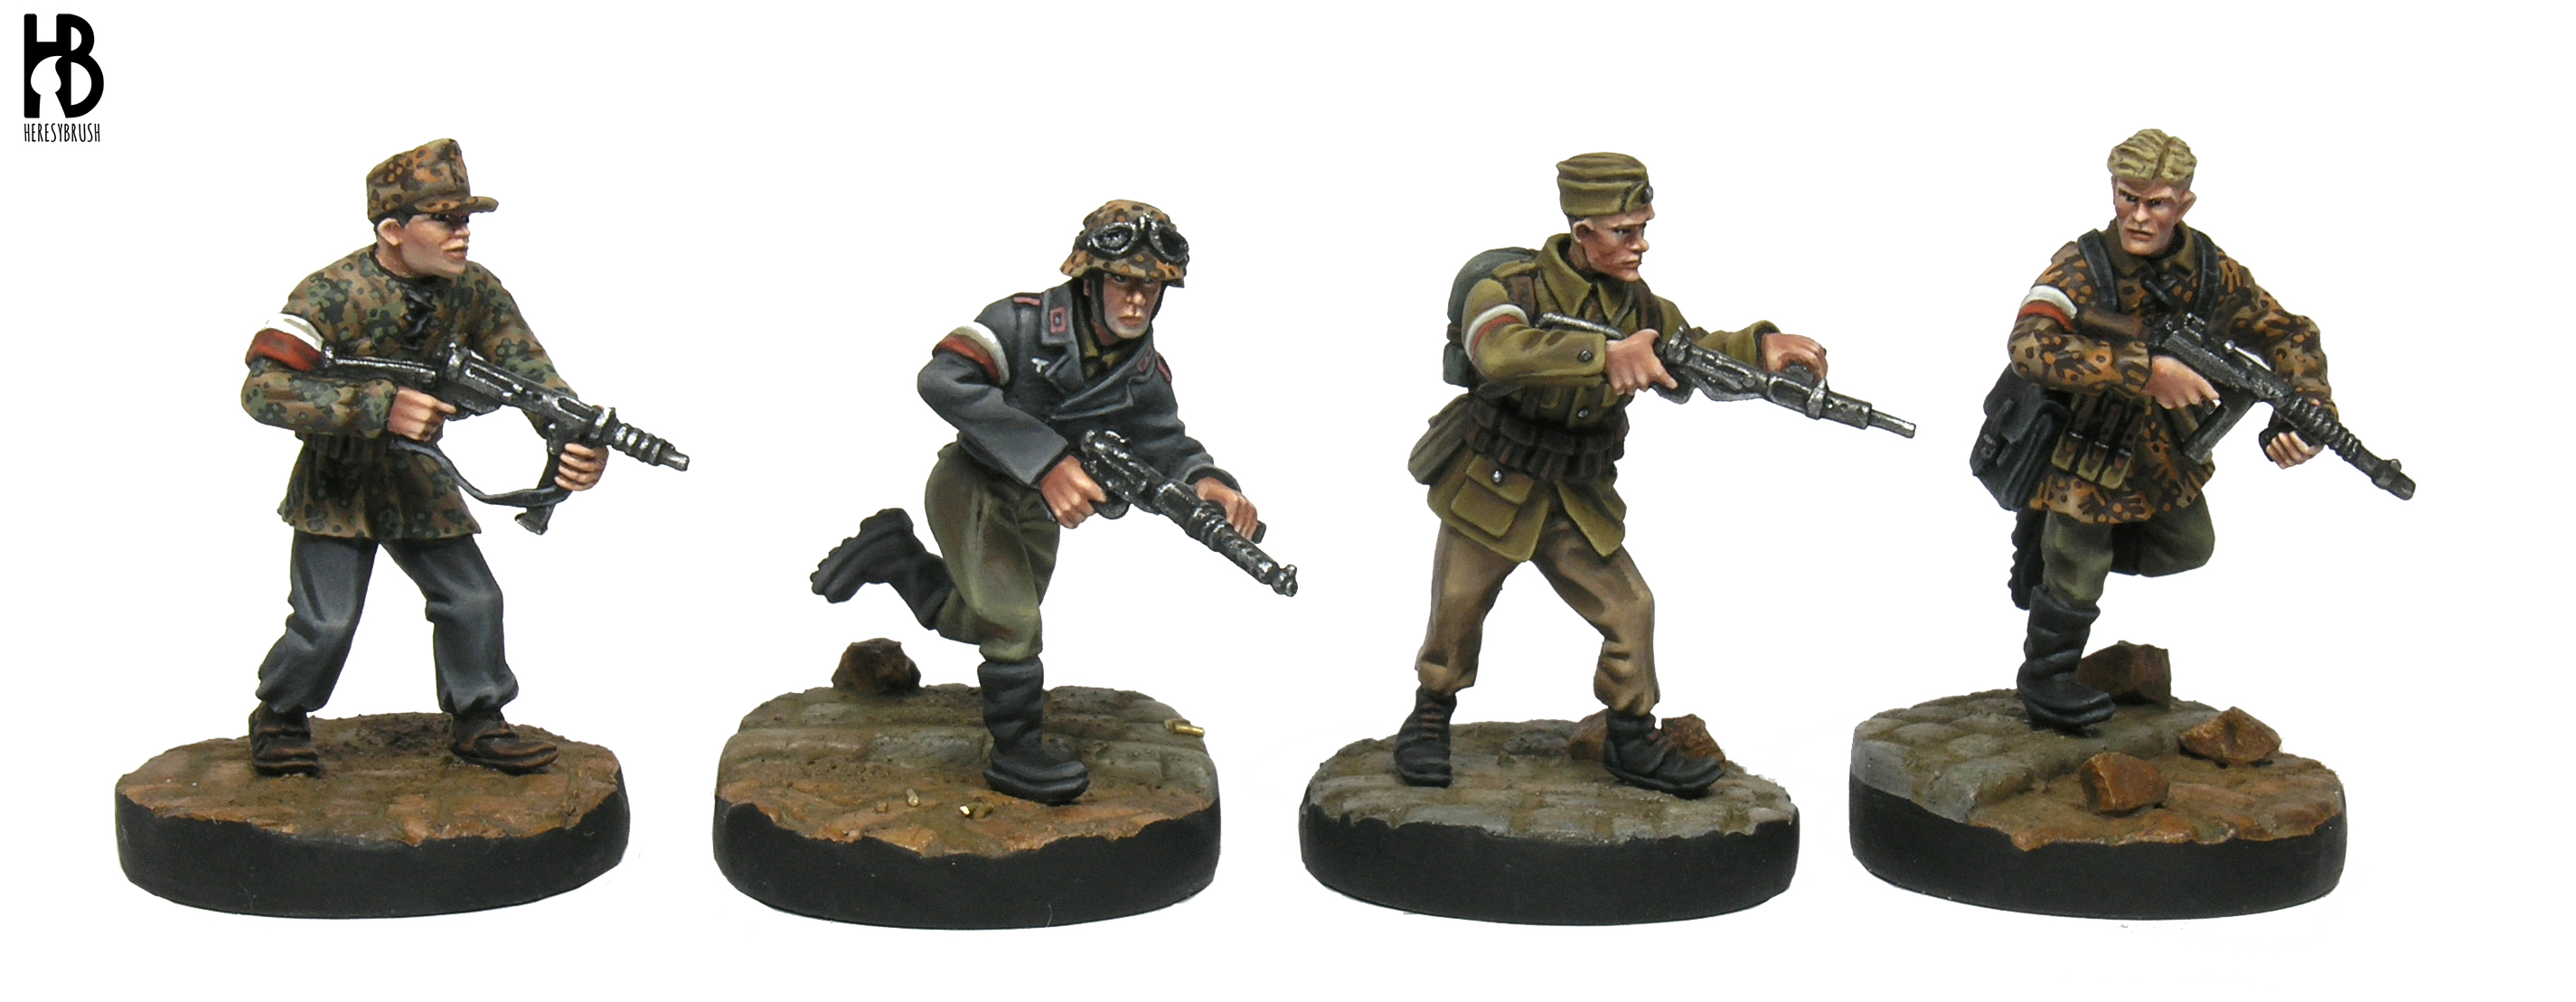
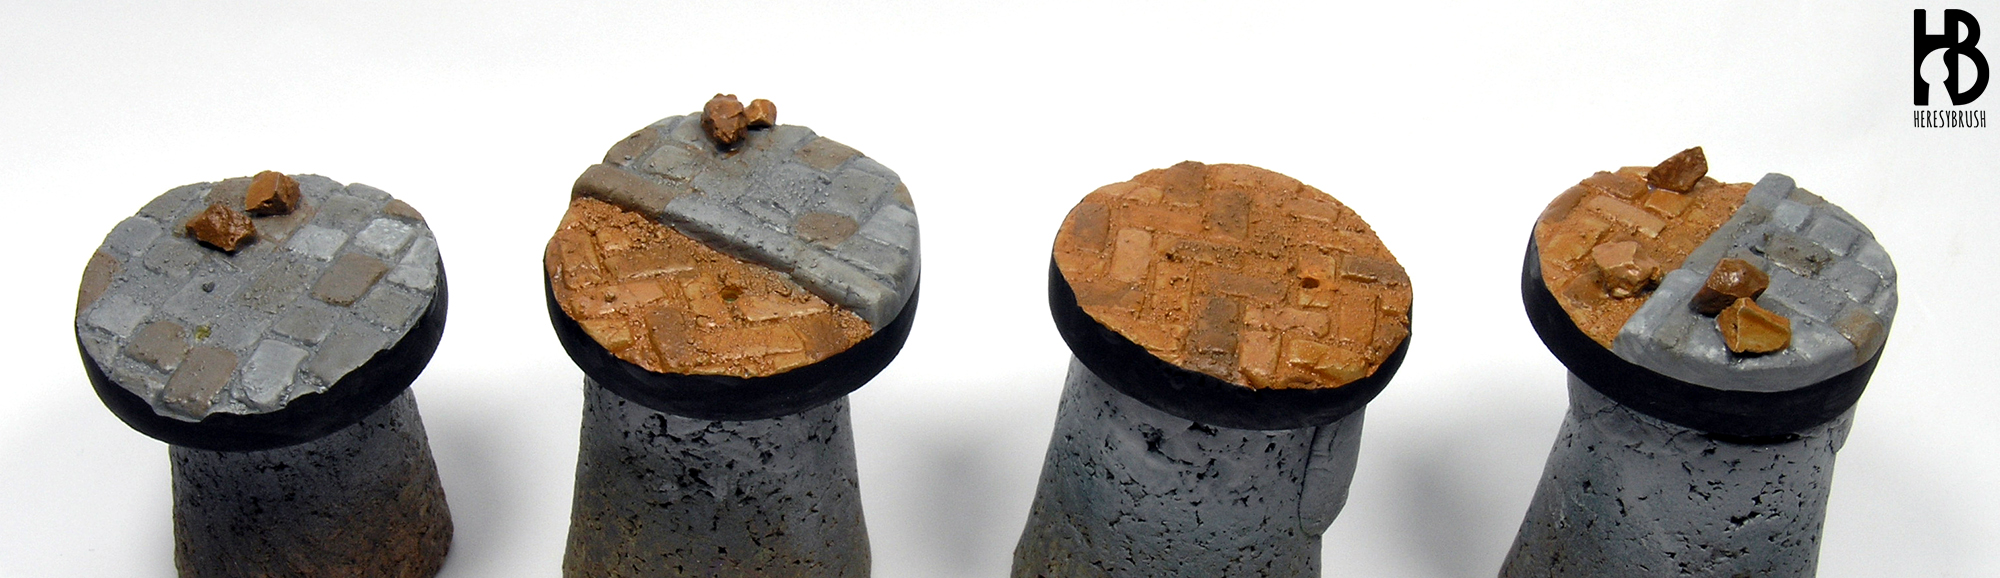
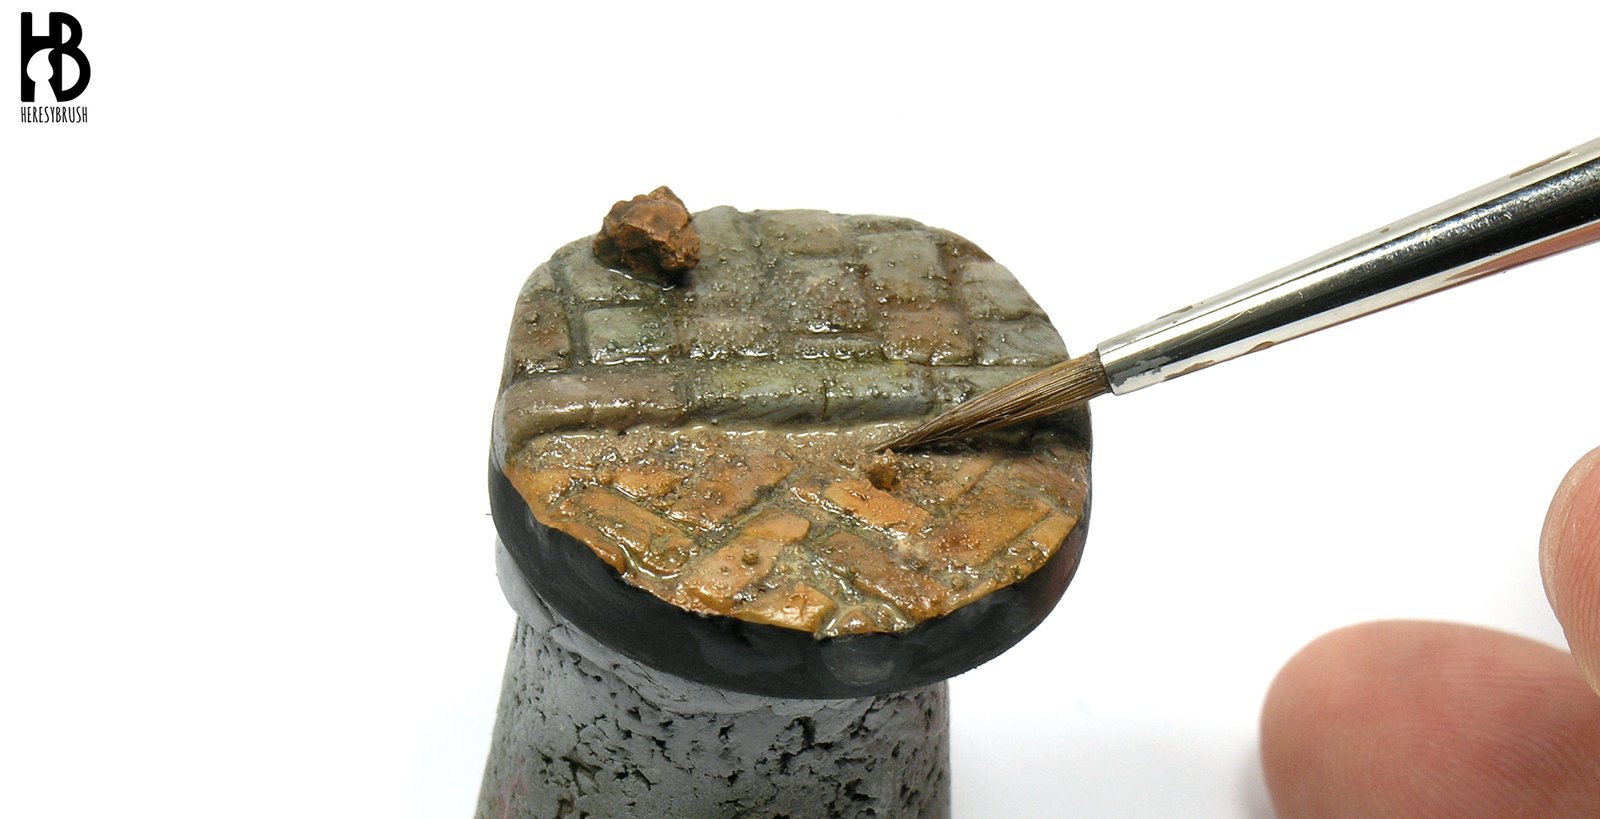
I decided to paint the cobblestone in different grey tones and the tiles in orange tones. I started painting all the cobblestone with Graphite (Scale Color) and all the tiles with Orange brown (982, Vallejo). I thinned the paint with more water than usual, so that the paint will not cover much the surface. This will create different tones in the same tile, and between tiles. Next, I mixed graphite with white or dark brown to create different grey tones, which I used to paint randomly some pebbles. I did the same with the orange tiles, using different red brown colors. Once again, the paint is very diluted. Finally, I apply with the brush a layer of satin varnish to protect the acrylic paint.
To highlight the different textures we have created previously, we can apply a dark brown enamel wash, such as Dark brown for DAK vehicles from AMMO of Mig Jimenez. I applied it as a “pin-wash”, only in the recesses or space between tiles. Once it was dried, I used several oils from AMMO (oil-brushes) to create more tone variations. I used red, yellow and green to change the color of some pebbles or part of these. And I used a dust color to paint the area around the debris. First, I apply small dots of these different oil colors, and then I used a brush moistened with white spirit to blend the oil on each pebble.
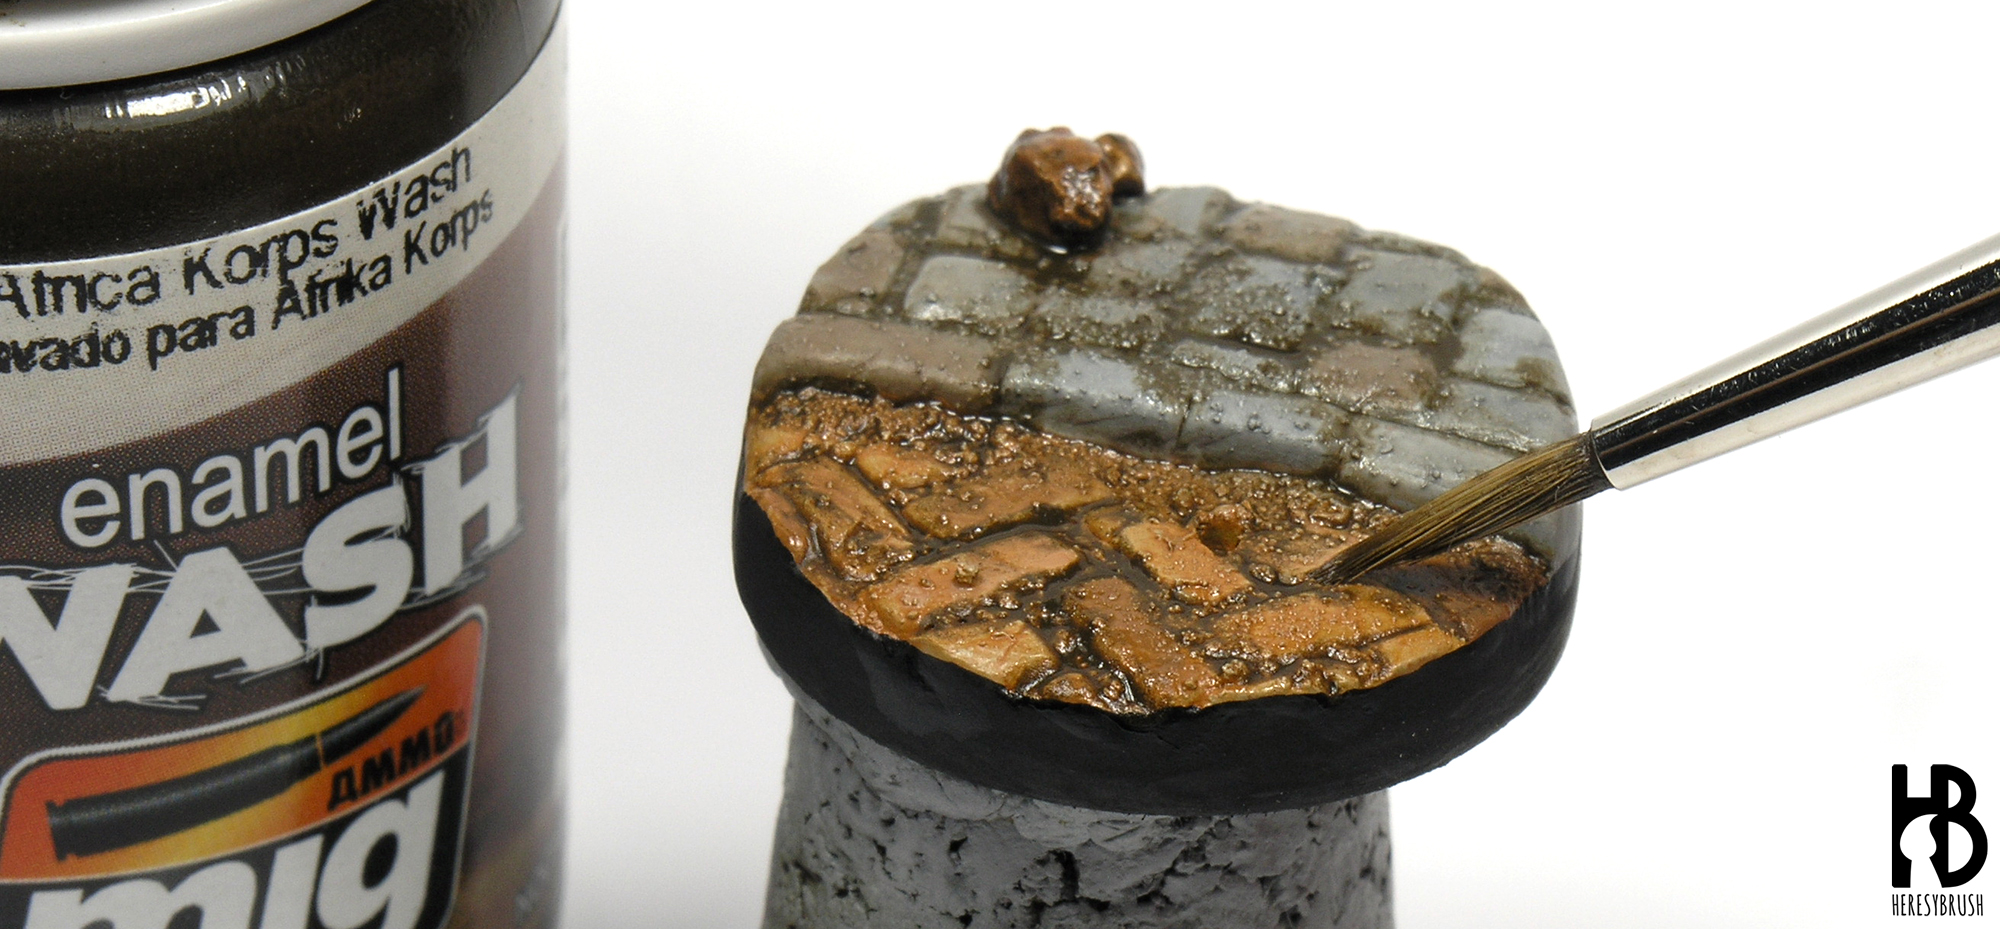
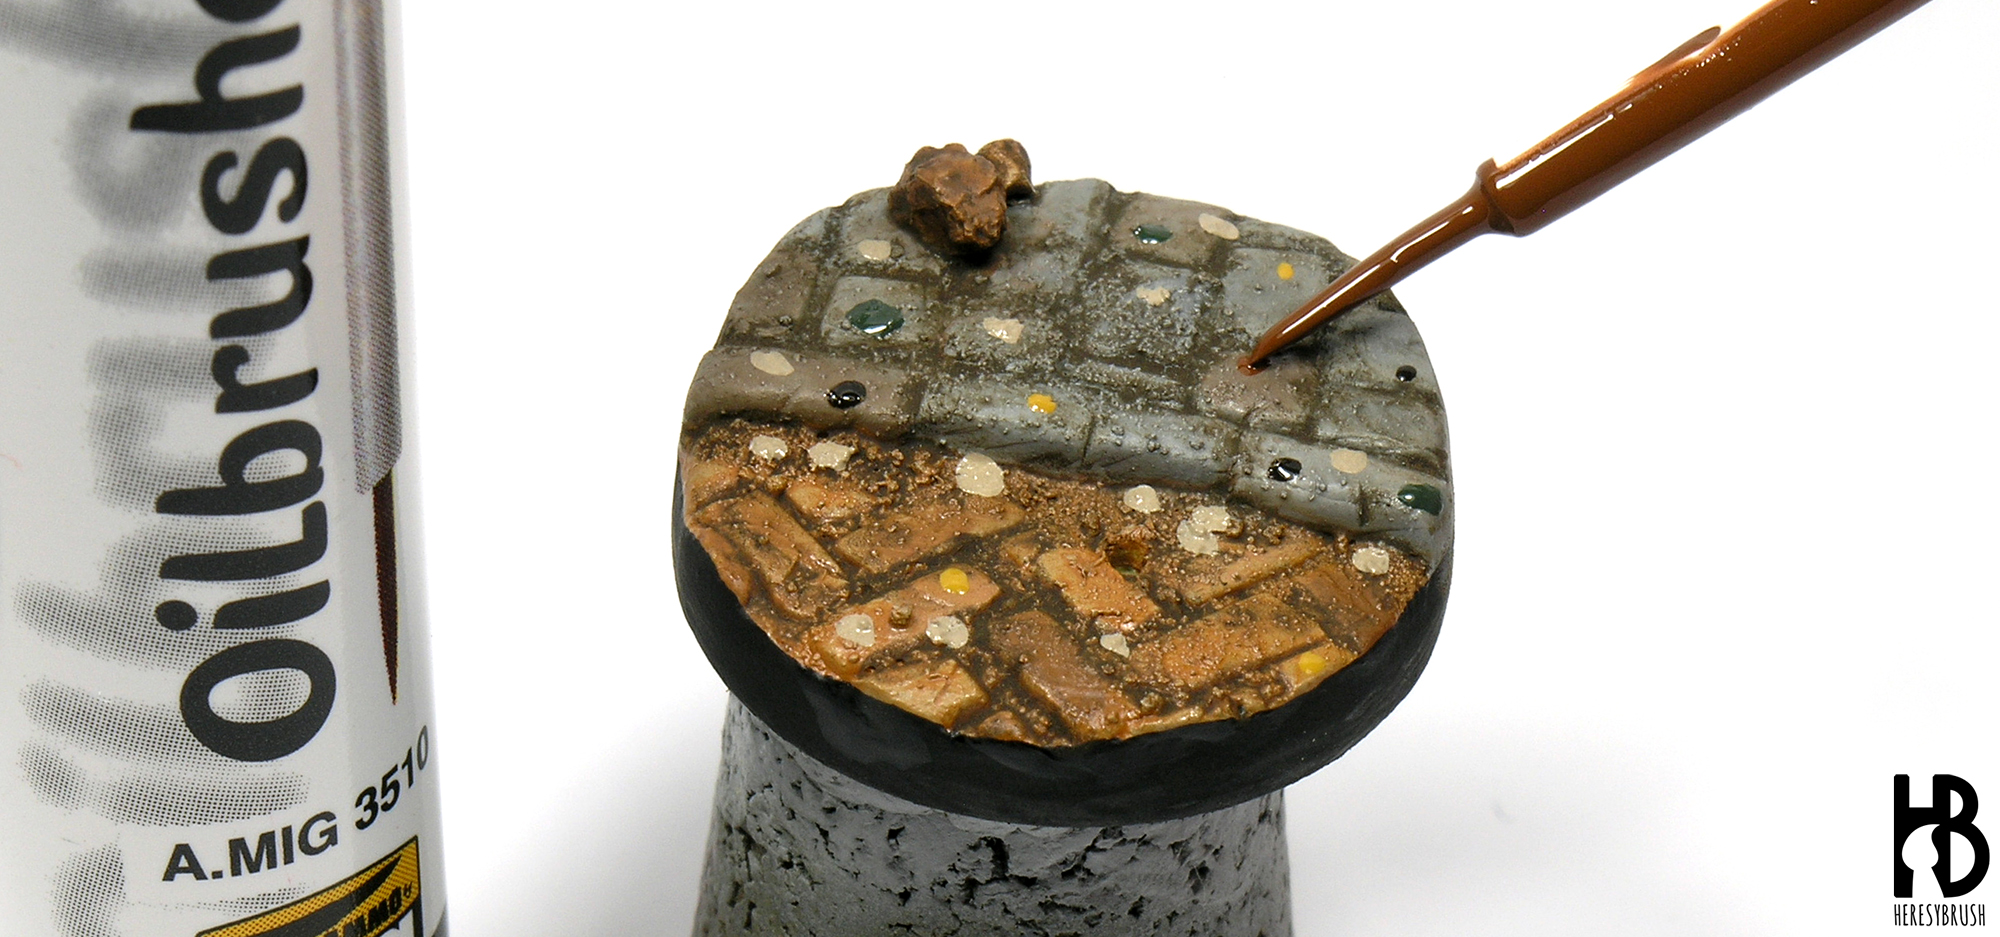
Finally, once the oils were dry, I use Earth pigment from AMMO to add some additional dust and matt effect (so far, our base had a satin effect). I use the pigment directly from the jar, dry. I spread it with a brush, specially focusing on the recesses.

The base is ready. And now I fixed the miniature with a little bit of cyanoacrylateglue using the anchoring system we prepared before. Obviously, you can continue and add more details to the base. That depends on you. You can add some oily stains using the corresponding product from AMMO, for example. Or you can add small tree leaves. The options are “infinite”.