
I previously wrote a short tutorial on painting TMM steel (which you can read here). Now, it’s time to write a similar post on how to paint TMM gold, using a batch of Easterling warriors (Games Workshop, 28mm) that I’m currently working on. I’ll also expand the tutorial to cover how to paint the red and marine blue clothing. The bases are still unfinished, but I plan to create another tutorial focusing on that aspect.
I would like to clarify that this is my own interpretation of the TMM gold technique; it’s not the only method, nor is it necessarily the best. I may have created shadows and highlights in areas where they might not be ideal, but I am pleased with the results. My approach is influenced by a painting technique used in scale models known as “color modulation,” which involves creating striking—though sometimes unrealistic—contrasts between shadows and highlights on adjacent panels.
Additionally, for these warriors, I drew inspiration from Iván Sainz de Castro’s masterclass in the book How to Paint Miniatures for Wargames. He advocates combining quick and detailed painting techniques to speed up the process while maintaining high quality. His approach involves applying the most time-consuming techniques to the key, symbolic parts of the miniature and using faster methods for the rest. Following this principle, I spent more time on the golden parts of these Easterlings (the dominant and most representative color), while using simpler methods for the clothing, leather, and weapons.
This tutorial has a follow-up describing how to create desert bases using an acrylic texture and pigments: How to create desert bases.
TMM gold

Step 1 – Primer
Start by applying a primer or undercoat. This not only facilitates the application of paint but also enhances its durability, which is crucial if the miniatures will be used in gameplay. I chose black primer for this project to leverage its effect in the recesses, but for painting gold, a grey or brown primer is often preferable, as these neutral colors are more easily covered by gold paint.
Step 2 – Base coating
Apply a base coat of Gold A.MIG-0198 to all the golden parts. Use several thin layers to achieve an even gold color across the surface.
Step 3 – Wash
Create a dark brown wash by mixing Dark Brown AMMO F-533 with Transparator A.MIG-2016 in equal parts. Transparator is a product designed to thin acrylic paints into semi-transparent coats. If you’re familiar with Citadel paints, this mix is similar to Agrax Earthshade. Apply a generous layer of this wash over all golden parts to accentuate the recesses and create an aged gold effect.
Step 4 – Glazing
Prepare a dark brown glaze by adding a bit more Transparator to the previous wash mixture. Unlike a wash, a glaze uses less paint and should not pool on the surface. Brush off excess paint on a paper towel or cloth, then apply the glaze in a specific direction—from the lightest to the darkest part of the surface. This technique enhances shadows in areas like joints and lower parts of the armor and adjusts the shadows created by the wash. For example, you might invert the shadows on the shield, placing them at the top and highlights at the bottom.
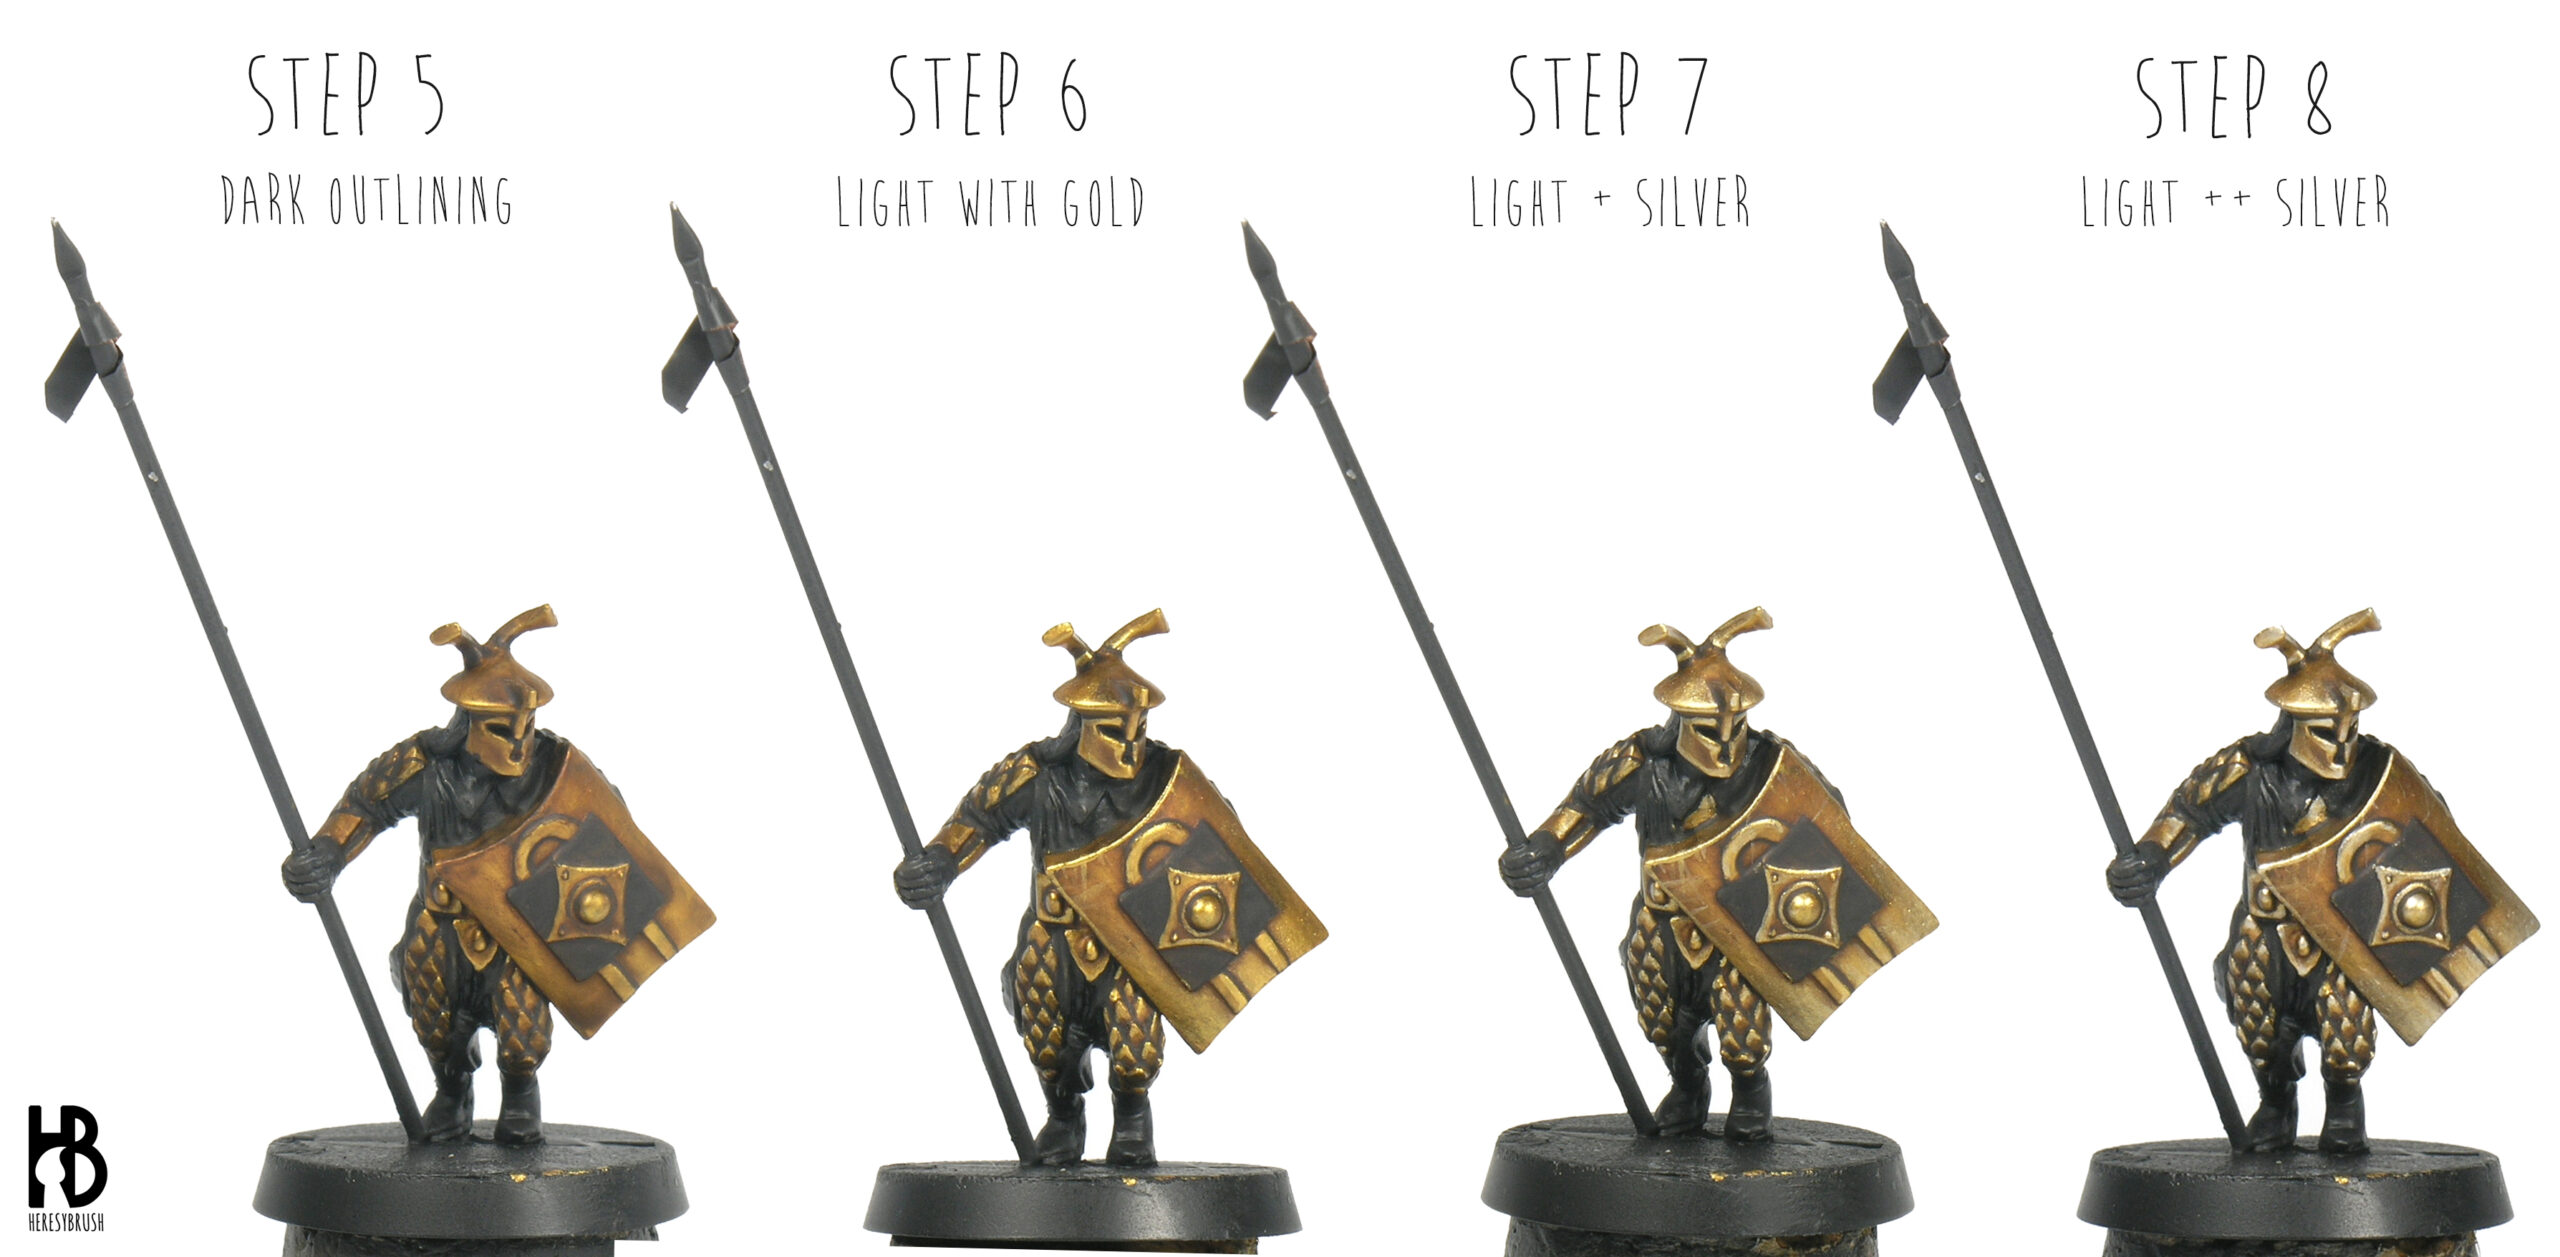
Step 5 – Outlining
Outline each part of the armor and shield using a mix of Dark Brown AMMO F-533 and black. This step is labor-intensive, especially on detailed areas like armor scales, but it is crucial for creating contrast and achieving the TMM effect. Use a sable brush to carefully paint thin lines between each element or scale.
Step 6 – Edge highlighting
Recover the base coat, Gold A.MIG-0198, and edge-highlight every part of the armor, helmet, and shield using a thin brush. For scales, highlight the two upper sides of each triangle. For the helmet and shield, highlight each edge. This step is time-consuming but essential for the TMM technique. Apply additional glazes (see Step 4) with Gold on larger surfaces like the shield and helmet. Note that for the shield, apply glazes starting from the top to place highlights at the bottom. Add scratches to the darker areas of the shield as well.
Step 7 – More highlights
Repeat the highlighting process using a lighter color. Mix Gold A.MIG-0198 with 30% Silver A.MIG-0195. Apply edge-highlights and glazes in the same areas, but reduce the painted areas. For scales, highlight only the very tips of each peak; for the shield, apply glazes more towards the lower parts, starting from a lower point than before.
Step 8 – Final highlights
Apply a final highlight using a mix of 40% Gold A.MIG-0198 and 60% Silver A.MIG-0195. Focus on the same areas as before, but reduce the painted area even more. If the use of silver has created a very light or whitish tone, apply a general glaze of 10% Dark Brown AMMO F-533 and 90% Transparator A.MIG-2016 over the miniature. This will “stain” the lightest spots and restore the warm gold color.
At-a-glance TMM gold tutorial:

Clothes, leather and weapon
For the clothing, follow a triad system (shadow > base > highlight) with an additional highlight. Apply three consecutive highlights over an initial dark base coat. To speed up the process, avoid using glazes for blending, but use thin paint for smoother transitions.
- Red Garments: Base coat with a mix of Pure Red AMMO F-527 and Bright Violet AMMO F-539. Increase the red ratio to 75% for the first highlight, applying it to exposed areas and wrinkles. Use pure red for the second highlight, applying it to the same areas but reducing the painted zone. For the final highlight, mix Pure Red AMMO F-527 with a bit of Sunny Skintone AMMO F-537 and Bright Orange AMMO F-538. Apply it in thin lines or dots to the extremes of each highlighted area.
- Black or Marine Blue Garments: Base coat with a mix of Marine Blue AMMO F-518 and pure black. Highlight raised parts with Marine Blue. For subsequent highlights, mix Marine Blue with increasing amounts of Light Sand AMMO F-511 (first 15%, then 30%). Apply each layer to the most exposed parts, reducing the painted area.

Leather and pike
- Leather Parts: refer to the other tutorial for painting leather (this). Note that in the leather square on the shield, shadows and highlights are inverted compared to the gold parts for greater contrast.
- Pike blade: refer to this TMM tutorial for painting metallic parts (this).
- Wood: start with a base coat of Matt Earth AMMO F-507, followed by a Dark Brown wash. Highlight by mixing Matt Earth with white and painting parallel lines across the pole using the brush body (not the tip) to simulate wooden veins. Add scratches with thin perpendicular or diagonal lines

Metal pikes
We can replace the original halberds and swords with metal pikes (from 1898 Miniatures, here). They are 10cm long, with a flattened and sharp end resembling the pike blade. The replacement process was simple:
- Remove the plastic halberd or sword with a sharp modeling knife, ensuring all traces are gone.
- Use a manual drill to perforate the hand.
- Cut the metal pikes to 6 cm and glue them to the hand and base with instant glue.
- Create the flag using a 0.3mm copper sheet and secure it with instant glue.


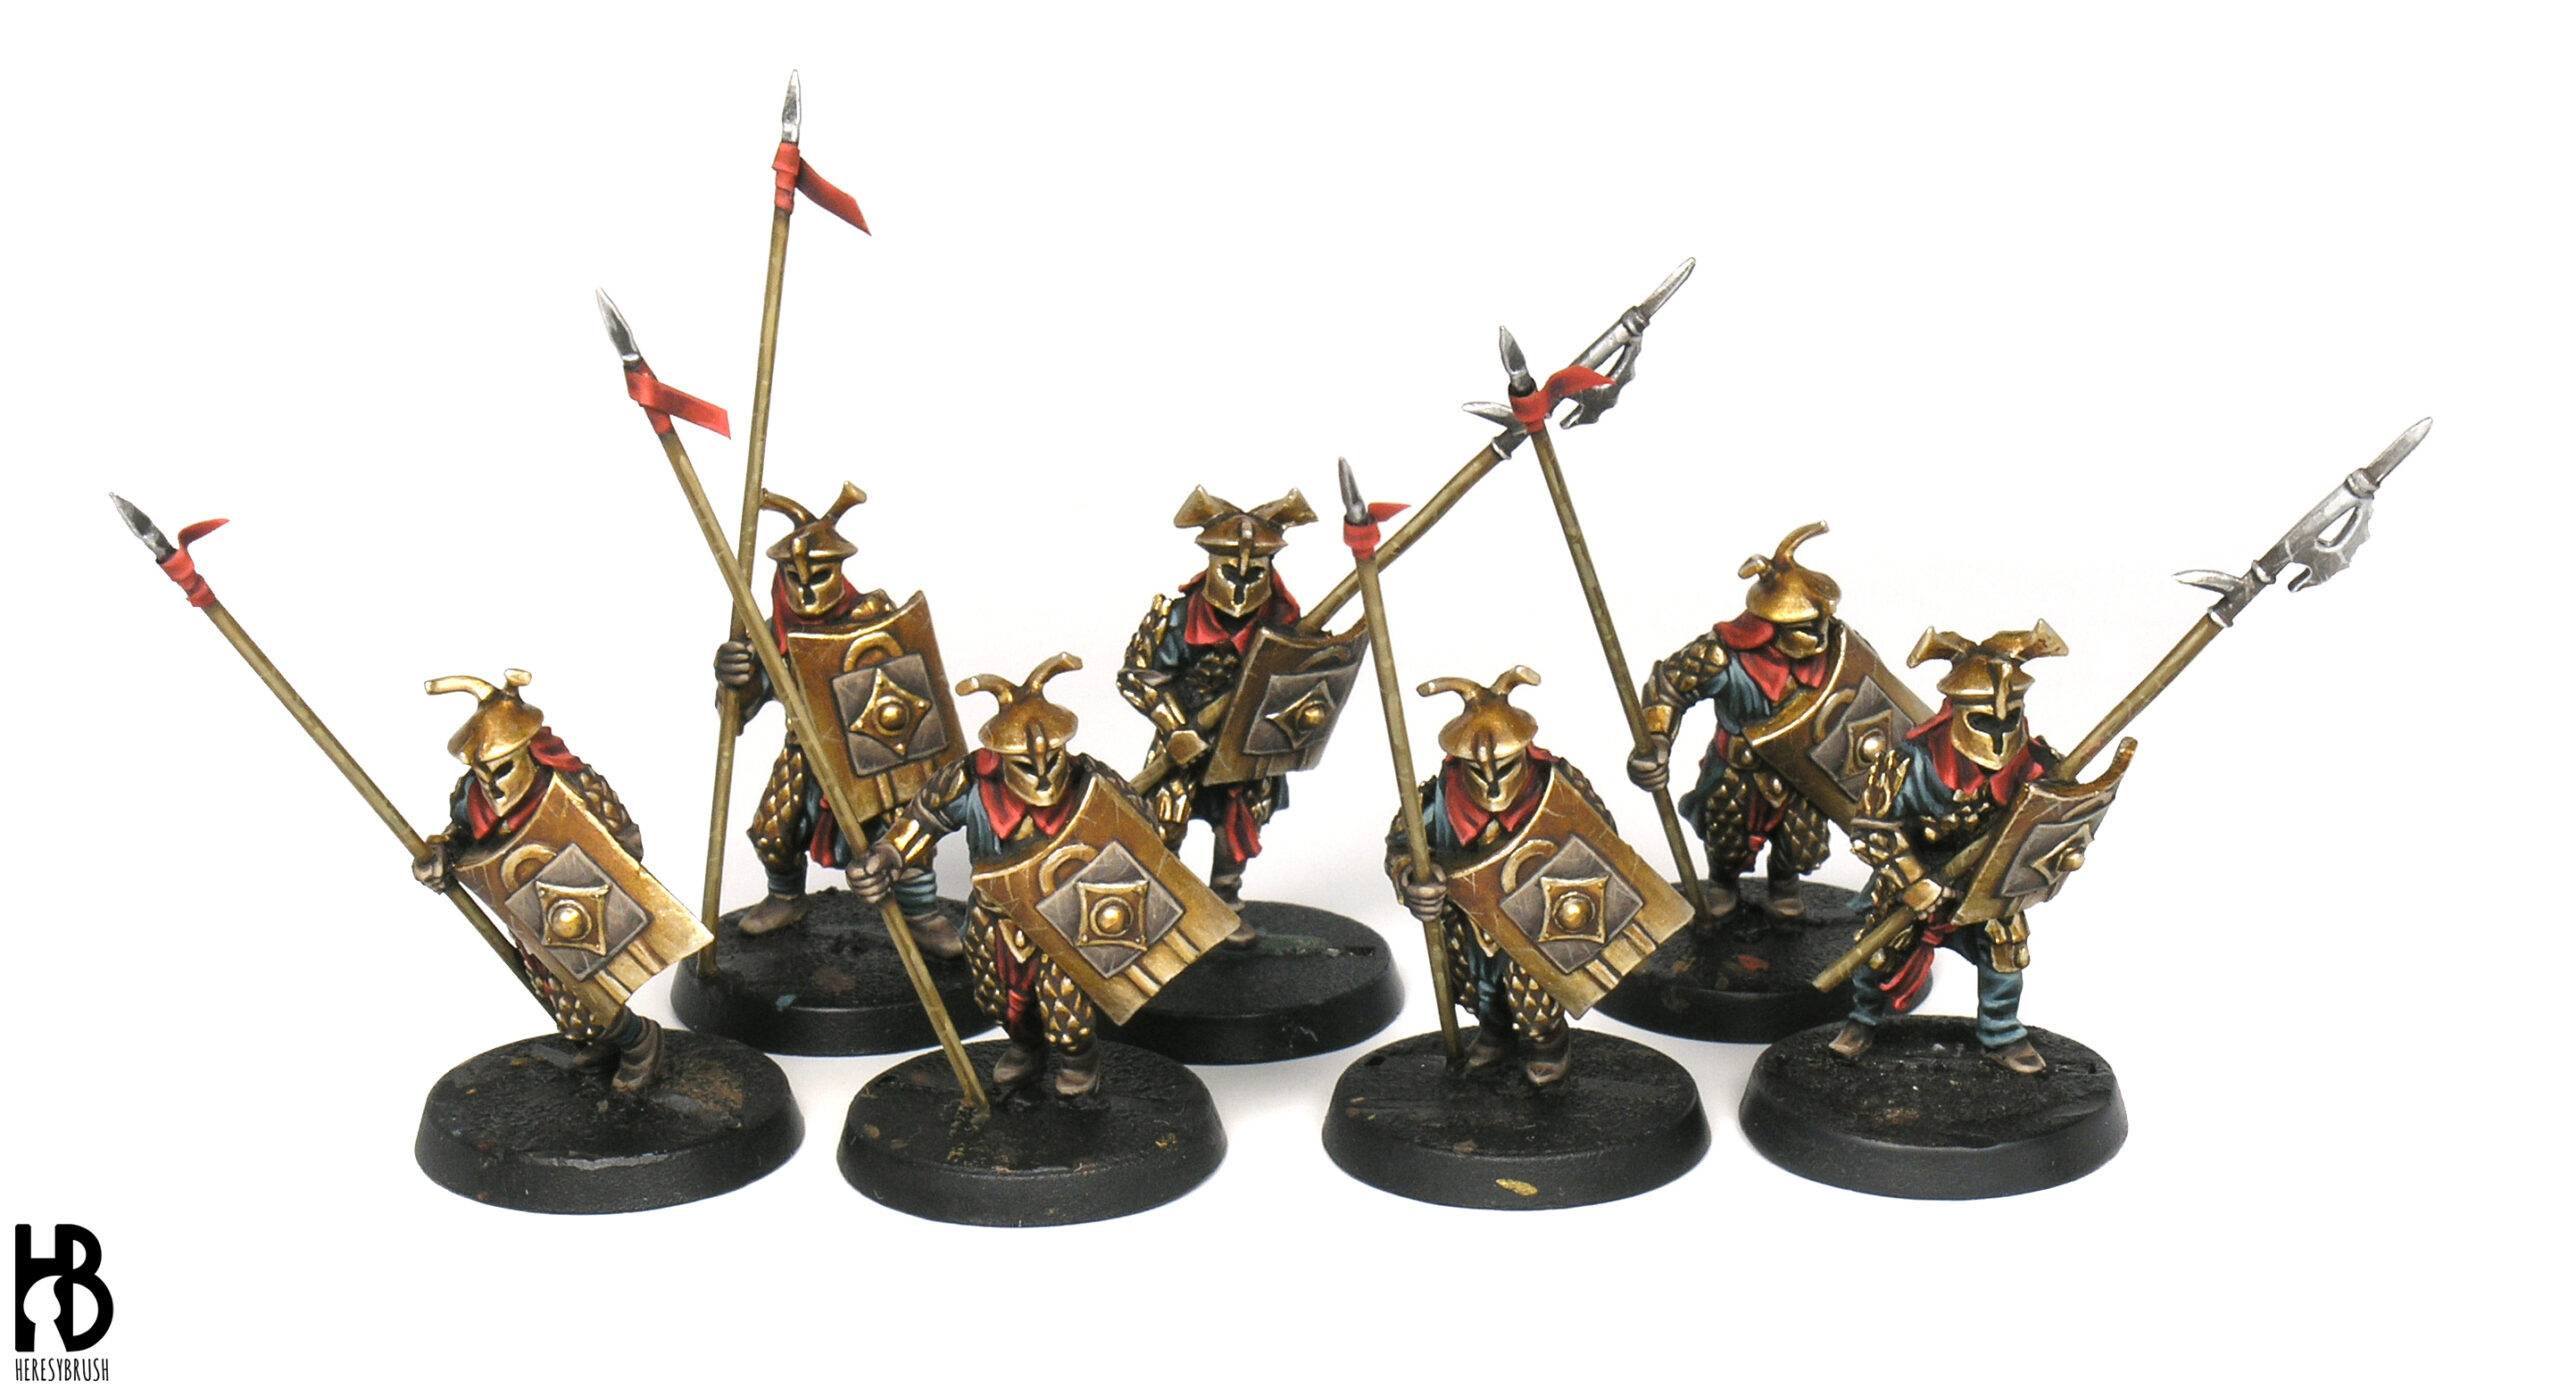
Final pictures:


These are absolutely gorgeous.
Thank you 🙂