Yes, yes. I am still alive. At least, at the moment. I am in the last step of my PhD, writing the thesis, and these weeks / months are being crazy. Hopefully everything will be done soon, and then I could continue painting every now and then while continuing working with mitochondria. However, my brushes did not stall completely these days. I have the need to scape a little bit from the reality of the world and I find in this hobby a great valve of scape. Therefore, I bring here a new post addressing how to prepare scenery bases. Using real sand as the common factor, I have already discussed this topic several times in my blog, including how to do mud, how to work with different types of substrates and how to obtain a realistic texture ready to be airbrushed. On the other hand, I also tried once to build a texture using only pigments. In these experiments, either I mixed the soil with white glue in order to create a paste to be spread on the base, I used the sand to create a random and realistic texture which was airbrushed afterwards or I enriched the raw soil by using enamels and pigments. In this case, I have followed a similar but still different approach. I have used the raw soil as such and then added a little bit of color by using enamel filters. Just subtle effects to slightly add some variation. Finally, I have added the vegetation. A little bit of very thin green sawdust to add another texture and then a great diversity of grass tufts. Different colours and sizes. Additionally, to break down a little bit more the monotony, I added some pieces of bindweed.
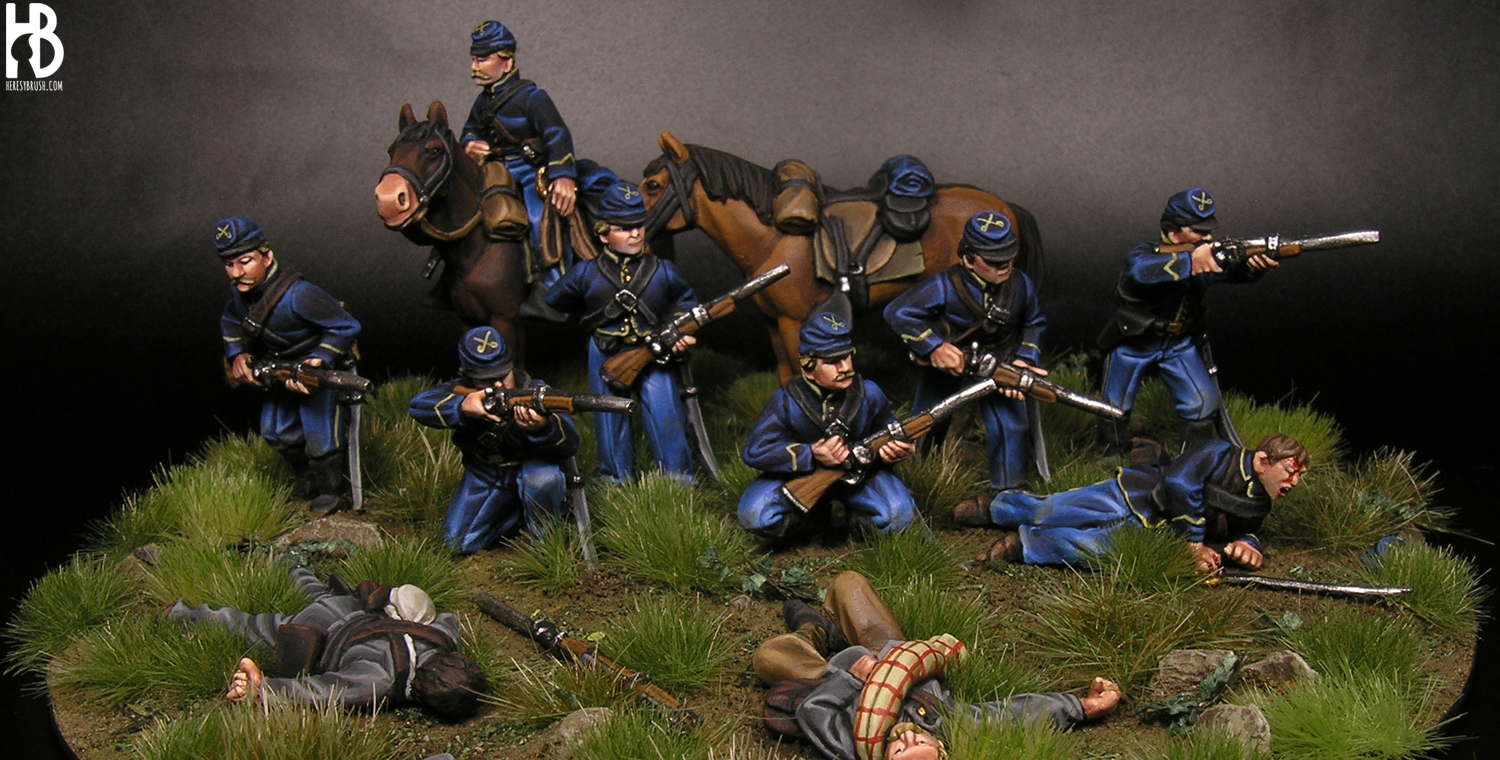
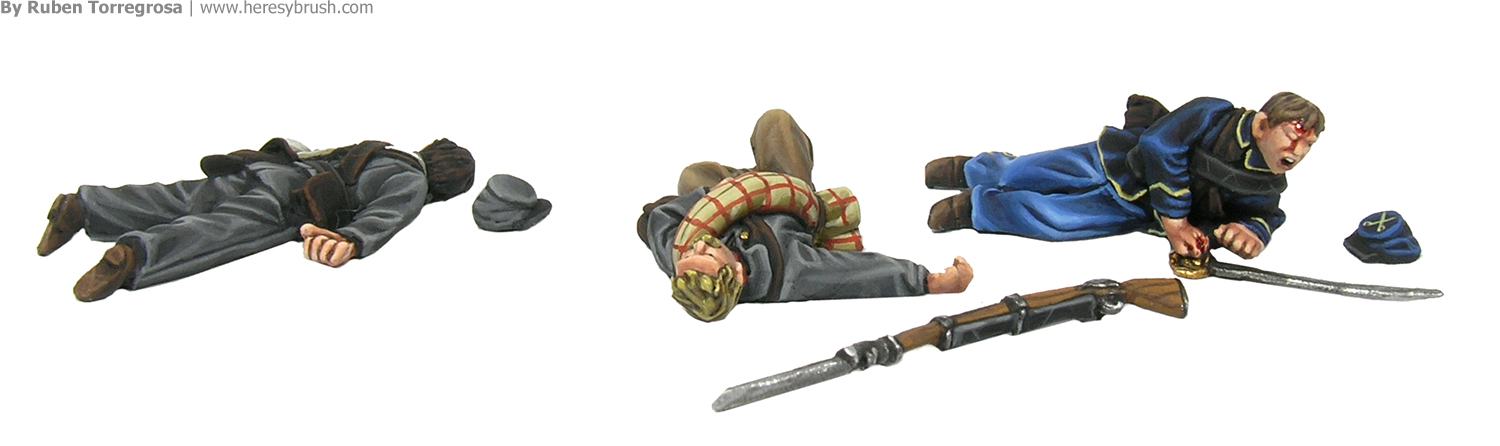
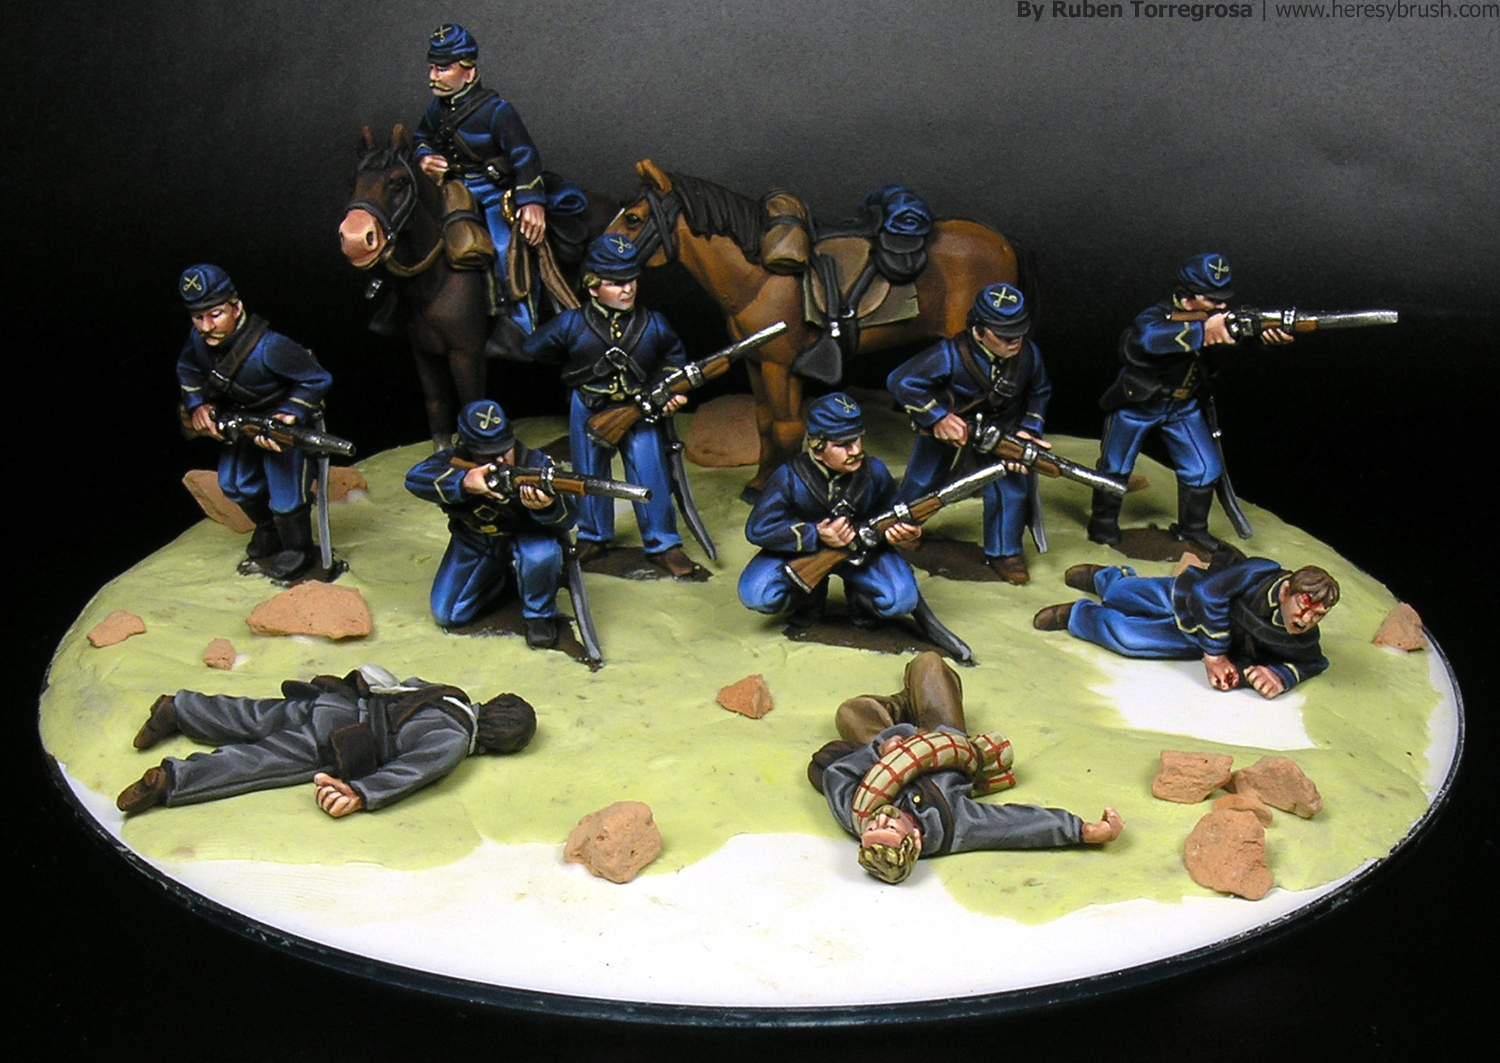
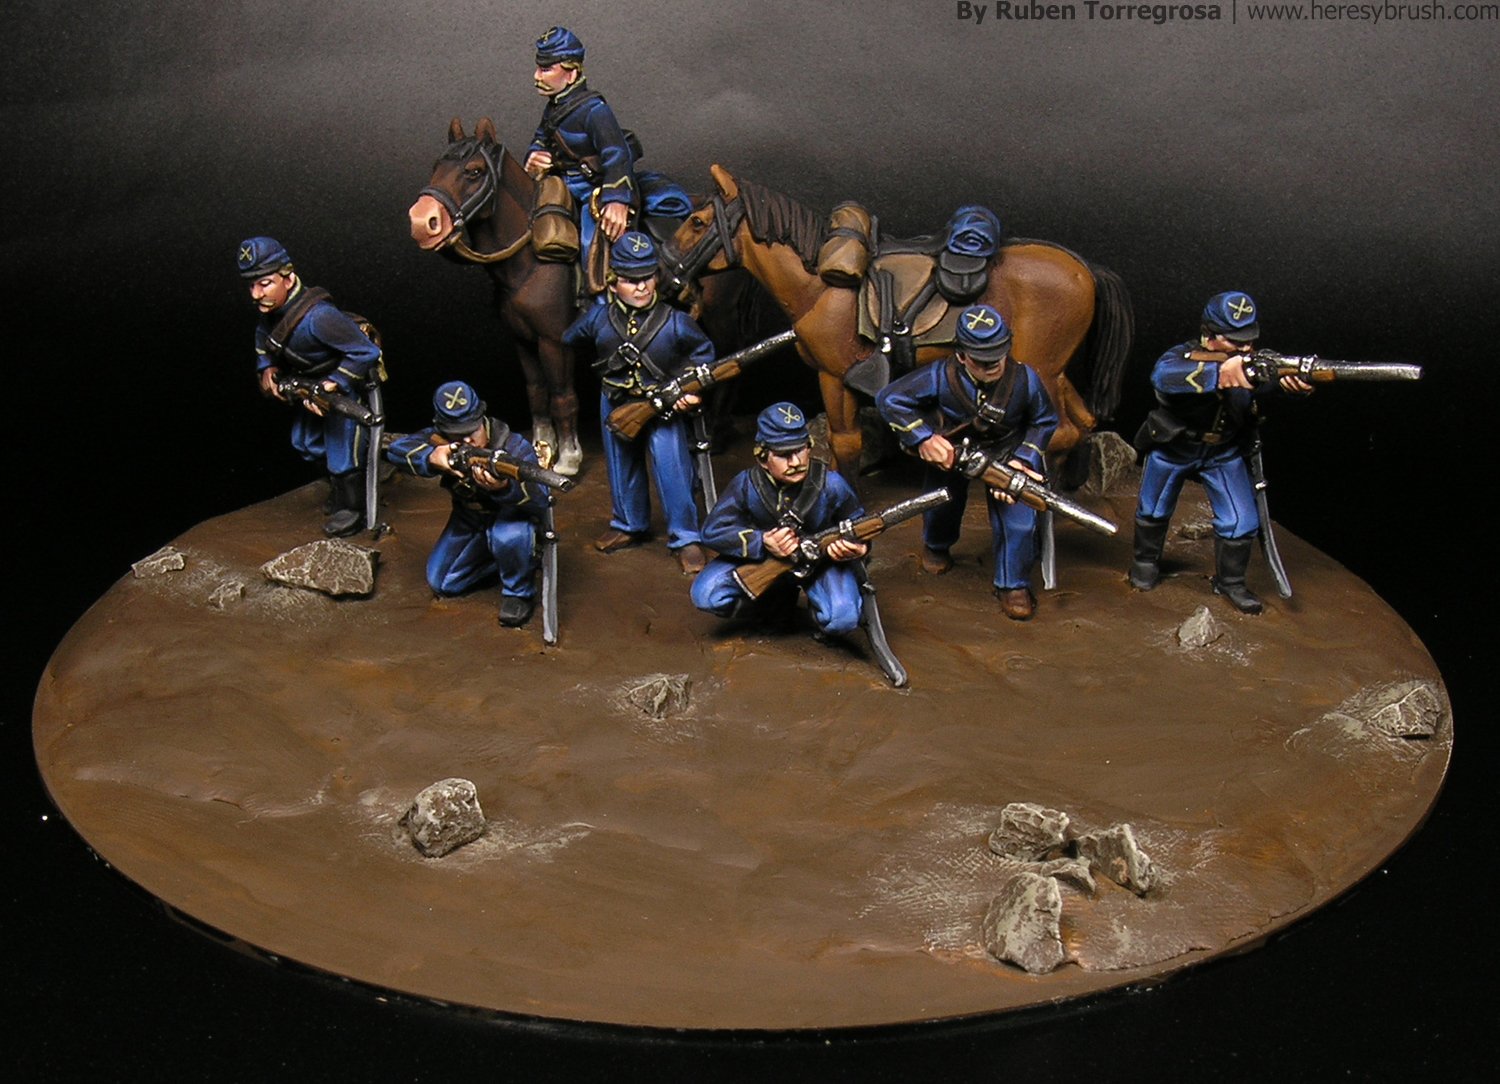
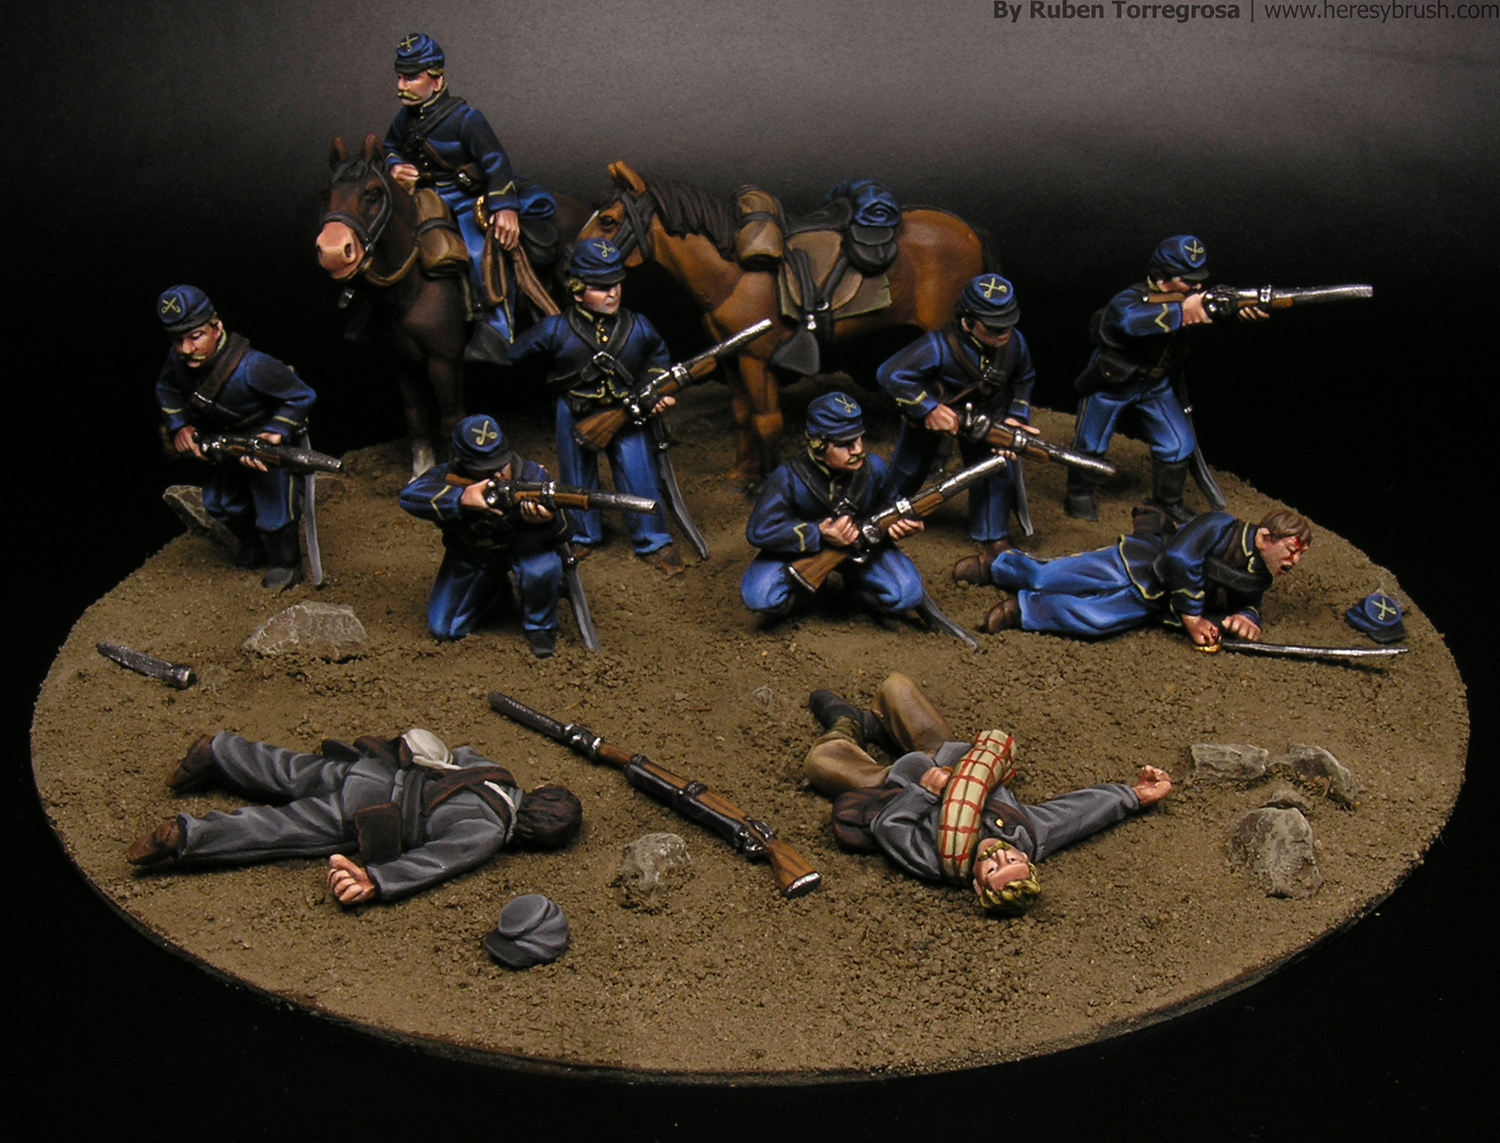
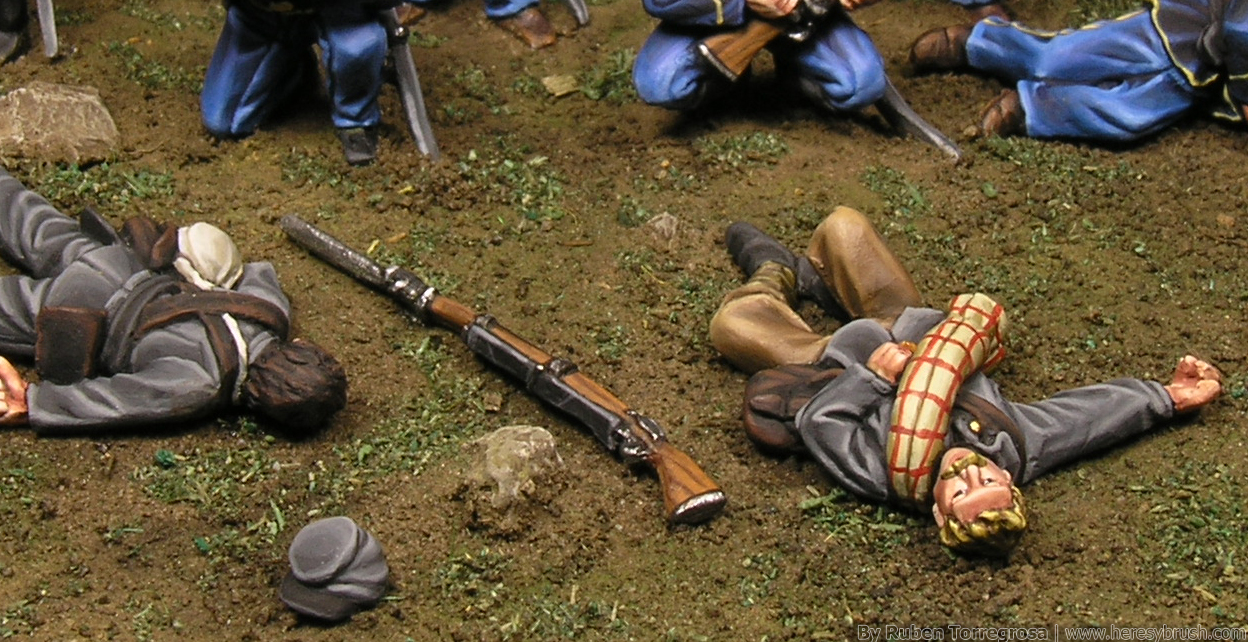
Before moving forward, I would like to explain a little bit the lore behind this vignette. I was honoured to prepare a new cover for the magazine Wargames: Solders&Strategy, whose theme was “raids during the American Civil War (ACW)”. I have barely touched this topic with my brushes, although I have to confess that I mastered my 15mm painting skills by painting a couple of hundreds of Conferate soldiers from Old Glory with the help of my brother. This happened roughly more than 10 years ago, and since that moment I have never touched this period again. Therefore, I was already a little bit excited about this ACW project, since it is always amazing to “rediscover” a painting topic. When I was told the theme of the cover, I immediately recalled one book I read several years ago. Intriguingly, it was one of the first (if not the first) anti-war book ever written: The red badge of courage, from Stephen Crane (1895). Until that moment, the war was in general terms always addressed form a romantic viewpoint. The war was the cradle of heroes, heroins and heroic actions; in some way, a road to perfection. In contrast, Stephen Crane (who did not participate in the ACW since he was born years later) reflected all the brutality and misery of the war. In this book, Crane tells the story of a young soldier that cannot cope with the war and run away from the battle, while describing all the horrors and consequences of the war. I really enjoyed this reading and it also changed how I contemplated the war. Therefore, as a tribute to this book I wanted to do something special in this diorama using the limited resources I have; that is, I cannot sculpt specific miniatures myself and I have to use what I have on hand. In this regard, I was only able to add two casualties along with one wounded soldier. The corpses would be in the front, as a reminder of the crude consequences of the war.
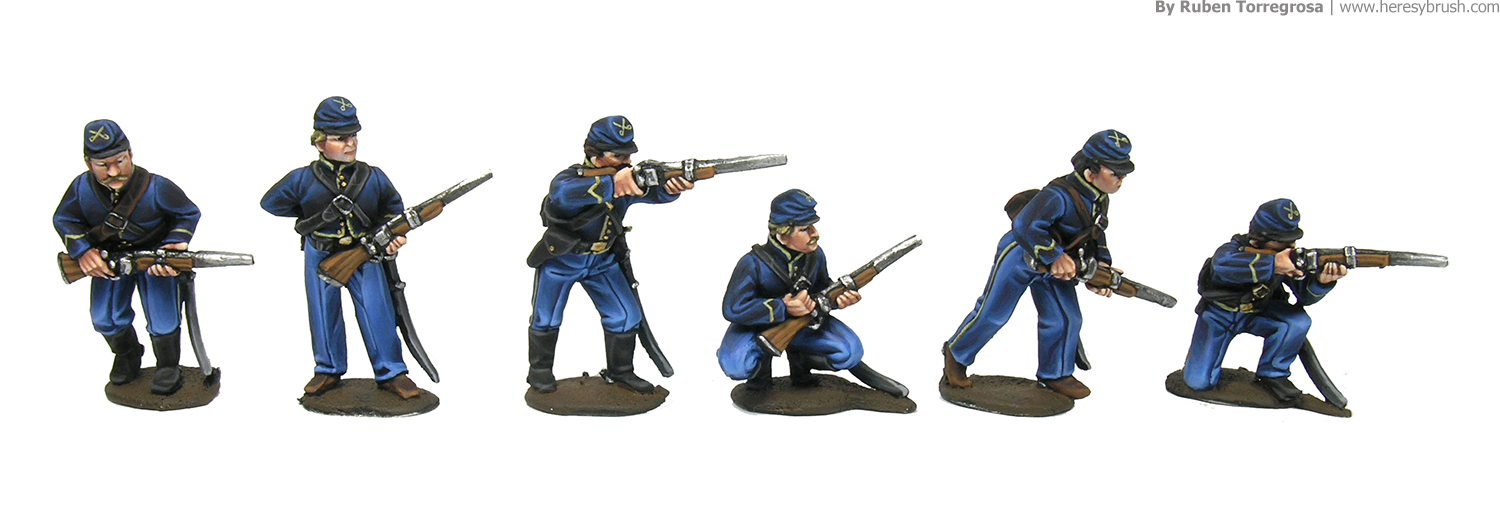
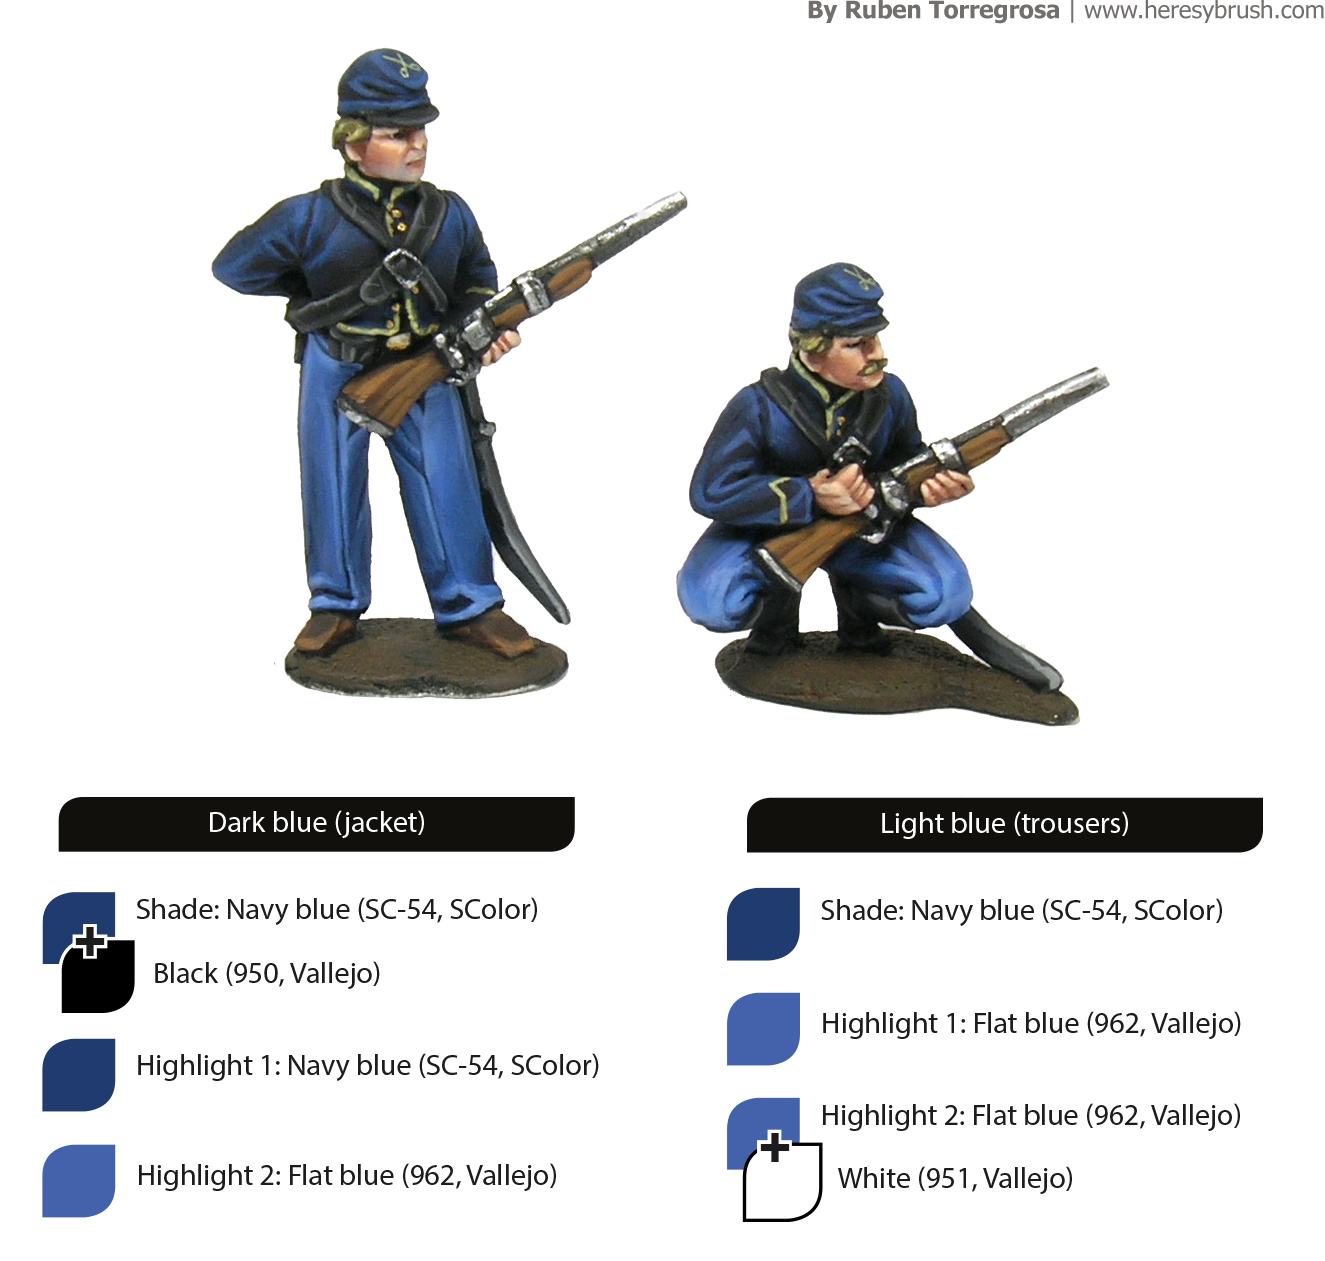
Let’s go back to the base. In this occasion I wanted to integrate the miniatures on the diorama base, instead of having each miniature its own base (as in the previous dioramas). Therefore, the first thing I had to do was to paint all the miniatures. The blue color is very grateful to paint, and using mainly Navy blue from ScaleColor and flat blue from Vallejo I obtain both colours for the jacket and trouser of the Union army, who continue using the oficial wooden uniform of the the American army. In contrast, the South decided to used a lighter and cotton grey uniform, since the weather was warmer there and they have tons of cotton. However, due to the action of the Union army, the South had a limited access to resources; and therefore, its army was badly dressed. One solution was either using civil clothes or used captured Union uniforms. To get rid of the blue color they boiled the clothes and/or stain them with butternut, baptising the resulting brownish uniform as butternut uniform. In the WSS magazine you can find more info about how I paint the blue Union uniform, but I would like to leave here at least the recipe:
Once the miniatures were painted and ready, I started working on the base. Since I did not get a wooden base on time, I decided to use a CD (with the data of my thesis, by the way). Flat dioramas are boring. Therefore, I added a second high with 3mm forex or foamed PVC. The idea was to place the Union soldiers on the rear, in the higher part. This subtle difference is enough to create a little bit of volume and break down the lack of realism of a flat surface. I use modelling putty to soften the difference between the two heights and to level the metal bases of the miniatures, and I added randomly some stones. Note that I did not glued yet the casualties nor the small details. I let it dry overnight.
Remember, my idea was to directly glue the sand and use it as such. I did not plan to paint it afterwards. This means that we need to used a solid color for the base before glueing the sand. Otherwise, the white and yellowish/greenish color of the putty might be visible afterwards, ruining the effect. For this propose, I used a dark brown color, such as chocolate brown, and apply a homogeneous layer covering the whole base. The only thing I painted were the stones. I basically apply a couple off dry-brusesh, first with a light brown color and then with ivory.
Now we can start adding the sand! For this propose we need two things. First, the sand. You can find in this other post how I got mine. Second, we need a liquid glue for fixing it, such as the Sand&Gravel Glue from AMMO of Mig Jimenez. White glue could be used instead, although the final texture is likely to be flatter. In contrast, this product is perfect as it does not dissolve the sand and it eventually evaporates, leaving the sand as it was added. The procedure to fix the sand can be separated in two steps. Initially, I spread the liquid glue over the surface with a brush, and then I start adding carefully the sand. After waiting 10 minutes, I remove the excess of sand and then with the help of a plastic pipette I add a second layer of liquid glue on top of the sand, and I add a second layer of sand on those areas where the texture does not look nice. Therefore, two layers of glue and two layers of sand. Note that this does not mean the second layer of sand must cover the all base again! only work on those areas that need a little bit more of texture. I did not glue the casualties yet, but I press them on place on the sand to accommodate them.
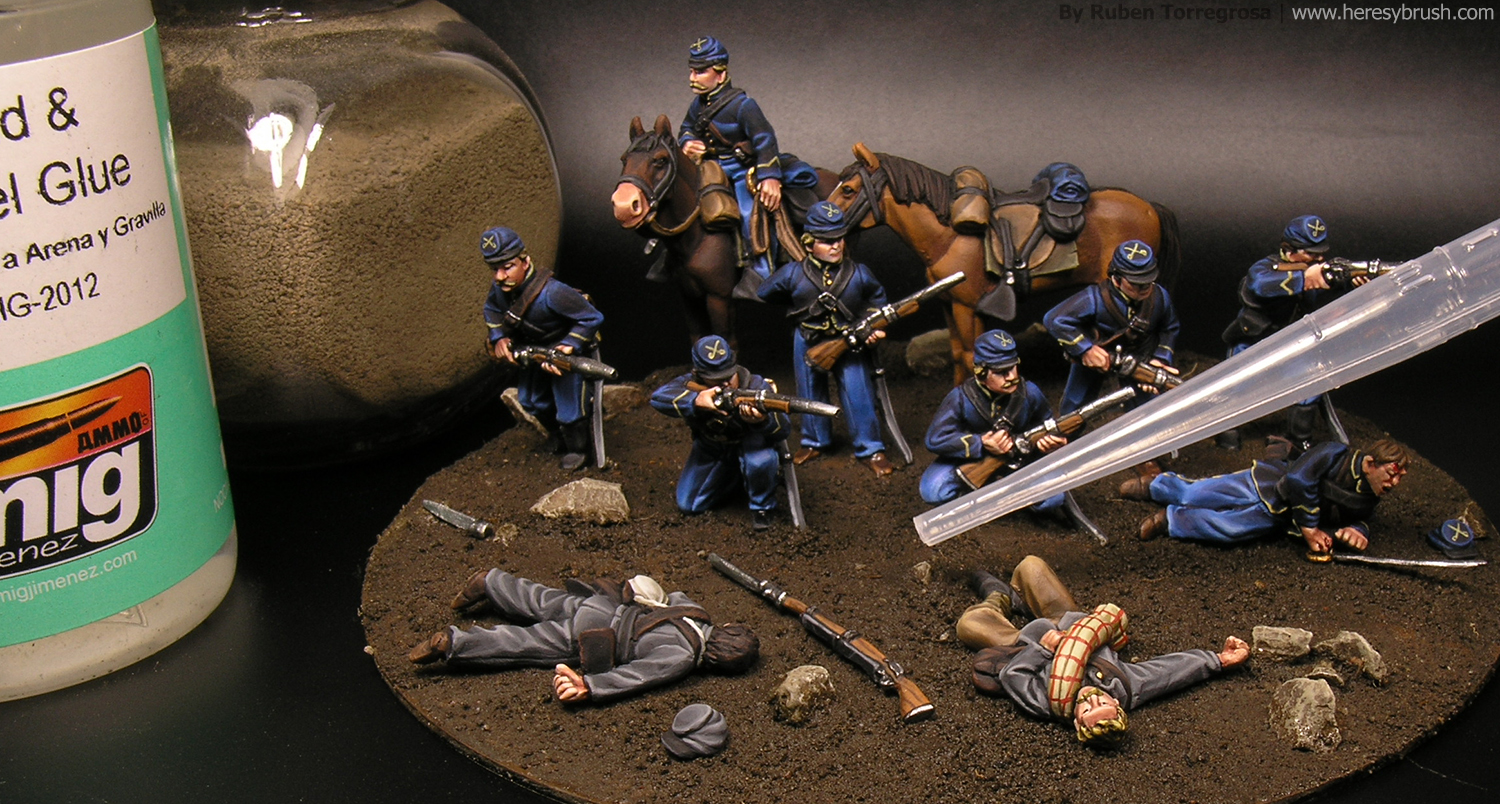
It took forever to dry or evaporate the glue (I finally used a hairdryer to speed it up). But the wait was worth it. Take a look. With a minimal effort we already have a very realistic base, with a perfect texture and color. There is no need to paint that and then apply dry-brushes, as canonically is done. Also note the huge advantage of this method: I glued the miniatures form the really beginning, and by following this method we have not ruined them at all, as usually is the case when we apply a dry-brush around them. Easy, “fast” and realistic. Can we ask for something else? In this step I glue the casualties with a little bit of white glue and / or cyanoacrylate.
However, we can improve this a little bit more. How? we do not want to entirely lose neither the texture nor the color. Therefore, we can use a filter: a very thinned paint to slightly change the color of the surface. AMMO of Mig Jimenez have a nice collection of ready-to-use enamel filters. Just open the jar and apply it. I use 3-4 different colours including several brown colours and green. The green color is one of the most important ones in our case. With it we are not only to create a baste contrast (it will compensate the excess of blue in the diorama), but we will also create the first layer of vegetation. Some moss or tiny grass. To apply the filters we can use a brush and randomly cover the surface. Do not follow any logic. Add a little bit of green here and there, then overlap this area with a yellowish color; and finish by adding a little bit of dark brown there. Random, random an random!
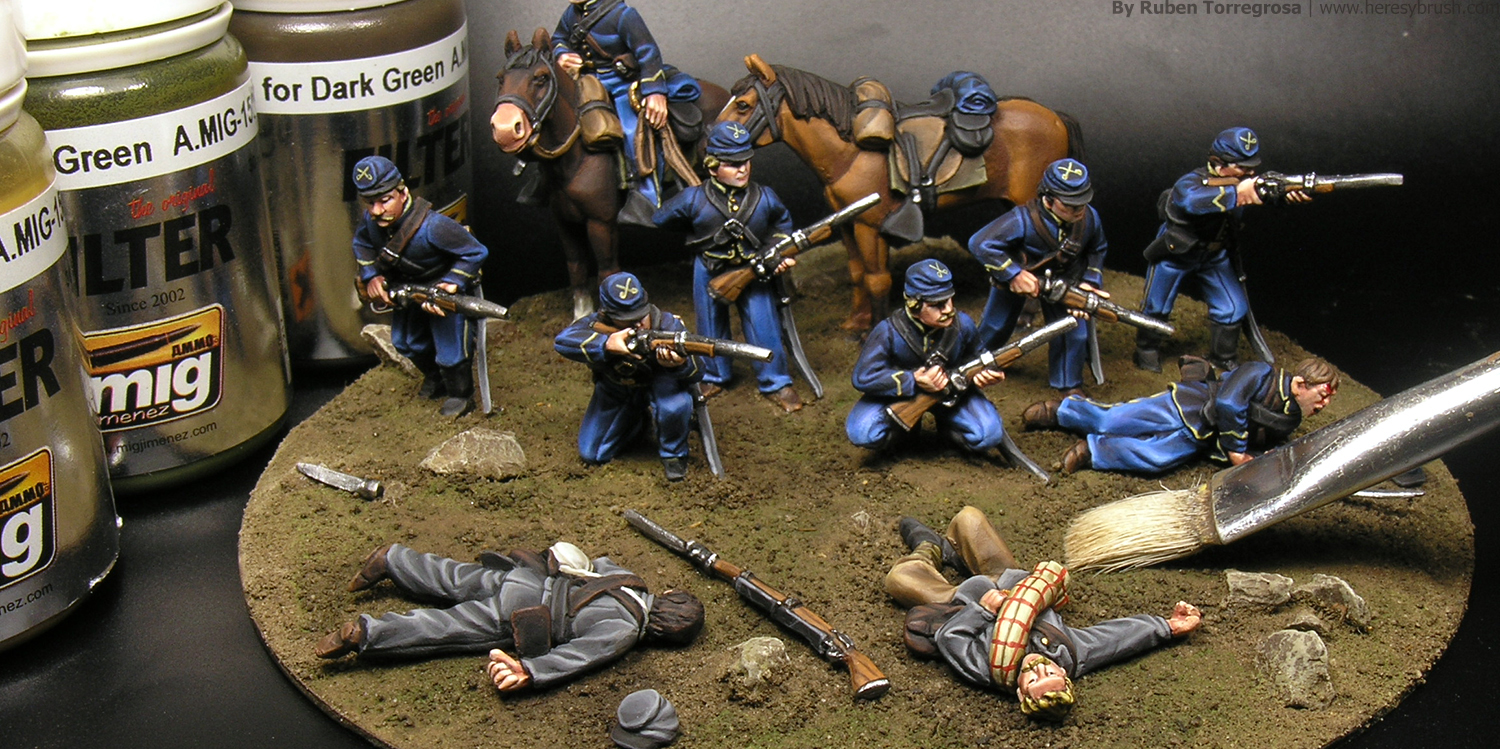
Once it is dry (it is a enamel and it will take a while), we can start adding the second layer of grass. In my case, I do not like much the hair-like modelling flock. Instead, I inherited from my father some kind of very thin green sawdust that looks amazing. I do not know what I will do when it is over… To glue it I used white glue thinned with water and randomly glue it on the base. Once again I did not follow any logic. Sometimes I overlap the green areas, sometimes not. Play with this variation. Also note that I did not cover large areas.
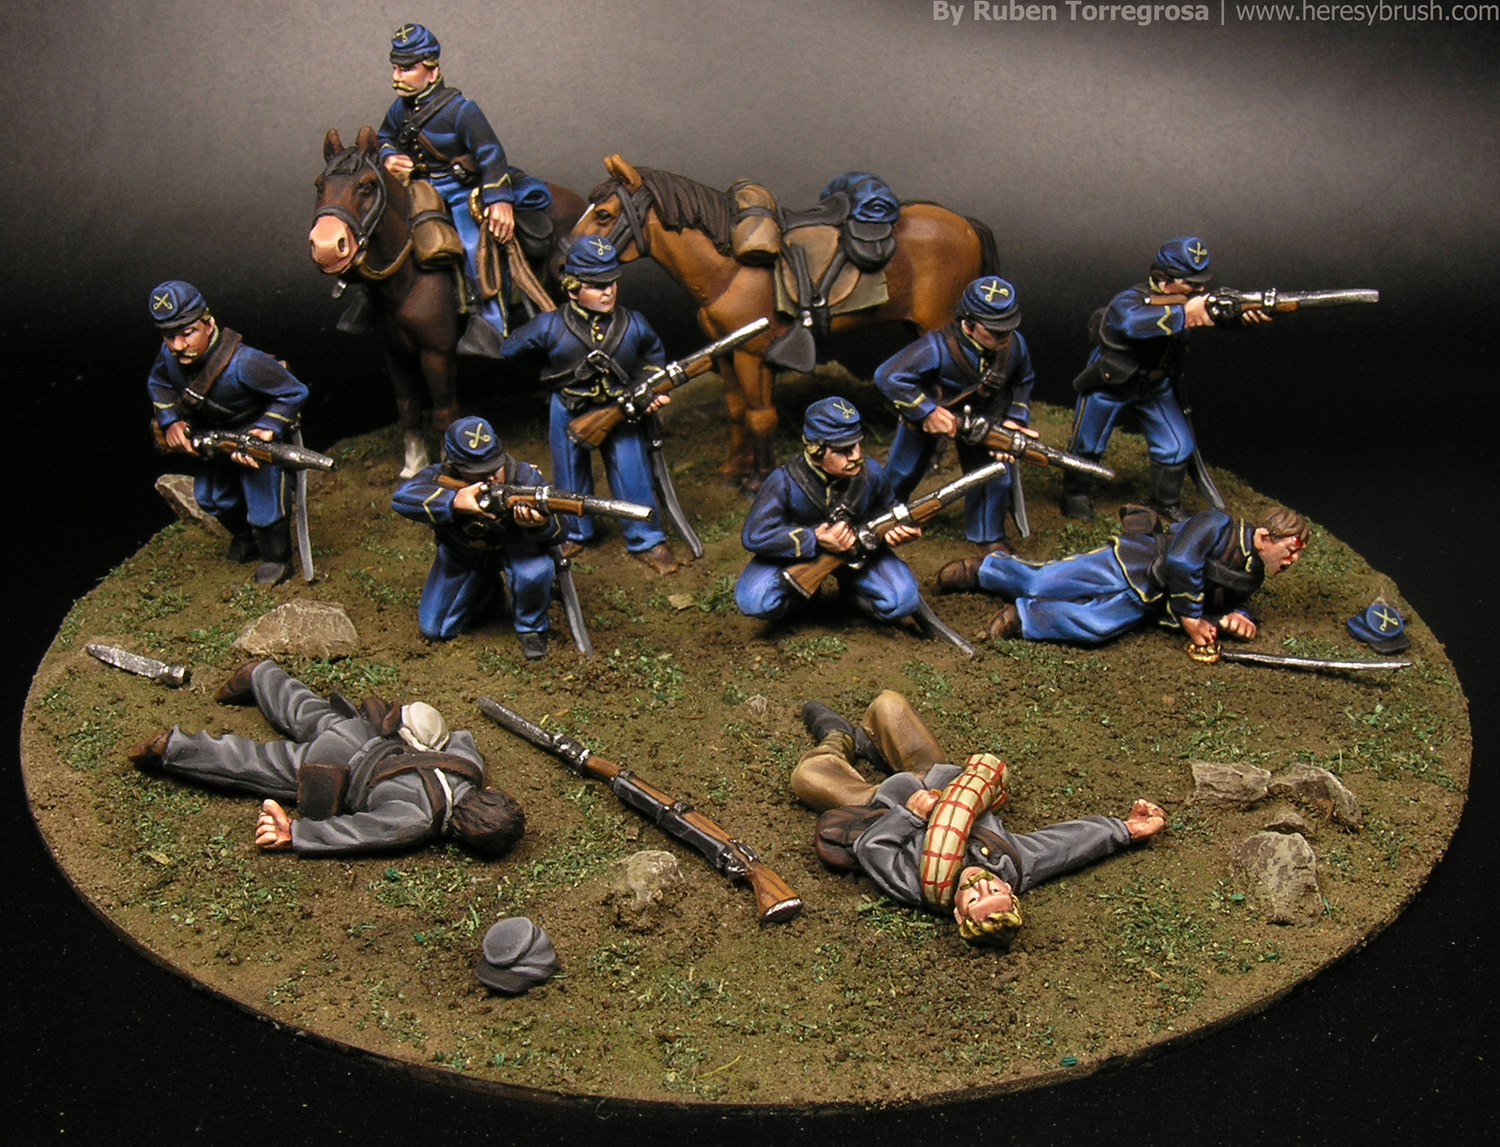
Finally, we work on the third and last layer of vegetation: the bushes. I have used everything I had on hand to add as much variation as I could. I have used grass tufts from Tajima1 of different colours and different sizes, which are auto-adhesive. To add another texture, I added randomly some pieces of blindweed or ivy from ArmyPainter. Note how many times I have repeated the word “random”. Randomness is one of the key words when creating the foliage on a diorama!
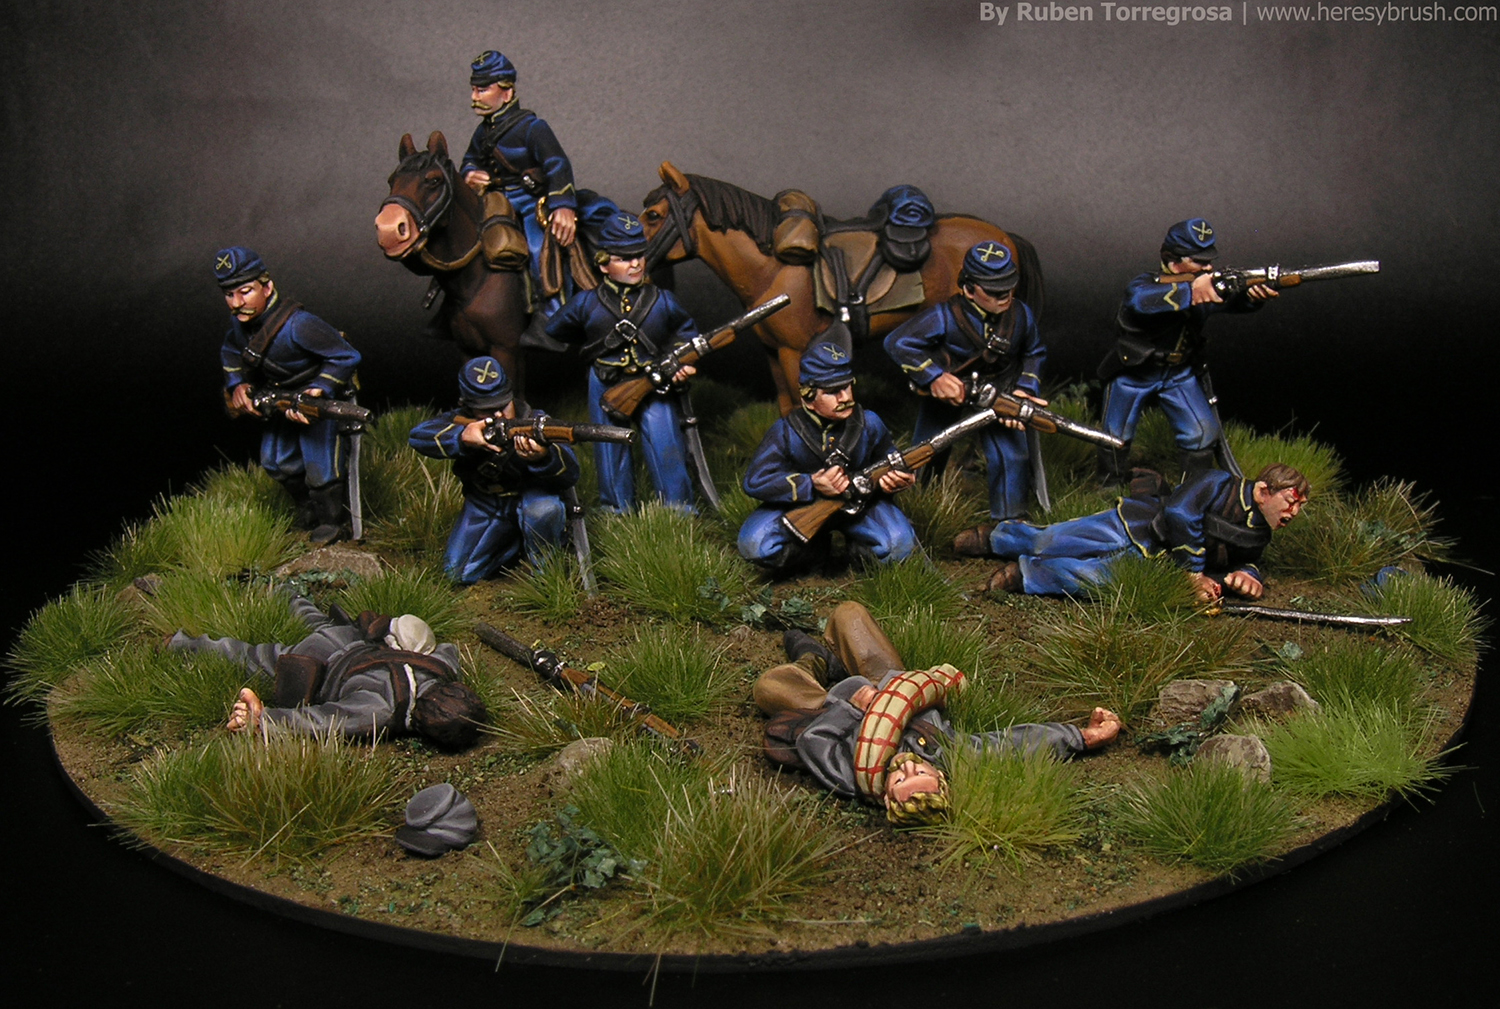
As a summary (& zoom in):
Step 1 – Paint the base with a dark brown color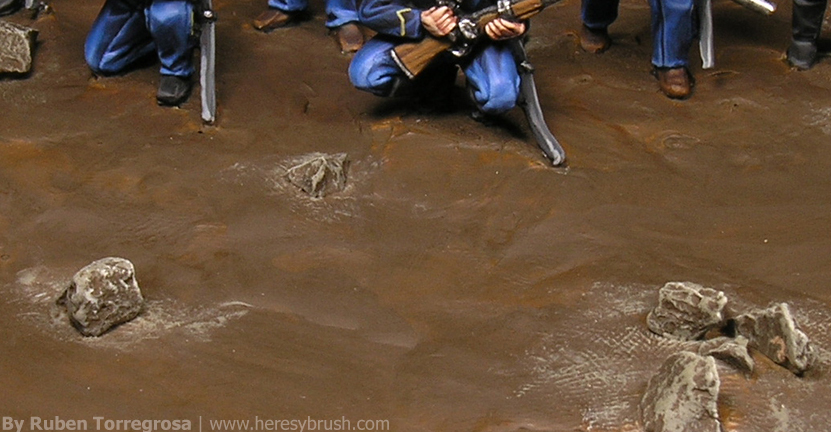
Step 2 – Pegamos la arena o sustrato con pegamento líquido / Fix the sand with liquid glue (i.e. Sand&Gravel glue from AMMO)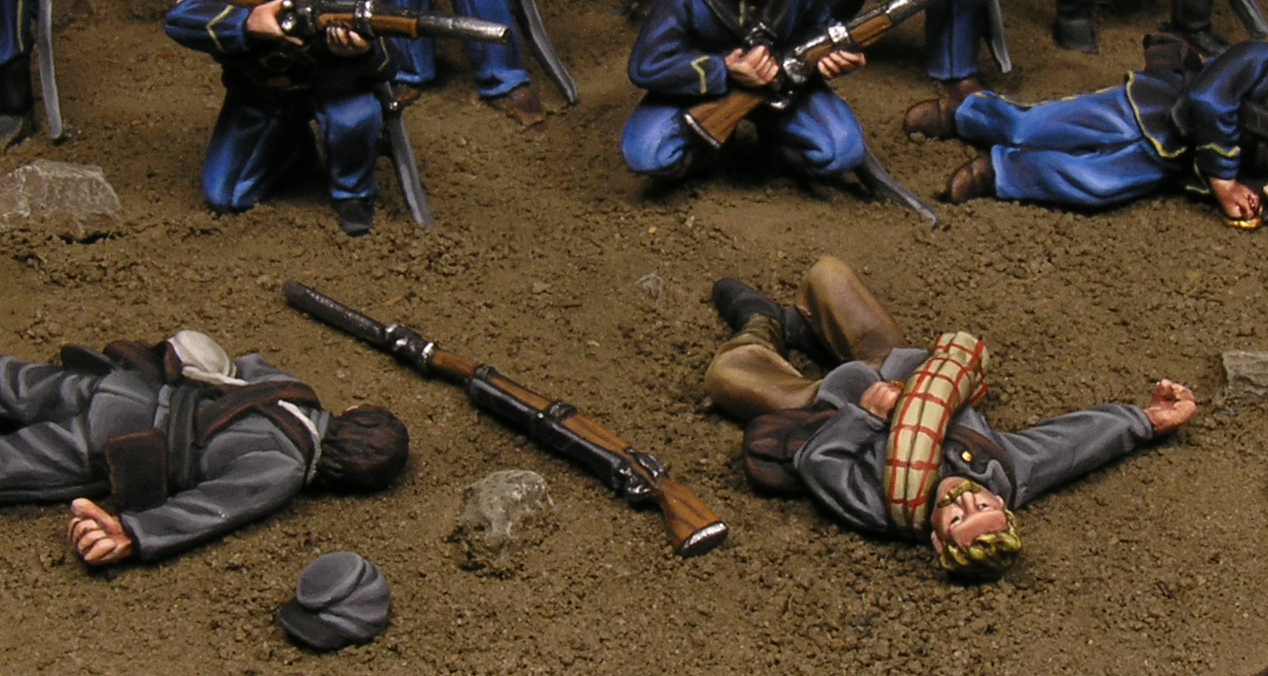
Step 3 – Add variation by using different enamel filters, specially green filters.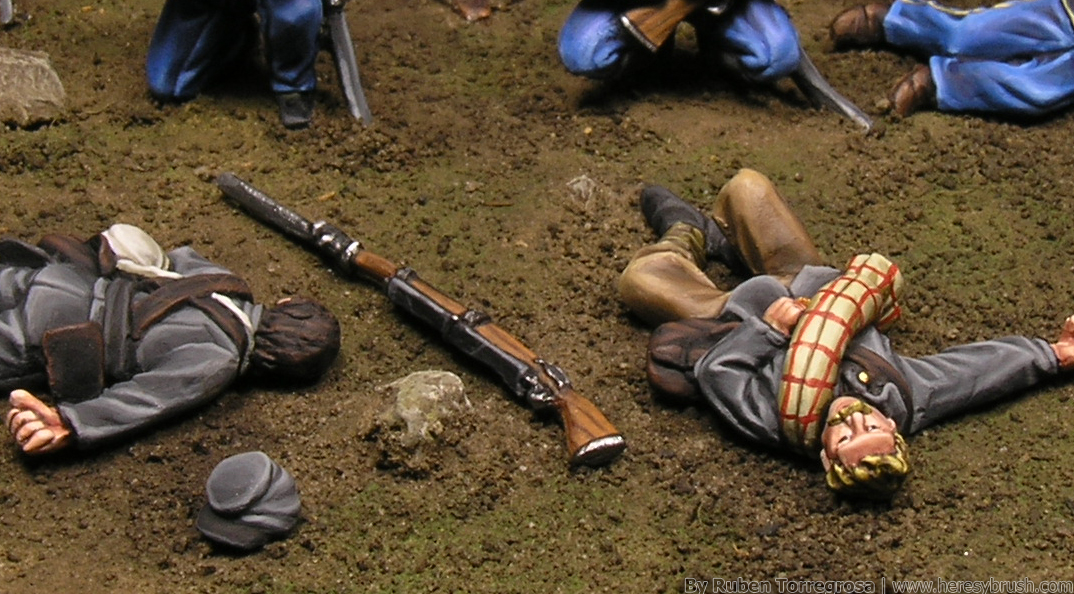
Step 4 – Add second layer of vegetation: sawdust or hair-like flock
Step 5 – Add the third and last layer of vegetation: grass tufts.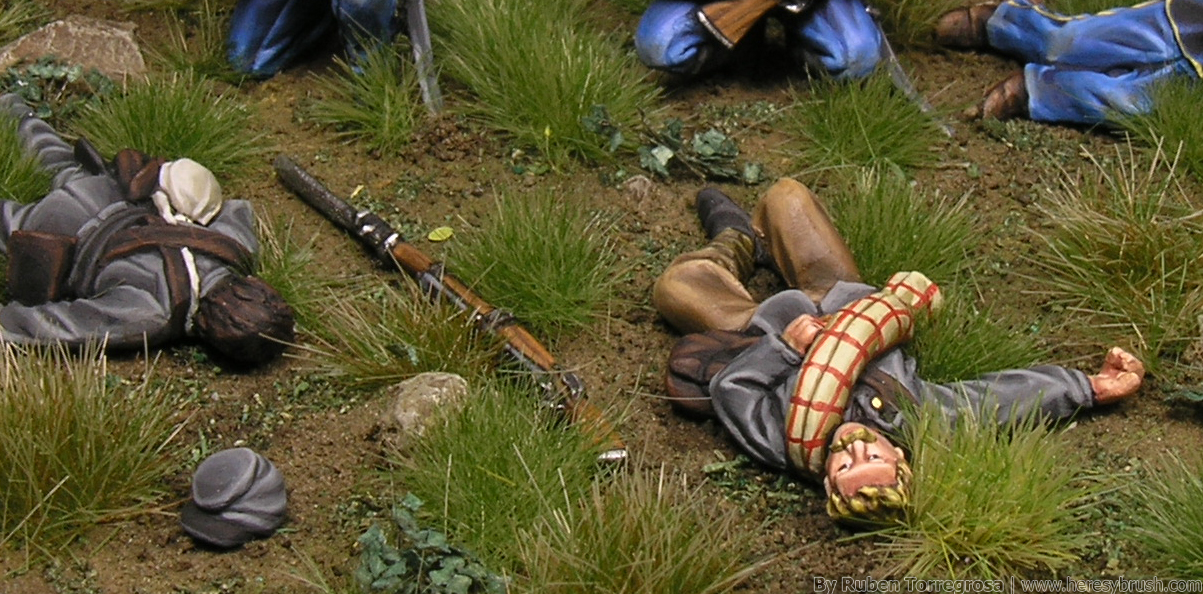
And remember, you can find a little bit more info about this scene in the latest issue of Wargames: Solders&Strategy along with a collection of very interesting wargaming articles. One of these articles is another painting guide I prepared featuring “street warriors” from the New Your of the 70-80, which belong to the game NYC street Wars from Funky games.