
I originally published this post seven years ago (in 2014). Since then, I have painted dozens (even hundreds) of small tanks and learnt from my mistakes. Therefore, I decided to update this article adding a few more pieces of knowledge based on my experience.
In this article I would like to talk about some of the most popular lighting systems applied on scale models (or at least, how I understand them), with a special focus on small tanks in 15mm or scale 1:100. I will briefly review and compare a few of them. If you like this topic, do not miss this book by AMMO.
We can find several lighting systems or styles in the scale-modelling world, especially in large scales such as 1/35. We can apply a complex pre-shading system where we create first a black and white grisaille, or more simple methods such as the classic zenithal lighting or even just a simple plain color without lights. Personally, I do not think that one method is better than another is. Each method has its advantages and downsides. Obviously, the quality of the results is directly proportionally to the time spent painting, but we cannot forget that some methods require certain skills, especially with the airbrush. For the wargames players like me, the choice between one method and another will mainly depend on the available free time to paint (as we normally need to find the balance between painting and playing).
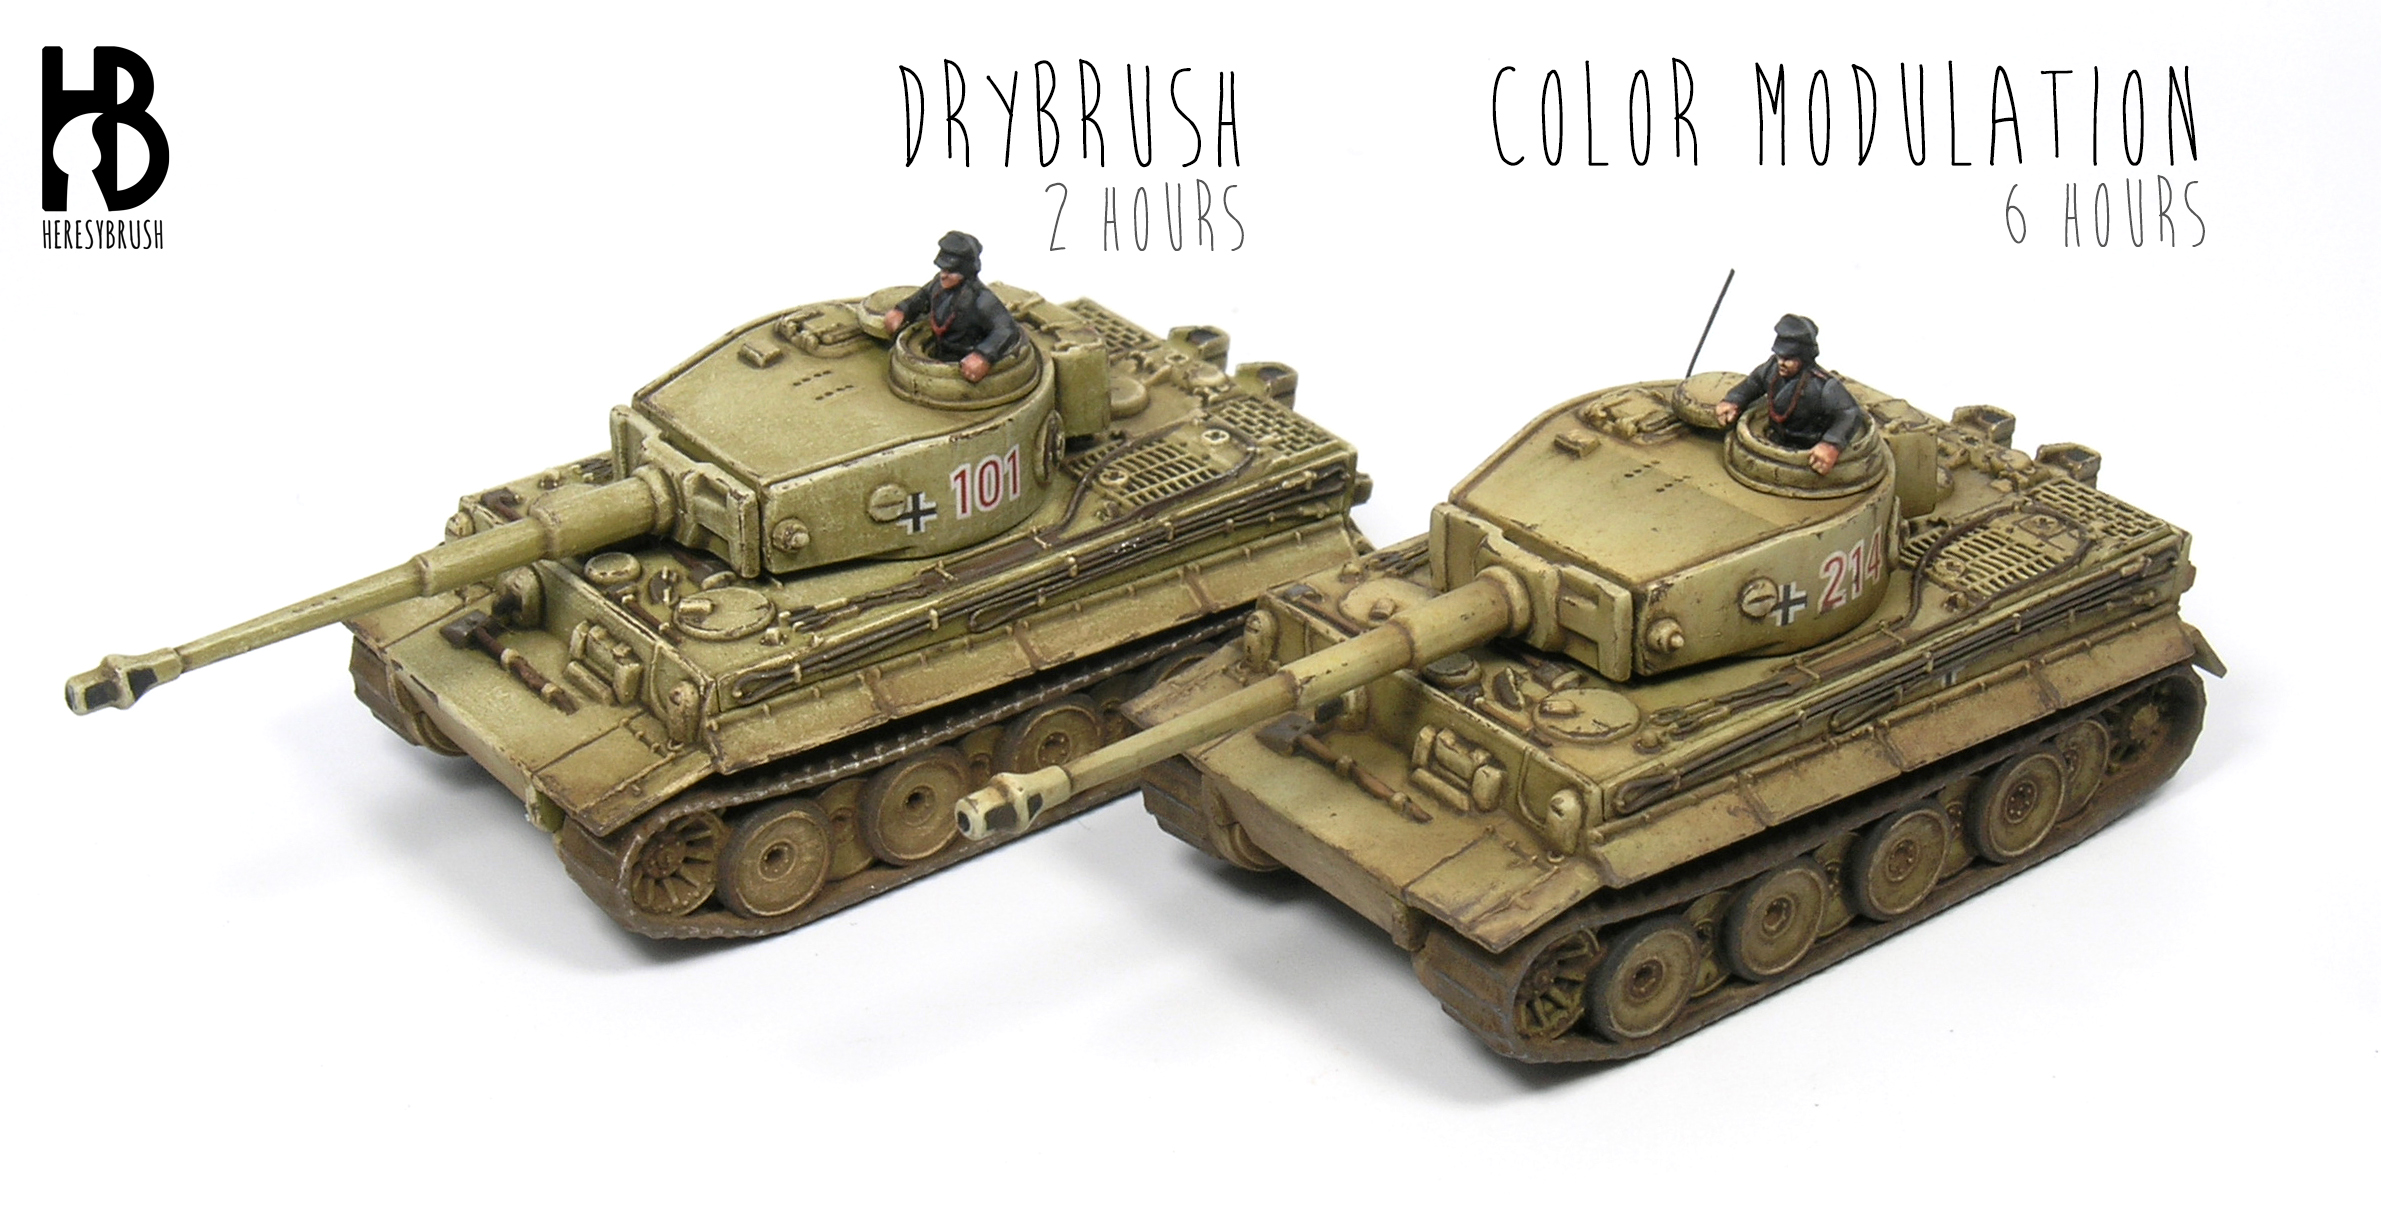
Probably you already noticed that I have indicated in the pictures the approximated time –in hours- dedicated to each method. This time also includes the application of weathering effects (although not the drying time for enamels), which can be more or less complex also depending on the time we have available or want to spend.
We are going to discuss the following lighting systems:
- No lights
- Zenithal lighting
- Panel lighting
- Color Modulation
- Pre-shading
1. No lights
Do we really need lights? Vehicles in real life are painted in a plain color and the lights and shades are generated when the sun hits them: those areas with more light will look lighter; and those with less light, darker. The application of this option in our tiny tanks is the fastest, since we only need to apply the desired color and forget about mixing colors or using other paints to create lights and shades. We could even use a primer can with the right color to save more time.
However, the biggest problem of 15mm (1:100 scale) models is precisely their small size. The smaller is an object or surface, the smaller is the amount of light reflected. This means that our tiny tanks will look much darker than the vehicle in real life, even though we use the exact color. Therefore, if we decide to follow this approach and apply only one color (without lights and shades), it is recommendable to apply a slightly lighter color than the correct one.
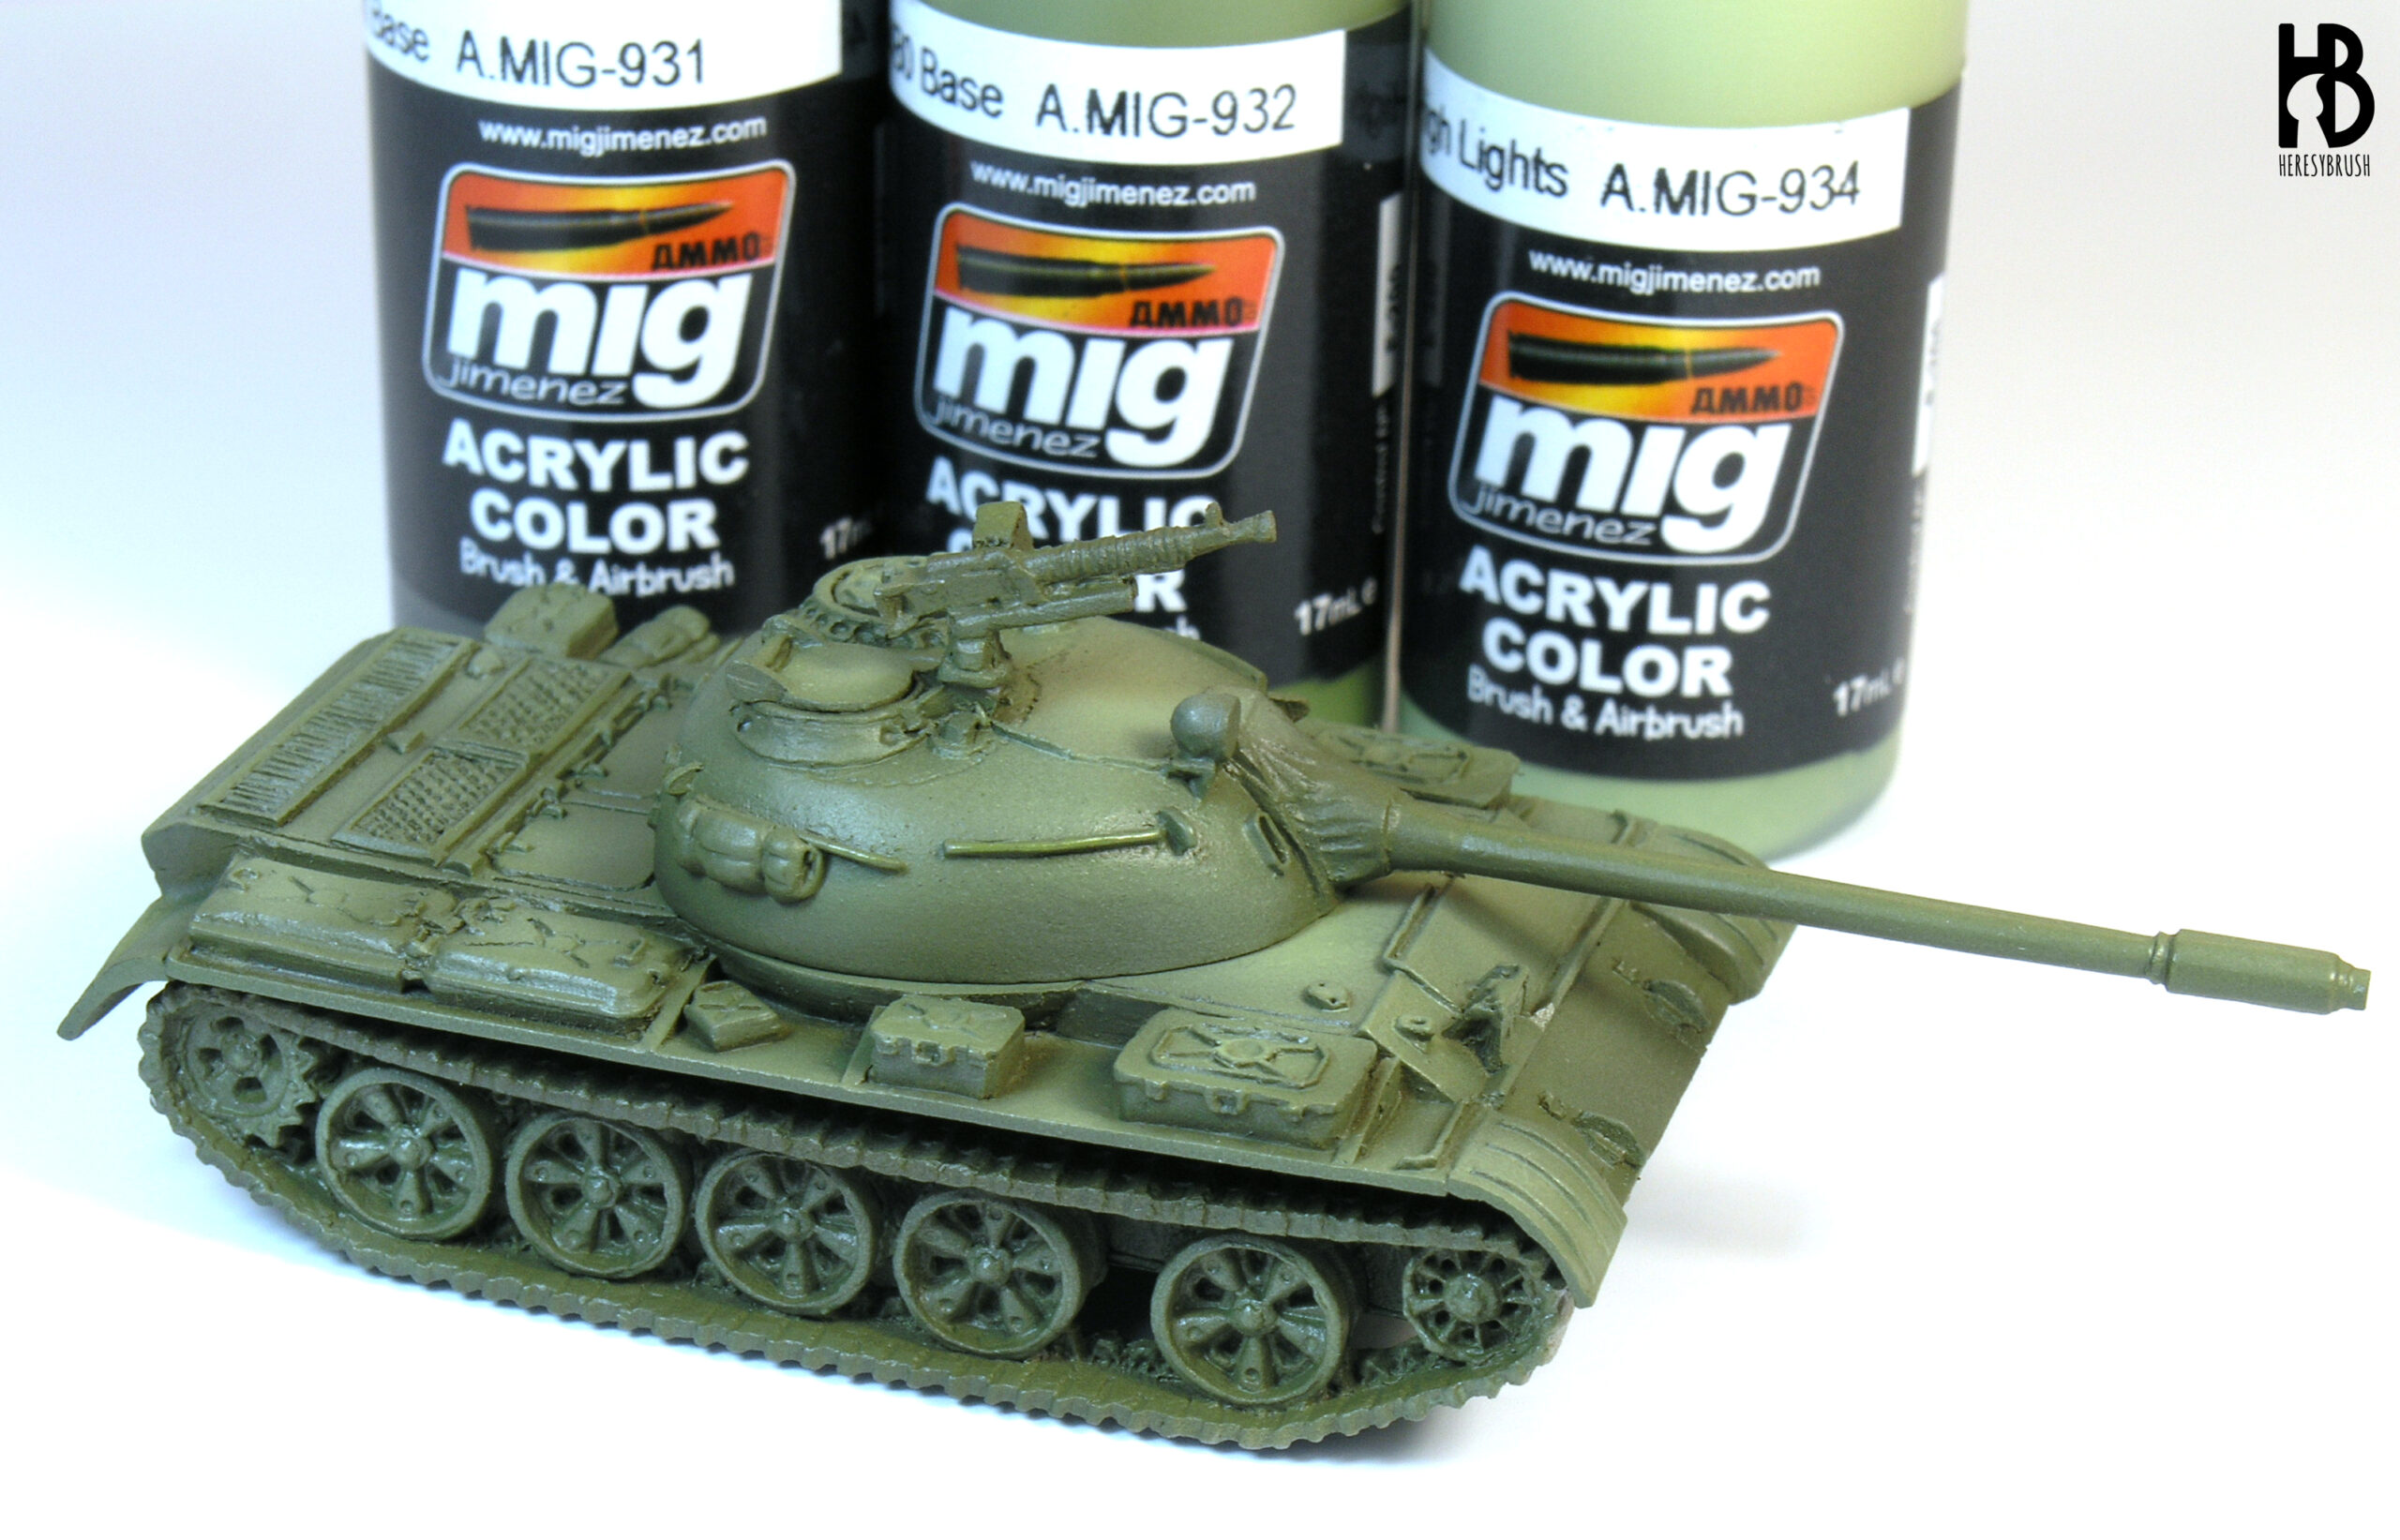
For example, and following this idea, if we use one of the modulation sets of AMMO (set of four consecutive colors from the darker to the lighter shade), we should use the “Base Light” instead of “Base” as our initial base coat. Additionally, we can further lighten the model by applying a general drybrush with a lighter color. This will also stand out the details. In the picture below, we can see a T-54 tank airbrushed initially with Base Lights (A.MIG-932), and then lighten by drybrushing Russian High Lights (A.MIG-934). As you can see, I did not use base (A.MIG-931) as the starting color.
Similarly, if we decide to use a primer of a given color, we should apply at least one drybrush layer to lighten the base coat. For example, if we start applying a dark yellow or dunkelgelb using a primer spray can (like this), we cold lighten it by applying two drybrush layers: first with Earth (A.MIG-0619) and then with Dark Sand (A.MIG-0620). I used two layers here to create more contrast. To illustrate this process you can have a look at this painting guide of a 12mm Tiger I tank.
Note that this method is the most use friendly, specially for people that do not have an airbrush or does not know how to use it. All the other methods we will see next imply the utilization of an airbrush.

On the other hand, we can also apply a single color and then later create the volumes (that is, lights and shades) using oils. This is what the master Michael Rinaldi normally does following his oil paint rendering method. The idea is simple: we use dark oil colors to darken a given surface or part of it, and light oil colors to lighten it. For example, if we follow a zenithal lighting, we do it so that the lightest part of a surface or panel is the upper area and the darkest the lowest. Of course we can use this method not only to create the lights and shade, but to create other weathering effects including dust and rust. Although our 15mm tanks have a very small size, this method is perfectly feasible.
To work with oils we have several options. We can first apply a small amount of different oil colors (for example, dark tones to create a shade) and then blend them with a brush moistened with White Spirit or turpentine. This is how Rinaldi normally does it. Alternatively, we can create and apply a filter. A filter is a very thin layer of paint that slightly change the color of the surface where it is applied. For example, we can apply a dark brown filter to darken the lower part of a panel to create the shades. To create a filter we can use normal oil or enamel paints that are thinned down 1:10 with white spirit or turpentine (9 parts of thinner and 1 of paint). Or we can use ready-to-use enamel products for this particular effect, such as the enamel filters of AMMO. Alternatively, AMMO has recently released two new types of products that are not toxic like oils or enamels: Shaders and acrylic filters. Both can be applied with the brush or airbrush and work as filters. Very importantly, remember that regardless of the type of filter you use, when we apply a filter with the brush is extremely important to brush off part of the paint on a piece of paper before moving to the tank. We should apply a very thin layer of paint rather than overflow the surface.

2. Zenithal lighting
Although quick, the main issue of the previous system is that the results are very flat (unless we use oils to create volumes). If we want to create contrast to bring our miniatures to life in the battlefield, we need to apply a more elaborated lighting.
Probably, the most commonly used lighting system in scale modelling is the zenithal lighting. This system is not only the closest to reality, but also one of the easiest. To apply it we need to imagine a source of light on top of the tank –representing the sun- and then apply the corresponding lights using the airbrush.
We normally apply the highlights on the upper part of the tank, leaving the dark color in the lower areas. To do it we can easily airbrush the light color from the top of the tank, in a 45-90 º respect to the model. Or if we want to do it more accurately, we can place the model beneath a lamp (our “sun”) to see where the lights should be exactly located. We can take a photo with the phone and use it as a reference. When using this method, I like to use at least two consecutive lights with the airbrush to create enough contrast between the darkest and lightest areas.
Nevertheless, the result is not defined given that we are not separating the different parts of the tank. The problem is that when we apply a general highlight from the top of the tank we merge the different panels and details (e.g. hatches, rivets, etc), creating an optic effect of continuity. Although this method works fine in large scales, in 15mm we are losing too much definition. Remember that definition is very important to create contrast, which in turn plays a key role in our small tanks, as we need to make them bright on the battlefield.
Of course, we can solve this problem later by simply applying a dark wash to stand out all the recesses and details as well as to separate the panels. We will preferentially use an enamel wash because it will facilitate this task. Acrylic paints dry in seconds, and once dry we cannot do anything. Enamels dry in hours. Therefore, we can apply an enamel wash on the recesses (this is a “pin-wash”), let it partially dry for 30-60 minutes and then remove the excess of wash using a brush moistened with white spirit or turpentine. After this, the enamel wash will remain only on the recesses. (I have explained this process a dozens of times in the blog, for example here).

3. Panel Lighting
In this lighting style, we work each panel (surface) individually; applying lights and shades in different parts of the panels or the vehicle to create contrast. We will often do this ignoring the zenithal light. Although this method is not that real, it will generate more contrast than the classical zenithal lighting system.
In my opinion, we can follow two approaches to apply this system. On one side, we can paint the tank first with the base coat and then airbrush the lights only in the central part of each panel, leaving the edges dark. On the other hand, we can do exactly the opposite. We can first apply a light color all over the tank, and then use a dark color to carefully stand out all the recesses and lines between panels. The latter option is commonly use in large scale (especially planes), but in my opinion it is not possible to apply in 15mm due to its small size. Note that we can always invert this lighting style, and apply the light exactly in the joints between panels, leaving the central area dark.
To be honest, I have never tried this method myself. I personally prefer to spend a little bit more time and apply a color modulation (see next section). Given that I do not have any example picture of this method, you can see below a collection of cartoons comparing three different lighting systems: color modulation, panel lighting and zenithal light. These were created by my talented brother.

4. Color Modulation
This method is similar to the previous one as it also implies that each panel (surface) is painted individually, with its own lights and shades, but we will try to force even more the contrast between panels. We can achieve this by combining the final shade of one panel with the final highlight of an adjacent one, as you can see in the picture below: for example, we apply the final highlight of the glacis plate in the upper part, close the darkest shade of the horizontal hull. In this lighting system we consider multiple sources of light rather than one (what we called “sun”) to create in each panel a different set of lights and shades, and always keeping in mind that we should maximize the contrast between neighboring panels. By doing this, we are clearly separating the different panels, which will create a huge contrast even before using a dark wash to stand out the recesses. After the color modulation, we can already distinguish clearly all the panels and details.
One of the cornerstones of the color modulation is the utilization of masks to cover the neighboring panels so that we can create very striking transition zones between panels. Furthermore, in the color modulation we do not apply the last highlight with the airbrush, but with the brush. That is, we use a thin and pointed brush to paint the small details with the lightest color to create more definition and contrast. If you are interested, you can read more about color modulation in this article (unfortunately, it is available only in Spanish, but I am planning to translate it soon into English after updating it). I normally use 4 or 5 different colors to create the highlight without losing too much the original hue. AMMO modulation sets are perfect for this, as we do not have to mix anything.

The color modulation method is the most unreal of all the lighting systems we have seen so far, because we are creating light effects that are completely impossible. However, in my opinion, it creates the highest level of definition and contrast. This is very important when painting 15mm models because the tanks will be far from our eyes during our games, and therefore we need to use all possible resources to make them stand out. Although you might think that the contrast after applying the modulation is excessive, it will be attenuated after applying the weathering effects (e.g. washes, filters, chipping, streaking effects, etc).
Personally, the color modulation is my favorite lighting system for 15mm (and for any other scale, to be honest). I do not only love the results, but I also heavily enjoy the painting process. I see each scale model as a challenge, where I need to find the most optimal combination of lights and shades to bring the model to life.

According to my experience, the color modulation works the best when painting a single color (e.g. olive drab or desert yellow) or hard-edges camouflage. For the latter, we will use the masks when painting the camo to apply also the corresponding lights on each camo spot. The problem of the soft-edges camouflages is that even when applied over a color-modulated surface, the blurred effect of the camo will severely reduce the definition we gained with the modulation (well, note that this is precisely the purpose of the camo!). In the image below you can see how a soft-edge camouflage can limit the contrast. This does not mean that we should avoid painting soft-edges camouflages over a color modulation. We should just keep in mind this when deciding which type of camo we want to apply on our model. In addition, it will also depend on the type of soft-edge camo we are planning to paint. If the camo spots are small, these will not be a problem.

And here you can see another example of a Jagdtiger (Forged in Battle) painted in a single color, dark yellow, using five paints from the shade to the final highlight. Actually, this is the color I like the most when painting color modulation.


To summarize, in my opinion we should always apply some sort of lights on 15mm tanks. It does not matter which particular method we follow, but due to the small size of these scale models, we need to force the contrasts. Furthermore, we should not forget that the weathering effects are usually more striking when applied on light surfaces, simply because they are easily distinguished. In addition, although we might think that the contrast is exaggerated after the airbrushing session, remember that the weathering effects will soften them.
5. Pre-shading
On the other hand, although I have never tried it, I always wanted to check how the pre-shading system work in 15mm tanks. In this lighting system we start creating a black and white grisaille, meaning that we use these two colors to create the lights and shades following our favorite lighting system (e.g. zenithal light, color modulation, etc). Once the grisaille is done, we apply a very thin layer of our desired color, for example olive drab for a Sherman tank. The thin paint will partially cover the grisaille, so that the olive drab will look darker when applied on top of the black areas and lighter when applied on top of the white ones. Although this method might look too complicated for 15mm, it is not more difficult than applying a color modulation.
What do you think? Which is your favorite lighting system for 15mm? And what do you think about the others?

The T-54 tanks that illustrate this article were originally published in The Weathering Magzine, in an issue dedicated to Vietnam. In the original article, I used three 15mm tanks from Battlefront to describe three different painting styles: basic, intermediate and advance. I applied simple lights using the drybrush, a zenithal light with the airbrush or a color modulation also with the airbrush, respectively. Similarly, the weathering effects were increased in number of layers and complexity in each level. This issue of TWM is actually very interesting. It contains other fantastic articles including tanks, planes and one mech, and two remarkable articles about modelling materials and the different types of Vietnam soil.ç
If you are interested, the three T-54 tanks are on sale (along with many other painted models). Check this post.

Hi Ruben. Yet another great article. You manage to explain it good and simple so we all can understand what you mean. Thanks for all these great posts and thanks for being a constant inspiration.
Regards Soren
Thanks Søren, I truly appreciate your kind words! 🙂
Awesome article that I’ll use as reference. Inspirational work. Thank you.
Thank you very much for your comment!
Hi Ruben, I love your comprehensive and consistent approach to the different shading techniques and find it really useful to keep referring back to these. Unlike you, I am a messier, less precise painter. Your light touch with the airbrush really shines through and the quality images are brilliant. I often revisit your posts and articles for reference. Thankyou👏👏👏😊👍
As usual, your comment made my day. Thanks a lot Chris, and happy to see that the time and effort I put on my blog is useful for some people 🙂
First, thank you so much for all of the information and the effort that you put into the tutorials!
The book that you reference is no longer on that page.
Do you mind sharing with me what the name of the book is please.
Thanks for the name of the book!
I just ordered your book about a week ago on painting figures for wargaming. It should be here sometime next week.
Hi John, it seems that the book is sold out and they did not print out a new edition. But do not worry, I am working on something new 🙂 Thanks for your words!