
I have prepared a new videotutorial to show how to paint a German tank. I have chosen a paperpanzer, a Jagdpanzer E-50 from Heer46. The large panels and pronounce edges make this vehicle a perfect model to practice the “color modulation” technique, as you will see later. The camouflage I chose is based on a drawing I found in the 1945 German Colors book from AK interactive, page 61. Inspired by the reference to real colors featured in this book, I have used the corresponding painting set from AK, AK554 German Late Color set.
I have tried to compress all the techniques I usually use to paint vehicles in three videos for a total of 40 minutes. I hope you find everything more or less clear, although I aknowledge that it might look a little bit messy. You can find a summary at the end of this post. On the other hand, I would like to highlight that I pursue to create big contrasts in 15mm vehicles. Due to the small size of these vehicles, the big contrast will bring them to life. However, this effect goes directly againts realism. It is just an artistic option. Said that, please, enjoy the tutorial.

PART 1 – Color Modulation
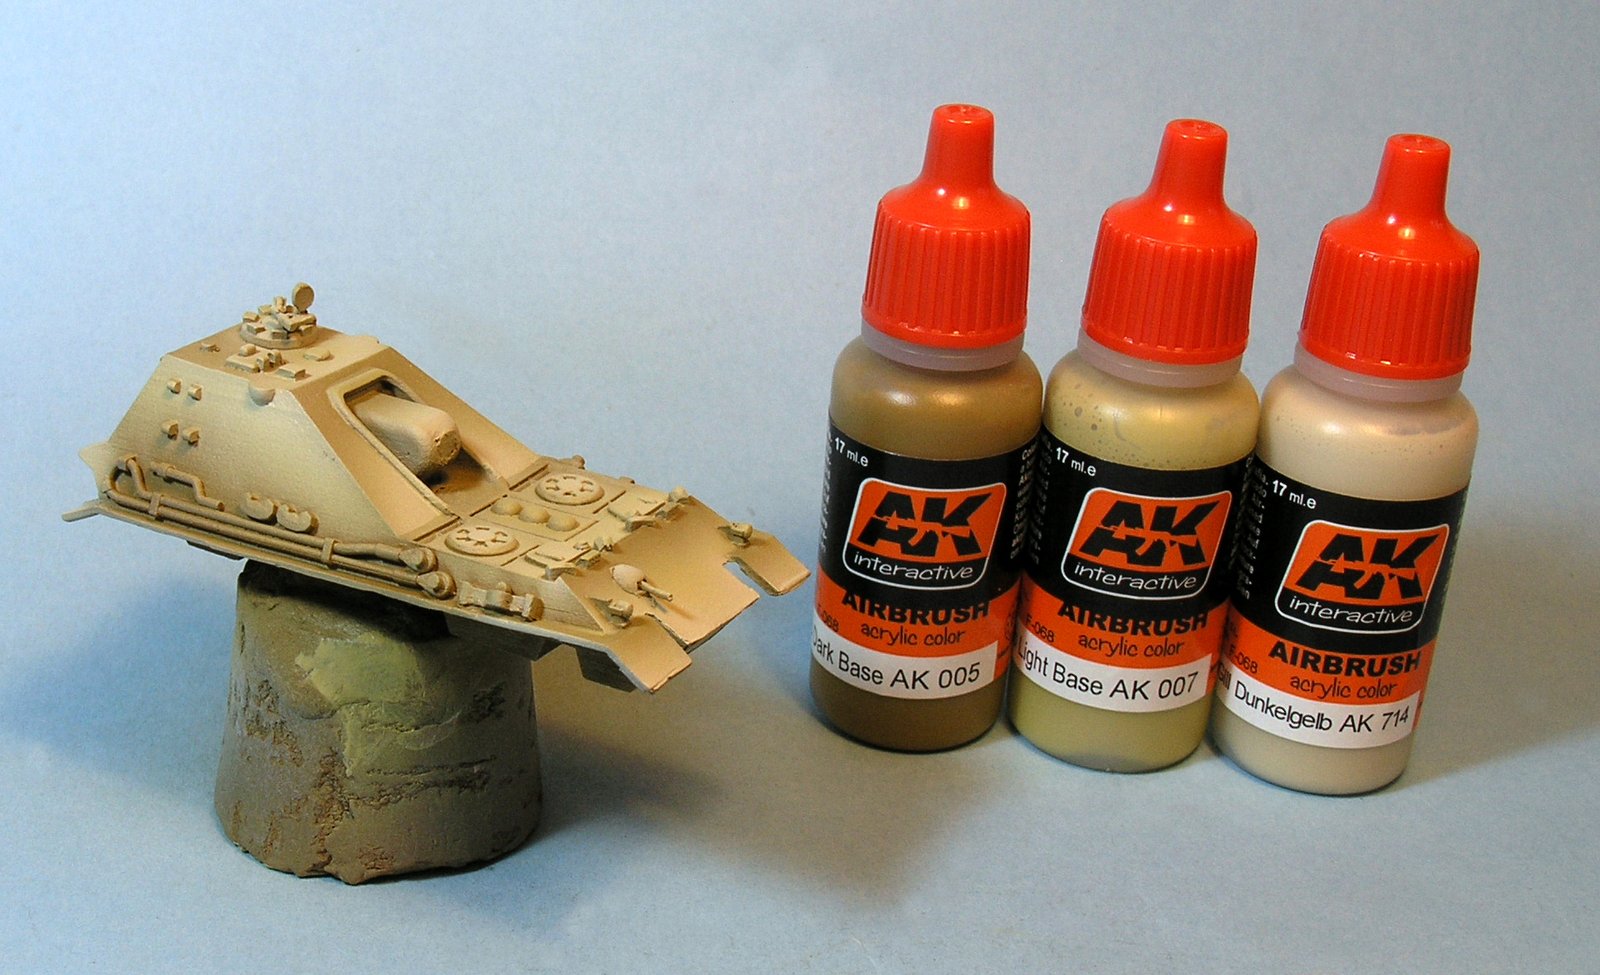
1. Paint the Dunkelgelb in 4 steps:
- Shadow: Dunkelgelb Dark Base (AK 005)
- Base: AK 005 + Dunkelgelb Light Base (AK 007), 1:1
- 1º light: AK 007
- 2º light: DGIII Dunkelgelb (AK 714)
2. Prepare a mask with Blu-tack or Sily puty (It’s recommendable apply first a varnish layer)
3. Paint the Resedagrün (green) in 2 steps:
- Base: Olivgrün shadow AK 171
- Light: RAL RAL6011B AK 716
4. Remove the Blu-Tack or Sily puty
5. Apply gloss varnish
6. Apply decals using Micro Set
7. Apply satin varnish
One of the most interesting parts of this set of videos is in my opinion the “color modulation” technique. It constis in considering several points of light instead of only one (the sun). This gives us the option to paint each panel independently. That is, we can apply highlights and shades differently in each panel, so that we can clearly distinguish different panels. For example, the final highlight of one panel can be adjacent to the darkest part of another. This will create a very big contrast that we can use to bring our miniature to life. This is not real, but the resulting contrast is very rewarding specially in these tiny vehicles.
I personally thing that one of the key points of this technique when painting 15mm vehicles is the masking step. If we want that each panel has its own set of lights and shades, it is very important that when painting one panel we do not paint and ruin the next one. To solve this problem we can use masks. We have three different options: adhesive putty (e.g. Blu-tak), masking tape or a piece of paper. The putty is very useful to mask some elements with complex geometric forms or an irregular surface. Otherwise, I prefer to use masking tape or paper since with these is very easy to obtain straight lines; although the Blu-Tak is very useful to do camouflages. We use the paper or masking tape to cover the panels we do not want to paint at the moment.
Another important point of this technique is the place where we apply the lights or the shades. If we consider multiple points of light, we have infinite possibilities. In my case, I like to apply the highlight of one panel close to the darkest part of the adjacent one (take a look at the frontal part of the tank). This enhance the contrast we are looking for with this technique. Finally, the third key point of this technique consists on forcing the highlights and shades. That is, use a color a little bit lighter than usual for the final highlight. And in the other way around for the shade. Once again, the goal is to force the contrasts. I normally start with the darkest color (shade) and then apply the lights. Do not worry if you think that the effect is very unreal at the moment. In the subsequent steps, the weathering effects, we will considerably reduce the contrast. That is why we had to enhance it at the beginning. Otherwise, at the end we would not be able to see it at all.
Regarding the paints, as I said I have used the set AK 443 German Late Colors from AK. However this set does not include a color dark enough for the shades. Instead, we can always mix the dunkelbelg color with a darker brown. Or we can use another paint. This is what I did. I use couple of paints from the AK 552 (German Dunkelgelb) set, the 005 and 007. Similarly, to paint the green camouflage with RAL6011 B Resedagrün (AK716), I used some dark paints from AK 167 (German Green & Brown). Anyways, the final highlight or lighter color was done with the “real” color (the “RAL” color I previously mentioned). On the other hand, I wanted to add a little bit of color (and contrast) by painting the gun barrel in red primer. To do it, I used RAL8017 Schokobraun (AK718) as a shade and RAL8012 Rotbraun (AK718) as a light.
The remaining steps have been already explained in the blog: how to use Blu-Tak to paint camouflages and how to put decals. For the record, if you wish to paint a tritonal camouflage, you can just repeat the Blu-Tak step after painting the green color, and then apply the third color.
It is VERY IMPORTANT to apply now a layer of varnish to protect the acrylic paints from the enamels and the solvent we will use with these. DO NOT FORGET THIS!
PART 2 – Weathering effects
8. Apply two/three layers of a brown filter (AK 076)
Wait 15-20 min between layers
Wait over night before continuing
9. Apply a profile with WASH for NATO AK 075
Wait 30-60 min
10. Remove the excess of wash with a brush moistened in solvent
11. We can brush up the profile using acrylics
12. Make chippings using sponge and brush, and AK 711
13. To win realism, we can profile chippings with Iraki sand (819, Vallejo)
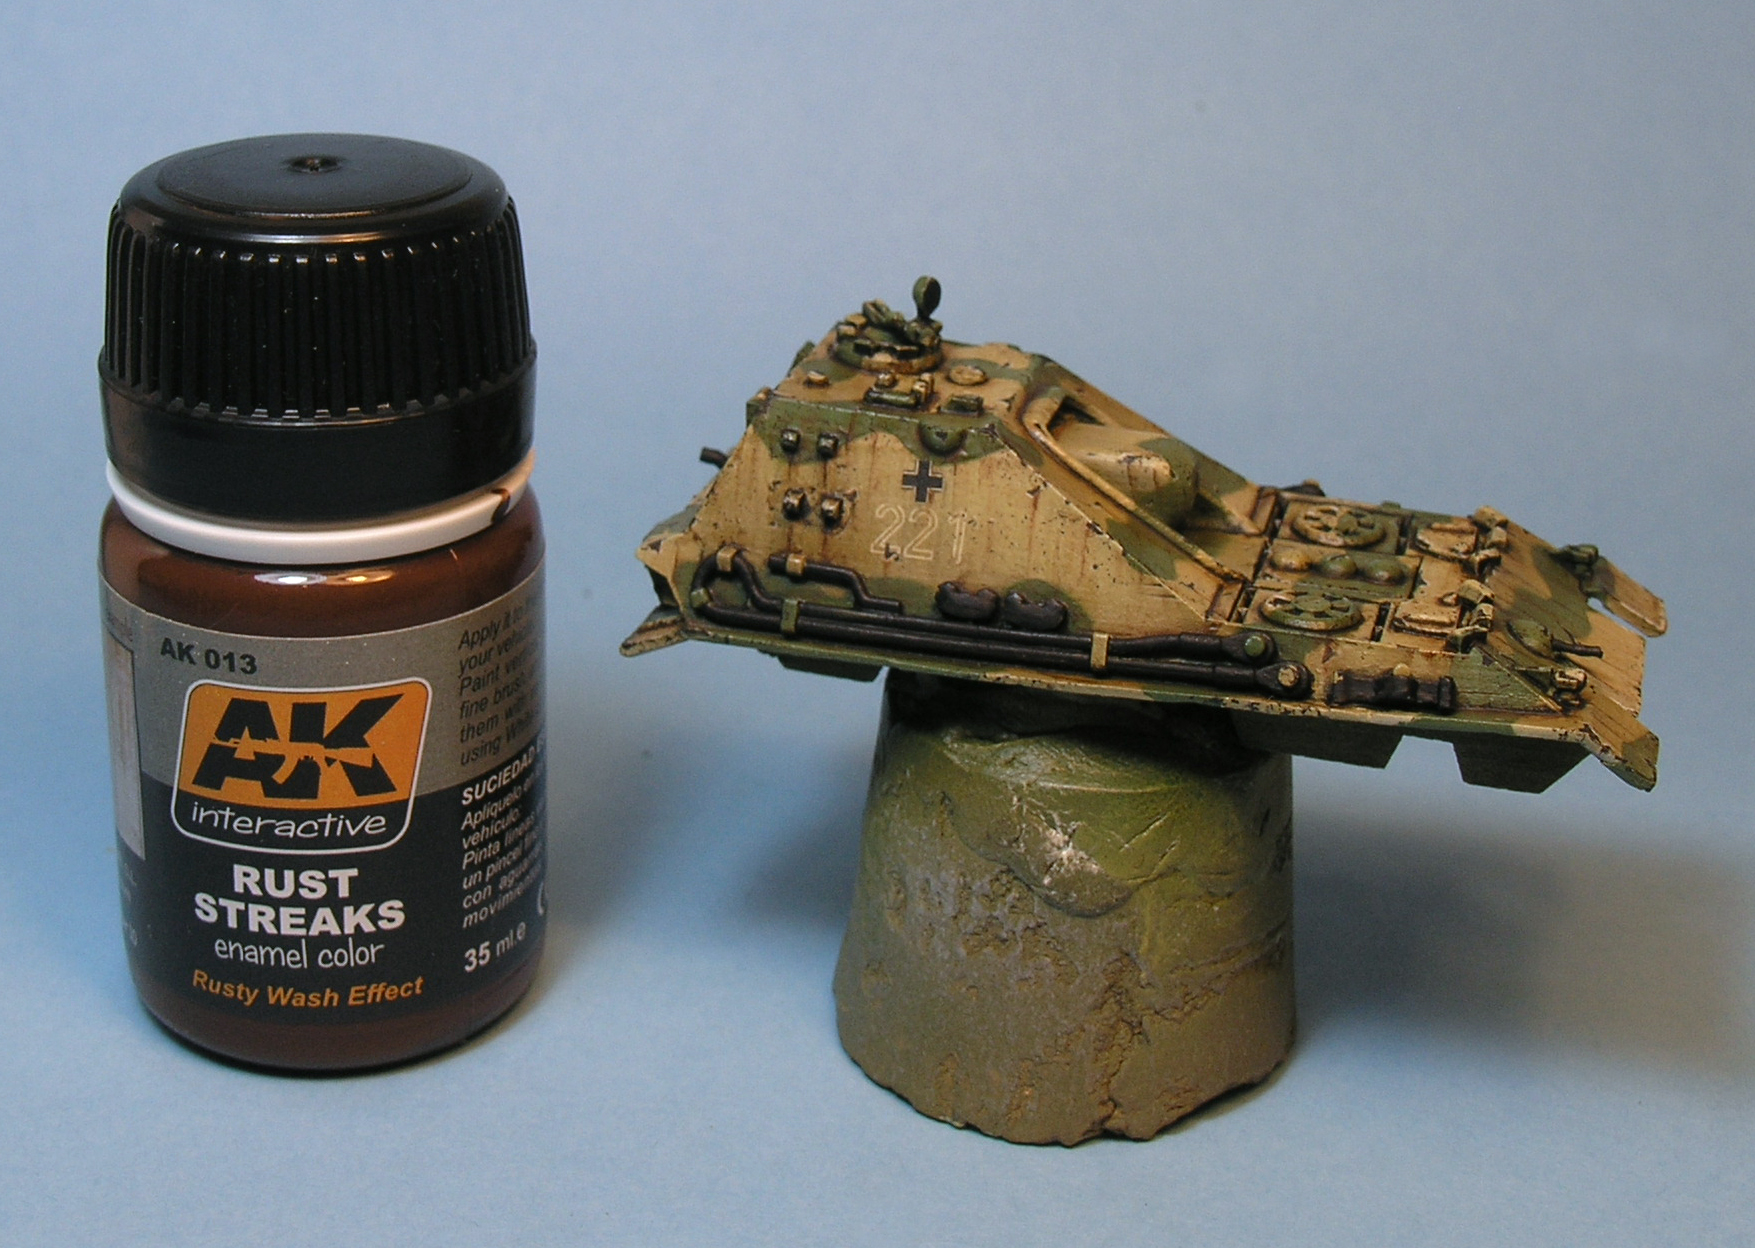
14. Apply streaking effects with Rust streaks AK 013
15. Blur streaking effects with White Spirit
The second video is about the weathering effects: filters, washes, chipping and streaking effects. These are done with enamels and oils (except the chipping effects) because these paints do not dry in second like acrylic paints, but in hours. This means that we will have plenty of time to work these effects. The final weathering effect is done with pigments, but this is covered in the third video.
In this post you can read more about filters and washes. When chosing a filter is very important to take into account which colors our vehicle has, an which is the effect we want to achieve. In my case, I wanted to slightly merge all the colors (yellow, green and red) and add a little bit of dust. Therefore, I used a brown filter, such as FILTER for NATO (AK 076). We can apply as many layers as we want, but remember that each layer will increase the intensity of the filter. It will become more opaque. I normally apply 1-3 layers waiting around 20 minutes between layers. If you do not wait a little bit, you will basically remove the previous layer. The filter will severely reduce the contrast we created during the color modulation, and therefore, if you want to preserve the initial contrast you should consider not to apply many filter layers. It is up to you. After this, I let the enamel wait overnight.
Next day I start applying the second effect, a pin wash using an enamel wash such as WASH for NATO (AK 075). In my case, I do not apply the wash all around but I specifically apply it on the recesses and around the details. This is a pin wash. If you cover the whole vehicle with the wash, the result will be very very dark, masking all the previous work. I do not recommend you this option. After waiting 30-60 minutes, we remove the excess of wash with a brush moistened with White Spirit or turpentine. We can exploit this step and create some streaking effect by applying vertical brush strokes, leading the brush towards the lower part. Sometimes we can accidentally remove too much wash from some parts. In these cases, we can use acrylic paint and a thin brush to fix it with a dark paint. Even do this effect is not very realistic, we are trying to create some contrasts.
I have already explained several times how to do chipping effects, so that I will not explain it again. The last weathering effect we can see in this second video covers the streaking effects. We can do this effects either with acrylic paints (dry in seconds) or with enamels or oils (dry in hours). As you can imagine, it is much easier to use enamels or oils since we can easily play around the streaks and even remove those that we do not like. To apply this effect, we simply paint vertical lines with the desired colors, and then with a brush moistened in White Spirit we blend the edges. In my case, I only used one color, a rusty brown: Rust streaks (AK 013).
PART 3 – Tracks and details
16. With acrylics we paint the details, such as tools, etc.
17. Paint tracks in 5 steps:
- Base with Track Primer (304 PA Vallejo)
- Drybrush with Gunmetal Grey (863 Vallejo)
- Apply Track Wash (AK 083)
- Dust effects with Afrika korps Filter (AK 065)
- Get contrast with AK 075
18. Apply pigments
19. Apply matt varnish
Finally, the third video covers the tracks and the last weathering effect, the pigments. Although I am explaining how paint the tracks in the last video, in fact we can paint them when painting the tank. For the tracks, we start painting them with a light brown color and then apply a dry-brush with a metal color (acrylic paints in both cases). Finally, we apply a dark brown enamel wash such as WASH (AK 083) to enhance the recesses. The brown color will also add an additional dust or rust effect. On the wheels, we can add a lighter dust effect by using a light enamel such as Afrika Korps Filter (AK 065). By using different colors we will increase the chromatic diversity of the models, enriching the final outcome (however, remember: “sometimes less is more”, do not start using every single enamel you have on hand…).
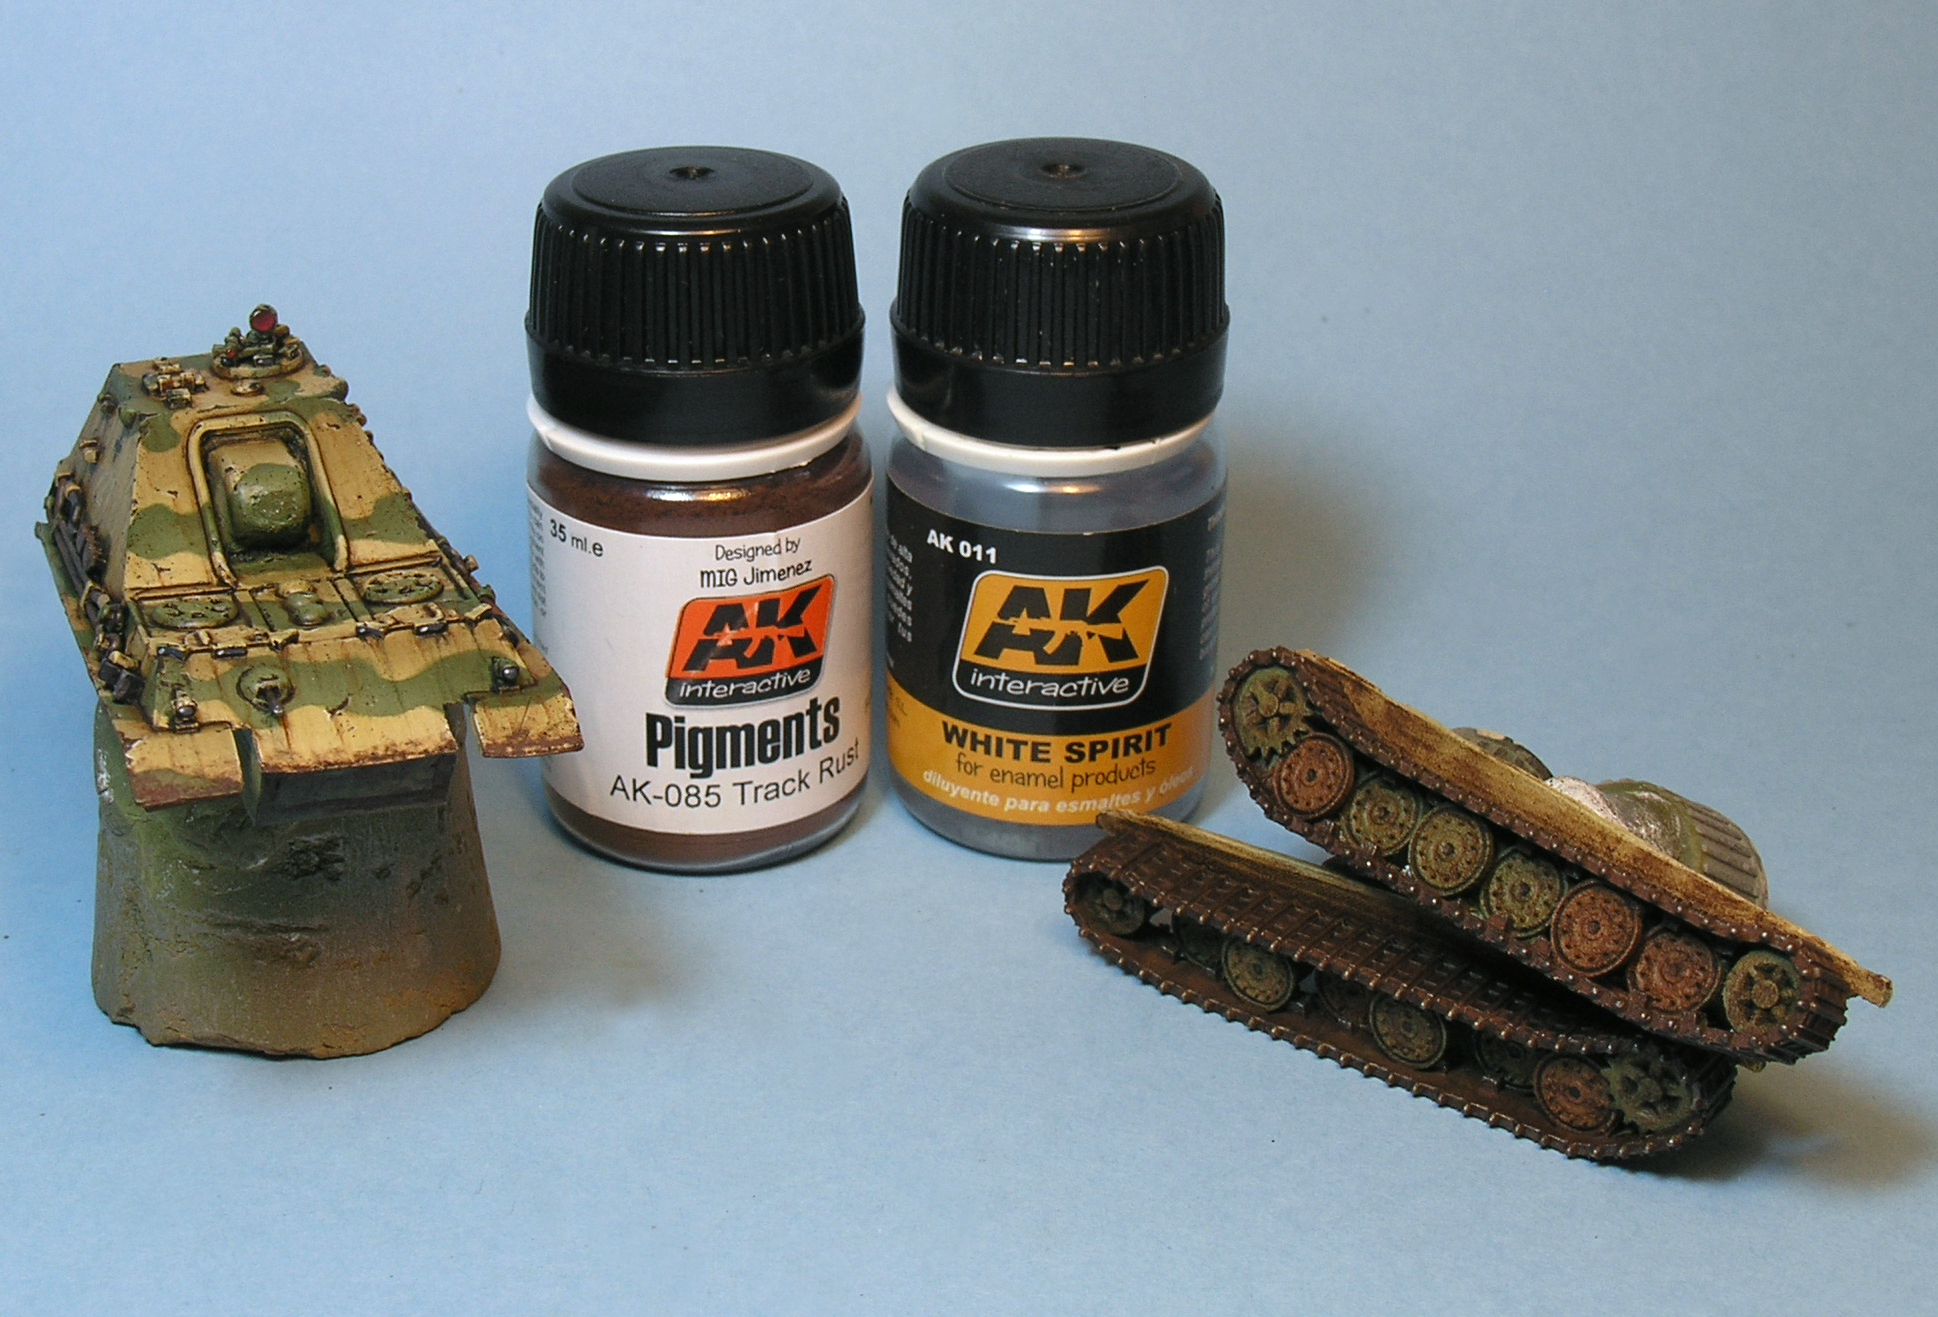
The very final step are the pigments. I have already explained something about them here, but in this case I have tried something else. First, we prepare a “wash” by mixing several pigments with White Spirit or turpentine. The texture of the resulting mix should be similar to milk. Then, we apply this mix generously on the tracks, wheels and lower parts of the tank. Once the solvent is totally evaporated, with the help of a cotton swab or even a finger, we remove the excess of pigment. Additionally, on the mudguards I did not remove the excess in this way, but with a brush moistened with White Spirit I blended the edges.
