
It is a great pleasure to announce a new book published by AMMO of Mig Jimenez where I have actively been collaborating beside Mig Jimenez and Carlos Cuesta. The book contains 96 pages. After a short introduction about general materials and techniques (differences between acrylics and enamels, what is a filter or a wash, how to clean the airbrush…) you can find ten complete painting guides “step by step” of different tanks (mostly Germans, but there are also from USA and Soviet Union). The three firsts pretend to assimilate the knowledge showed in the introduction (we can say “basic level”), while the remaining explain similar techniques and new ones in more detail. The idea is to show the spectrum of existing possibilities to paint our tiny tanks for Flames of War (the guide is prepared with tanks from Battlefront, The Plastic Soldier and Heer46). And therefore, every one can assimilate the techniques or effects more interesting for him. You can find more information and screenshots here.


More video reviews:
- https://www.youtube.com/watch?v=3-5ZxJYGhig
- https://www.youtube.com/watch?v=CUc_N2FYxu0
- https://www.youtube.com/watch?v=MyPzXVzFhUU
And now you can see an example: how to paint a British Sherman tank!
BRITISH SHERMAN
Sherman tank was the war horse of US and British army during the whole Second War World. Very different versions know all battlefields. From the snowed meadows in Russia (granted to the Soviet army thanks to the leasing program) to the Normandy beaches, including the warm desert of Africa. Therefore, Sherman tanks displayed very different camouflages; however, the classical green color was the most common one and it is my favorite choice. Green color is really easy to wear! But it is important to consider that the green color used by US and British tank was different. British green was a “bronze green” or brownish. Nonetheless, sometimes we don´t need to use the exact color at the beginning of the paintjob. As you will see, we can use the same color we use for US tanks but using a brown filter we can easily change the color to obtain the brownish tone.

Sometimes metal and resin pieces have traces from the casting process. Therefore it is advisable to wash every component with water and soap to avoid problems during the painting process.

We cannot create hard contrasts on rounded edges in the turret because there are not “corners”. But we can simply apply the light on the rounded corner at these sites.

I always start painting the darker color and then I work the lights. But we can also do the opposite. Anyway, it’s recomendable to recover some contrast at the end of the process using the original color. We are not perfect and it is really easy to go bad with this tiny models.

If you have the opportunity to put a decal, do it. These small details provide very nice contrasts and they bring to life our model. Check on internet or books the proper position of them! We can use some specific products such as MICRO SOL and MICRO SET to fix and melt them.

There are two types of varnishes depending on the base: acrylics (water) or enamel. They are “immiscible” and we can exploit this property. If the weathering effects we are going to apply are based on enamels and oils, we should use acrylic varnish to avoid shatter the previous work. Conversely, we can protect the previous work with an enamel varnish and then use acrylics for the weathering effects. Of course, if we wait enough time we don’t need to use these features of different varnishes.

I usually paint metal and rubber before start applying the weathering effects. But if we want we can also paint the different tools or other elements. Therefore all components will have the same looking at the end. But we can play with this property: maybe some tools have recently been replaced and they look new than others.

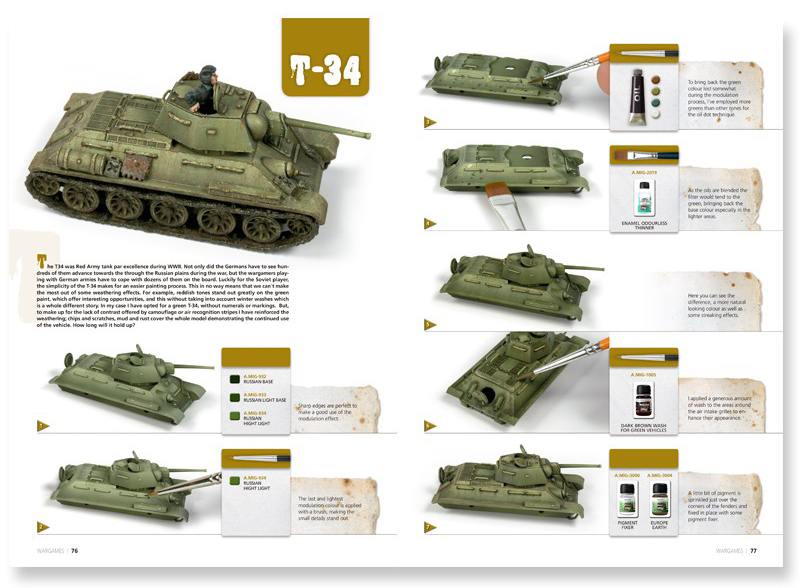
To obtain the classical British bronze green we can apply a brown filter. This fine paint layer will smoothly change the green color, resulting in a brownish green tone. To prepare a filter I usually use oils and I prepare a dilution 1:10 (paint:thinner). Then I remove the most part of the filter from the brush and I smoothly apply it on the whole surface.
 Another option for applying the filter, used in the book, is to apply oil dots of different colors and then blend them with a moistened brush in solvent. You can use both techniques in the same vehicle. For example, first you apply a general filter layer with the first method, and then you reinforce a specific area with the dots option.

Depending on the color we are working we should use a different wash tone. For example, we would use a dark wash when we paint a green tank, but the one needed for a yellow Panzer will be lighter. We want to create contrasts, but we don’t have to overexaggerate the effect!
 To remove the wash excess we can also use a moistened cotton swab with White Spirit. The process is faster than using a brush, although we cannot access to some details.

To highlight the chipping effect on green vehicles we can use a light beige color or mix the original green color with ivory. However, we shouldn’t use an excessive light color or the effect will be very unreal.
 The chipping effect should be variable. That’s, we shouldn’t paint all chippings with two colors (light + dark). Some can simply be scratches (only light color), while others directly show the metal (only dark color). Variety!
When we work dark colors like this green, the light streaking effects (i.e. water marks or light dust) are more striking. However, we have to consider where is placed our vehicle! During the Russian winter there is not so much dust!

I don’t usually wait more than 5 minutes before starting blending the streaking effects. But we have to apply very smooth strokes with a moistened brush in White Spirit to avoid the total elimination of the streaking effect.

Generally the streaking effects should be subtle (the vehicles are not abandoned!). But we can increase the intensity of some of them to create interesting points. Once more: variety!

To apply pigments we can disolve them with White Spirit or turpentine and prepare a “wash”. We apply it in the same way we use a normal wash, looking the recesses.

Note, washes can be “general” or “pinwashes”. I prefer to use “pinwashes” or specific washes. They are easily retouched and we avoid to darken in excess the vehicle.

Once the wash is dry, we can remove the excess with a cotton swab. We can repeat this process as many times as we want.

If we have added some pigments on the recesses, we wanted to simulate a vehicle tracking in a dusty place. Therefore we should also add pigments on the sides. Generally, all elements of the vehicle are similarly expose to the environment.

Although the grease and oil are really interesting, they have a glossy effect. Therefore we shouldn’t avoid to apply too much these effects.

We can easily create a “used” looking applying small splashes with different enamel colors. This stains can represent splashes, dirty or any stuff we can imagine.

The crew’s gear is a very impressive resource to characterize our vehicles and make them unique. Take advantage of them always you can. In addition, I sculpt some additional stuff with modelism putty. Basically I sculpt “flexible” elements, such as blankets and bags, which can perfectly be adapted to the surface.

 Although gears can have very different backgrounds, it’s interesting if they receive more or less the same weathering process. For instance, if our tank is on the desert they should show some dust effect. But remember: the variety is really important.

To simulate the rubber tracks of US tanks we can start applying a generous dark grey paint layer.

We can use a brown wash not only to highlight the recesses, but also we can add an interesting dirty effect. Note that brown colors are a better option than black for washes. Black is too much dark and therefore the contrast is excessive.

A combination of different light pigment easily highlights the dark base we painted.

The mixture of pigments plus White spirit or turpentine shouldn´t be so dense, because the idea is to remove the excess afterwards. We only want to denote the recesses.

We can also mark the metal glitters of the tracks with a brush and steel paint. The idea is to drybrush the paint to mark only the reliefs. An alternative is to use a graphite pen (used in the book).

Final pictures:
 If you liked this tutorial, you can find another ten articles in the Painting Wargame Tanks
You can get all the paints mentioned above at AMMO by Mig Jimenez website with 10% off using the affiliate code: Heresy10Ionic

2 thoughts on “How to paint a British Sherman tank, and a new book: Painting Wargame Tanks”