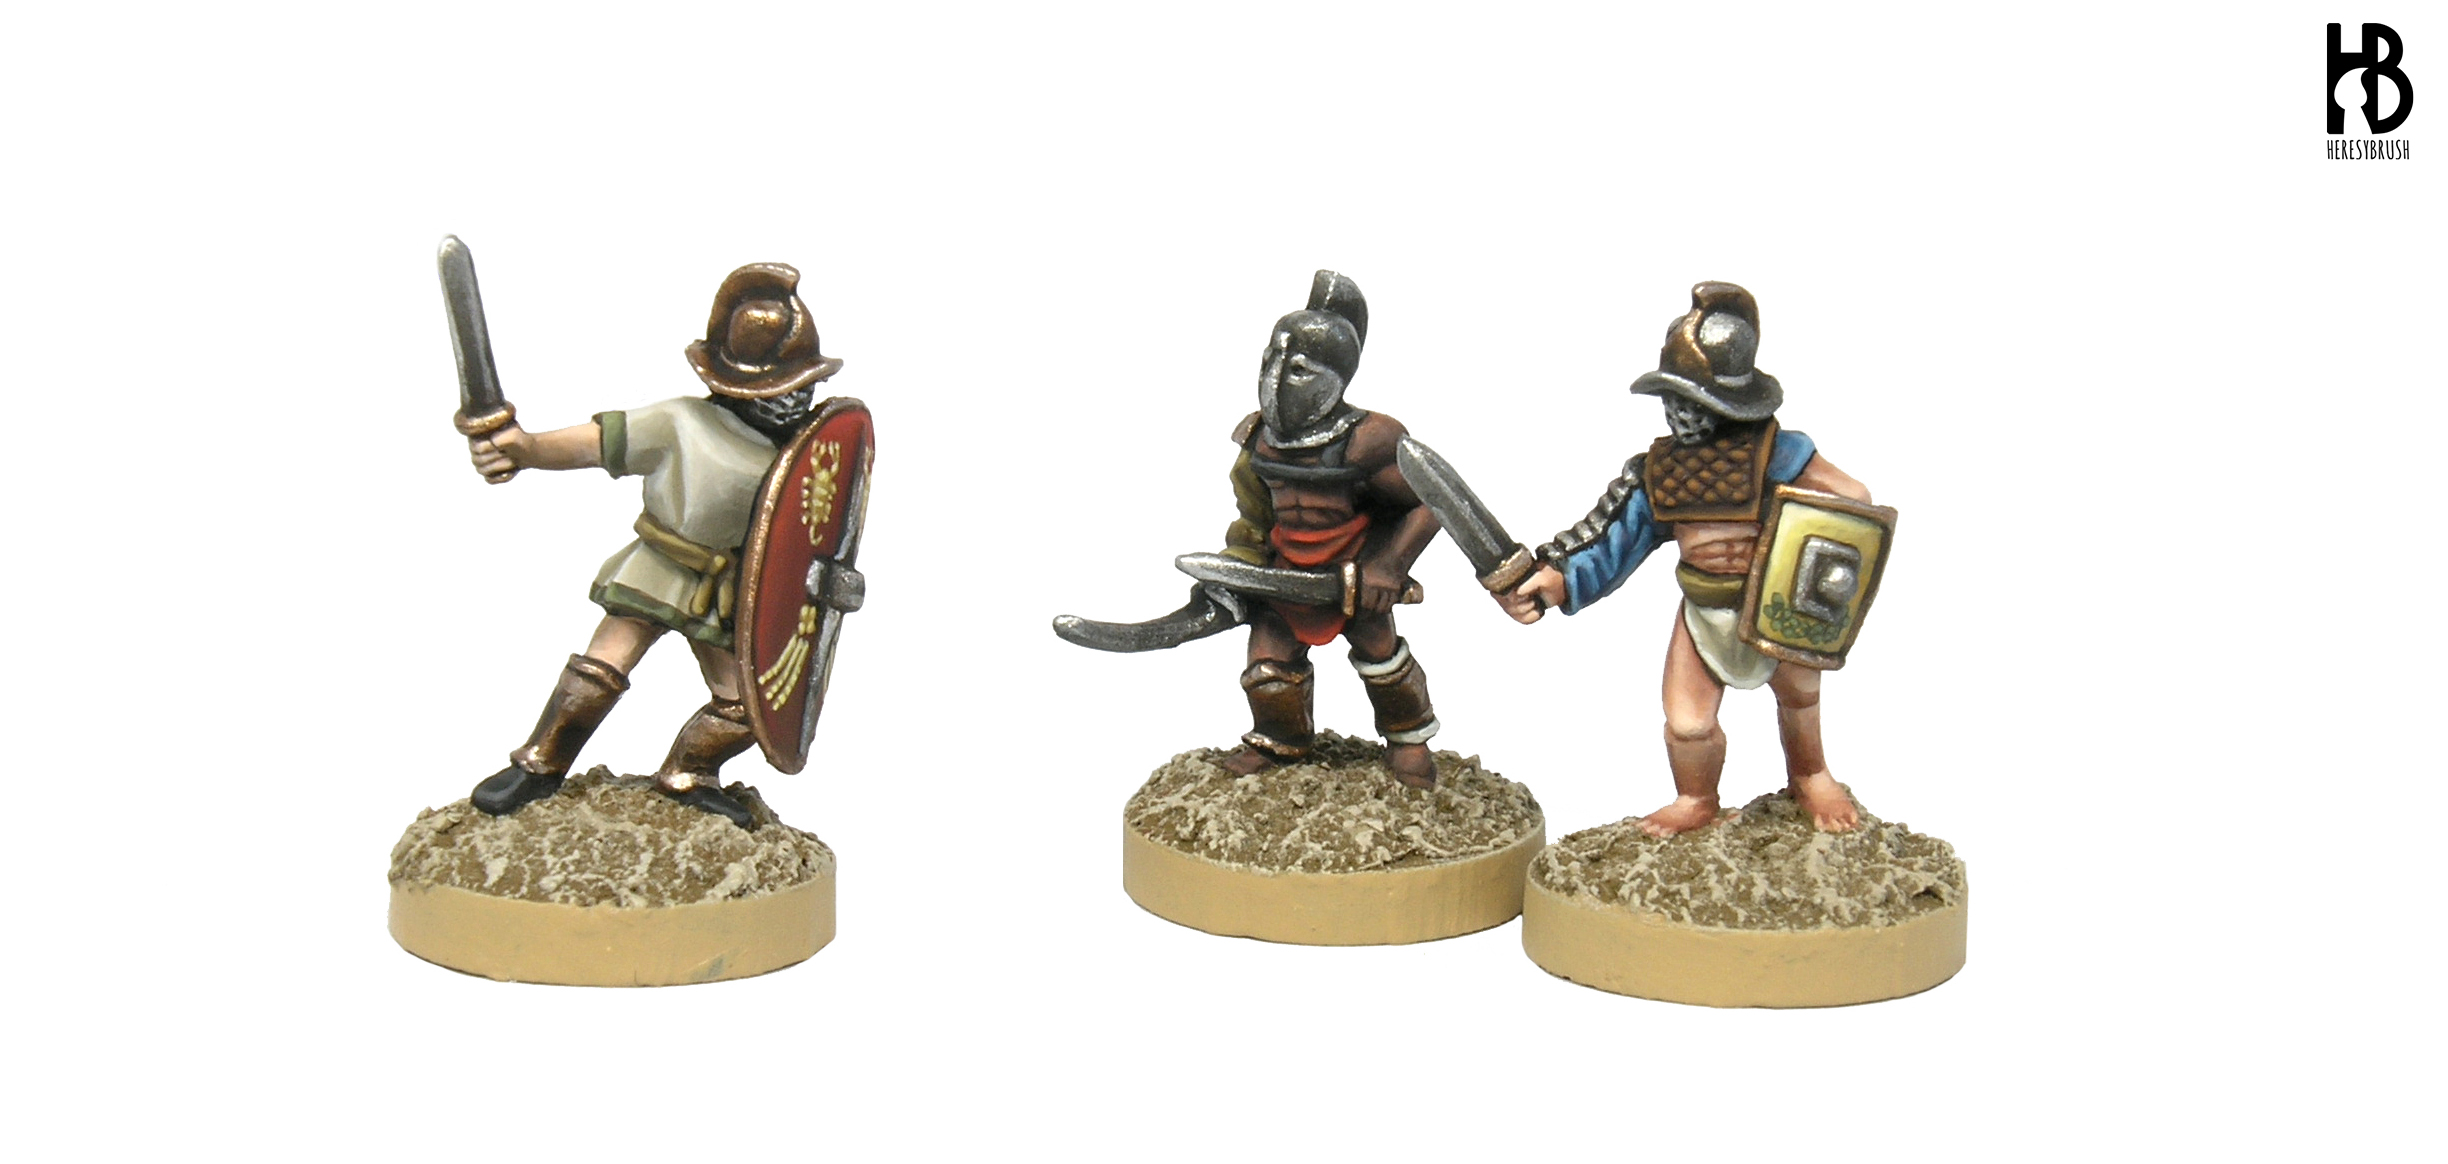
 Ave, Caesar, morituri te salutant! (“Hail, Emperor, those who are about to die salute you”). Today, we are going to focus on how to paint different types of skin using some lovely gladiators in 15mm from Forged in Battle. I will also say a few words about how to paint other parts of these gladiators, so that you will find a complete step-by-step tutorial below.
In the following lines I will describe how to paint three different types of skin: dark skin (African people), medium skin (Mediterranean and middle-east people) and light skin (northern people). This is based on my own interpretation of how skin colors should be painted, and it does not mean that this is the only way to do it! You will find dozens of articles about this topic on the internet. Check them, try different ways to paint skin, and find your preferred method!
Step 1 – Primer
Always, always and always apply a primer coat before starting to paint the miniature. The primer will not only make the paint more resistant (which is extremely important when we are planning to play with the miniatures), but it also facilitates the adherence of the paint. Here, I applied grey One-Shot primer from AMMO with a brush.
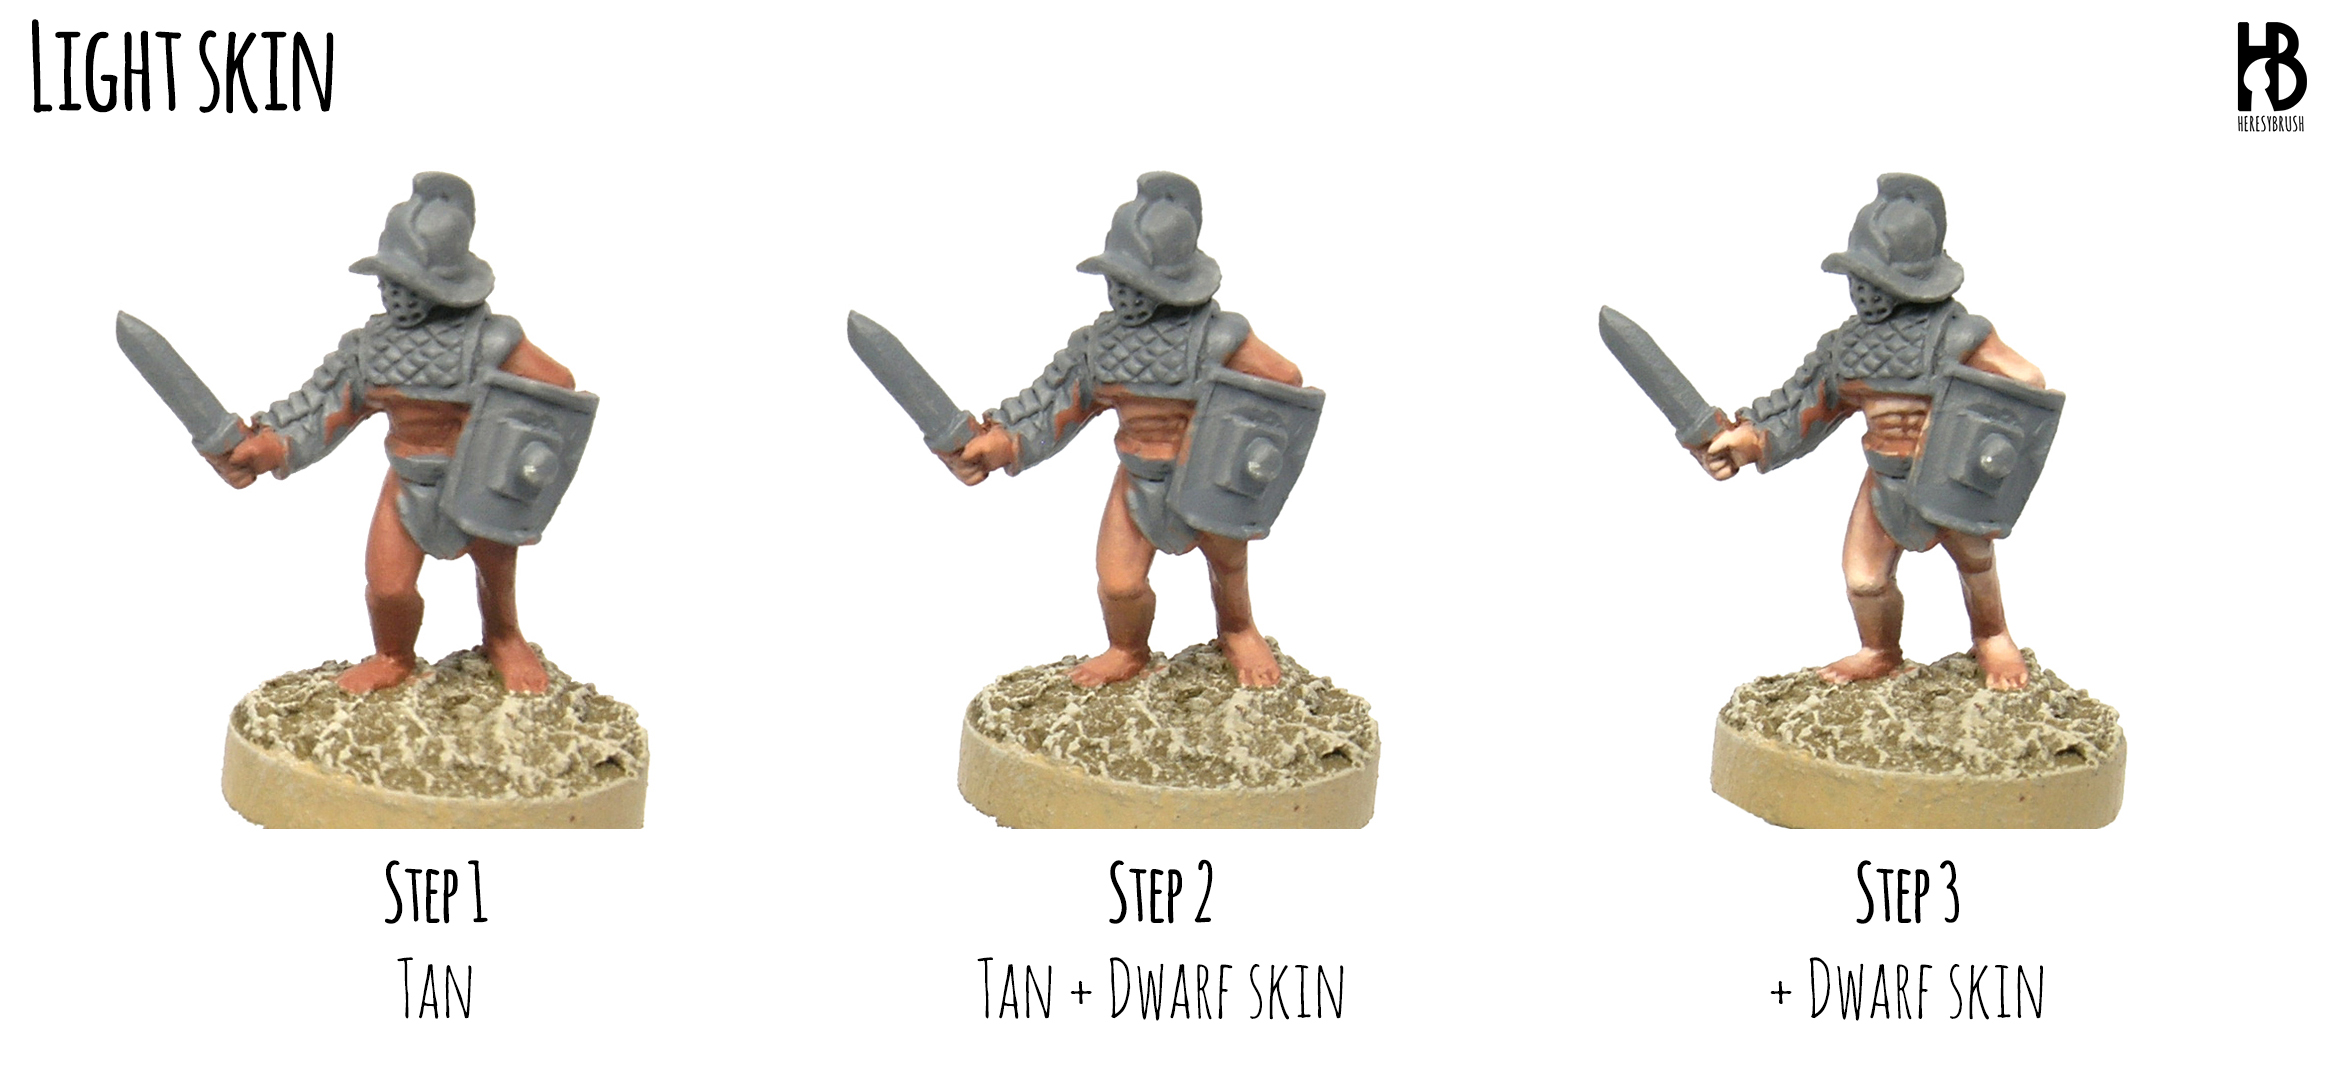
Step 2 – Skin
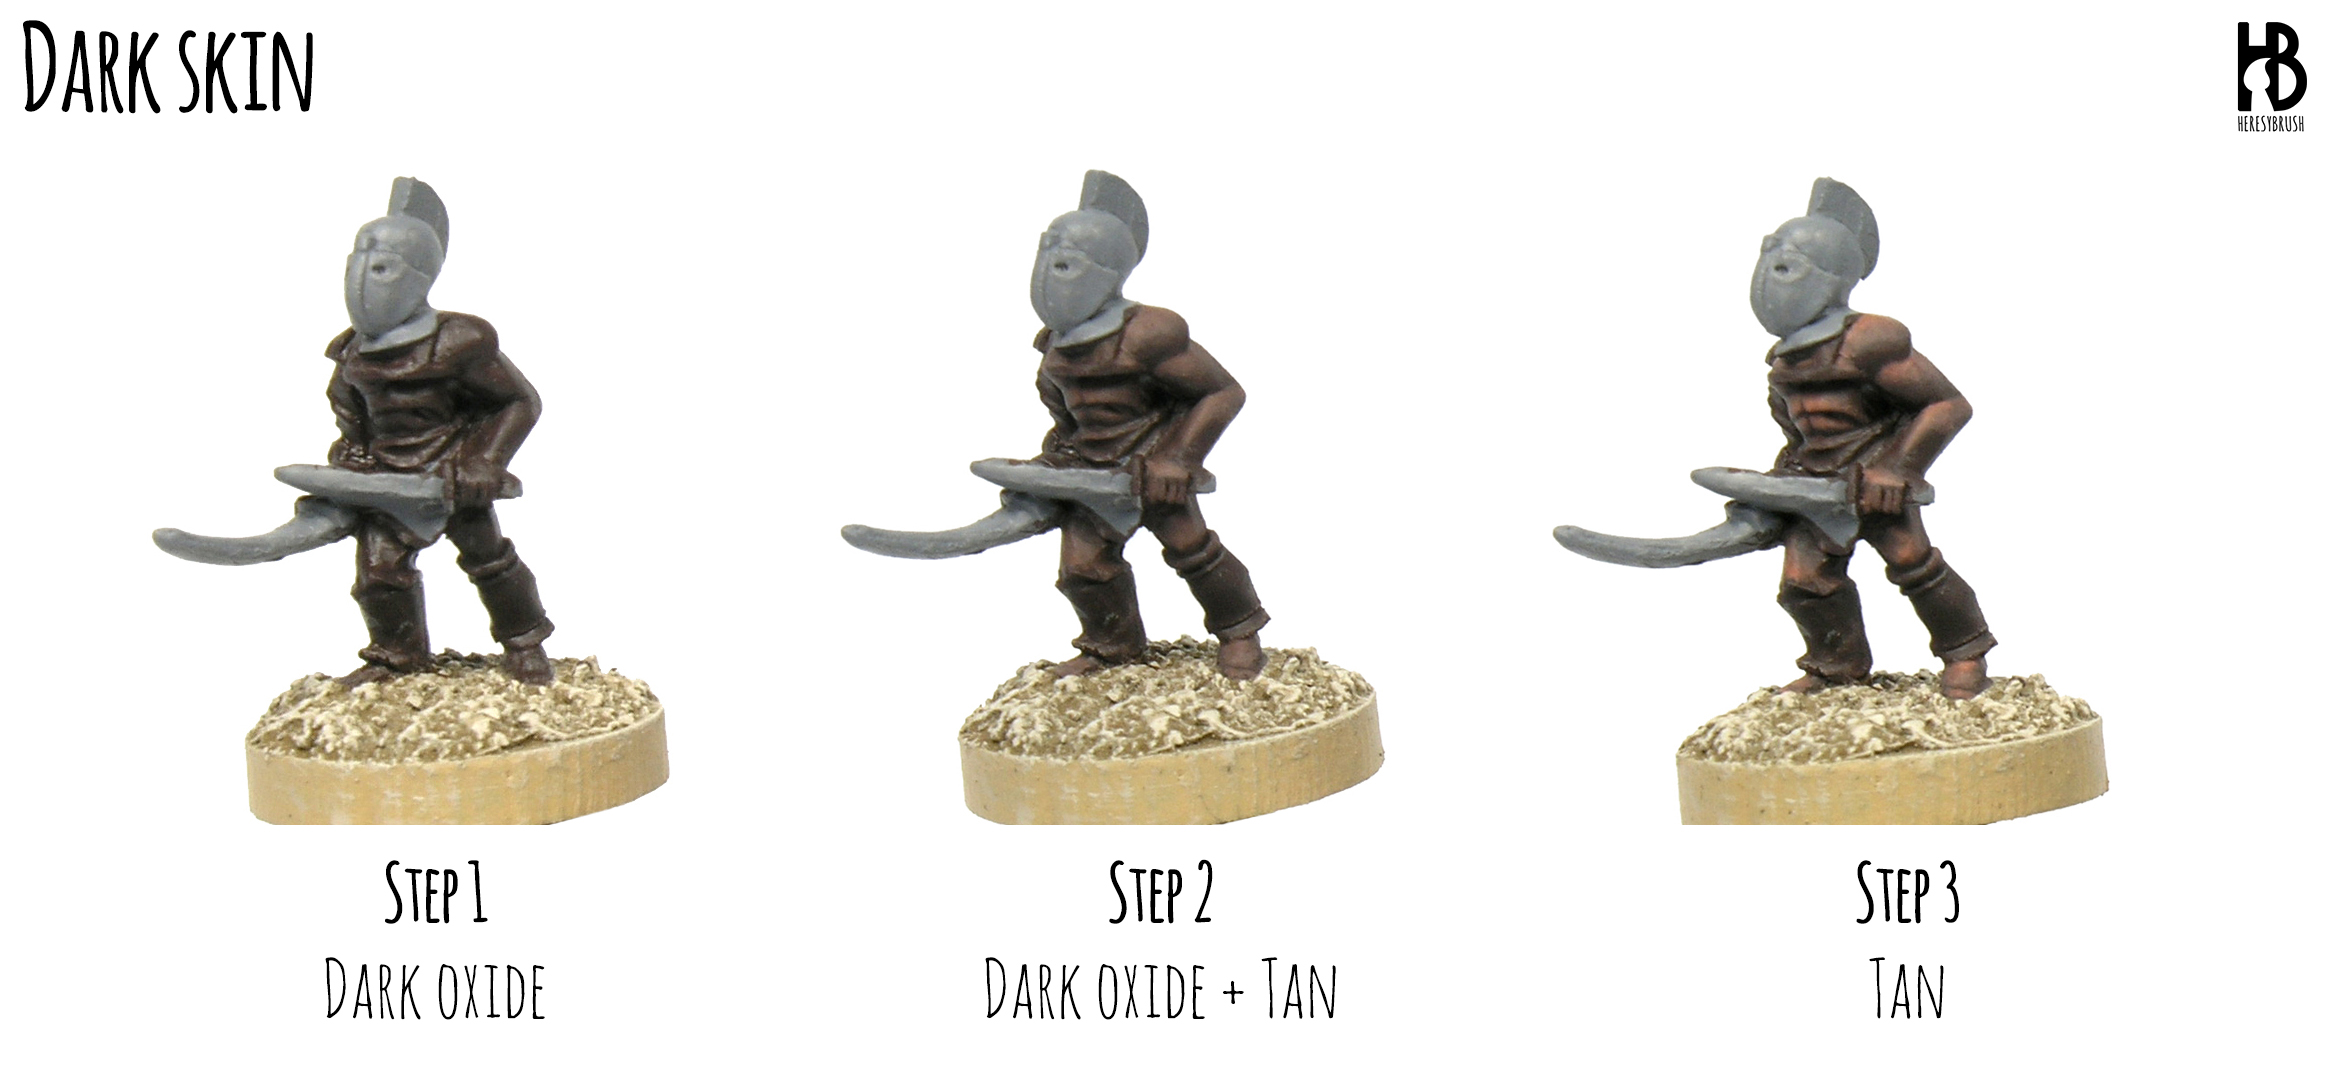
To paint dark skin I normally use only two colors: Dark oxide (302, Vallejo) and Tan (066, Vallejo Game Color). We start by painting the skin areas with Dark oxide. Remember to always thin acrylic paints with water (at least 30% water). Then, we begin working on the highlights by mixing Dark oxide with increasing amounts of Tan. The final highlight is done only with Tan.
To paint medium and light skin I use three colors instead of two. For the medium skin we need: Beige brown (875, Vallejo), Dwarf skin (041, Vallejo Game Color) and white. And for the light skin we need: Tan (066, Vallejo Game Color), Dwarf skin (041, Vallejo Game Color) and white. As you can see, the only difference between medium and light skin is the shade color: beige brown or tan. In this case, we begin by painting the skin areas with the darkest color (beige brown or tan), and then we start mixing either color with increasing amounts of dwarf skin, and finally we use pure dwarf skin. To conclude, the final highlight is done by mixing dwarf skin with white in the same proportion.
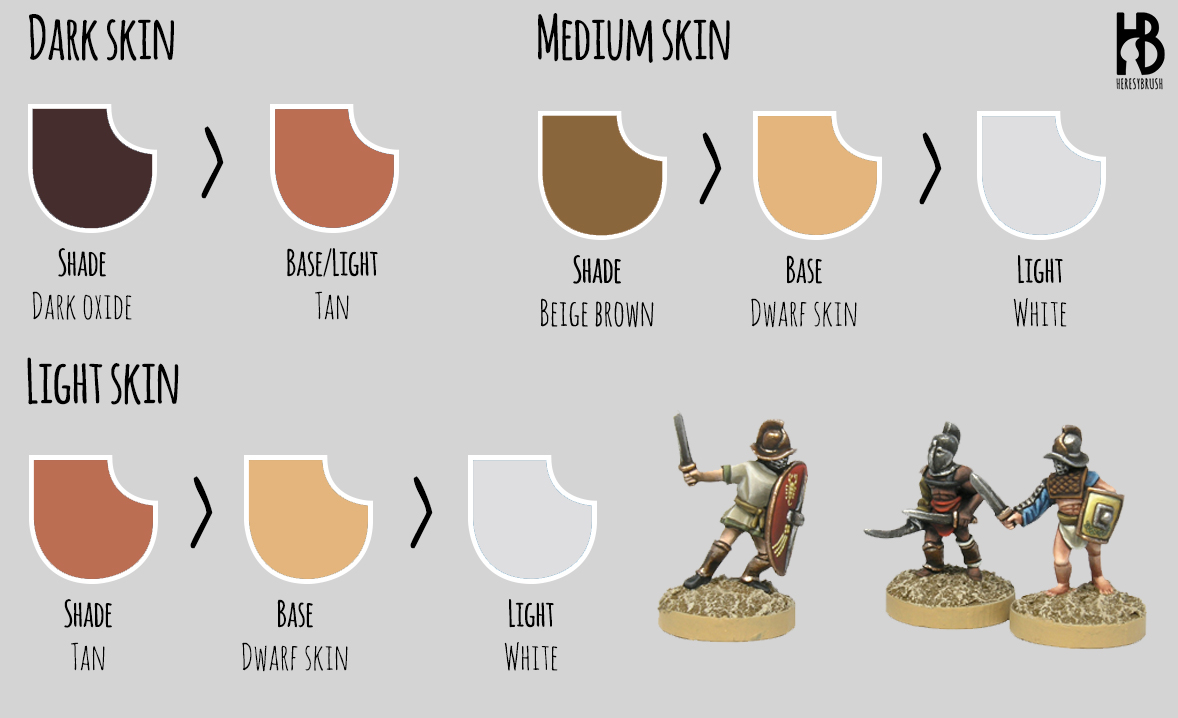
How many layers or highlights should we apply? It depends on the contrast we want to create. I like to create smooth transitions between layers (shade > base > light), and therefore I normally add additional intermediate layers (I normally apply five layers in total). Another factor that helps to create smooth transitions is the water: I thin my acrylic paints with at least 50% water, so that I can create semi-transparent layers. Thus, we can play with the number of layers to create more or less intense areas.
Where should we apply the lights? This is the most difficult part. The easiest answer is: follow the volumes sculpted on the miniature. That is, you can lead the lights toward the more protuberant parts of the miniature. For example, the elbows, knees and knuckles. This is a little bit unreal (in contrast with the classical zenithal light), but it is a good resource to make our tiny miniatures more striking.

 In any case, I have discussed how to paint faces and hands in several occasions (regardless of the skin color). Although these are a little bit outdated, you can still get some interesting hints:
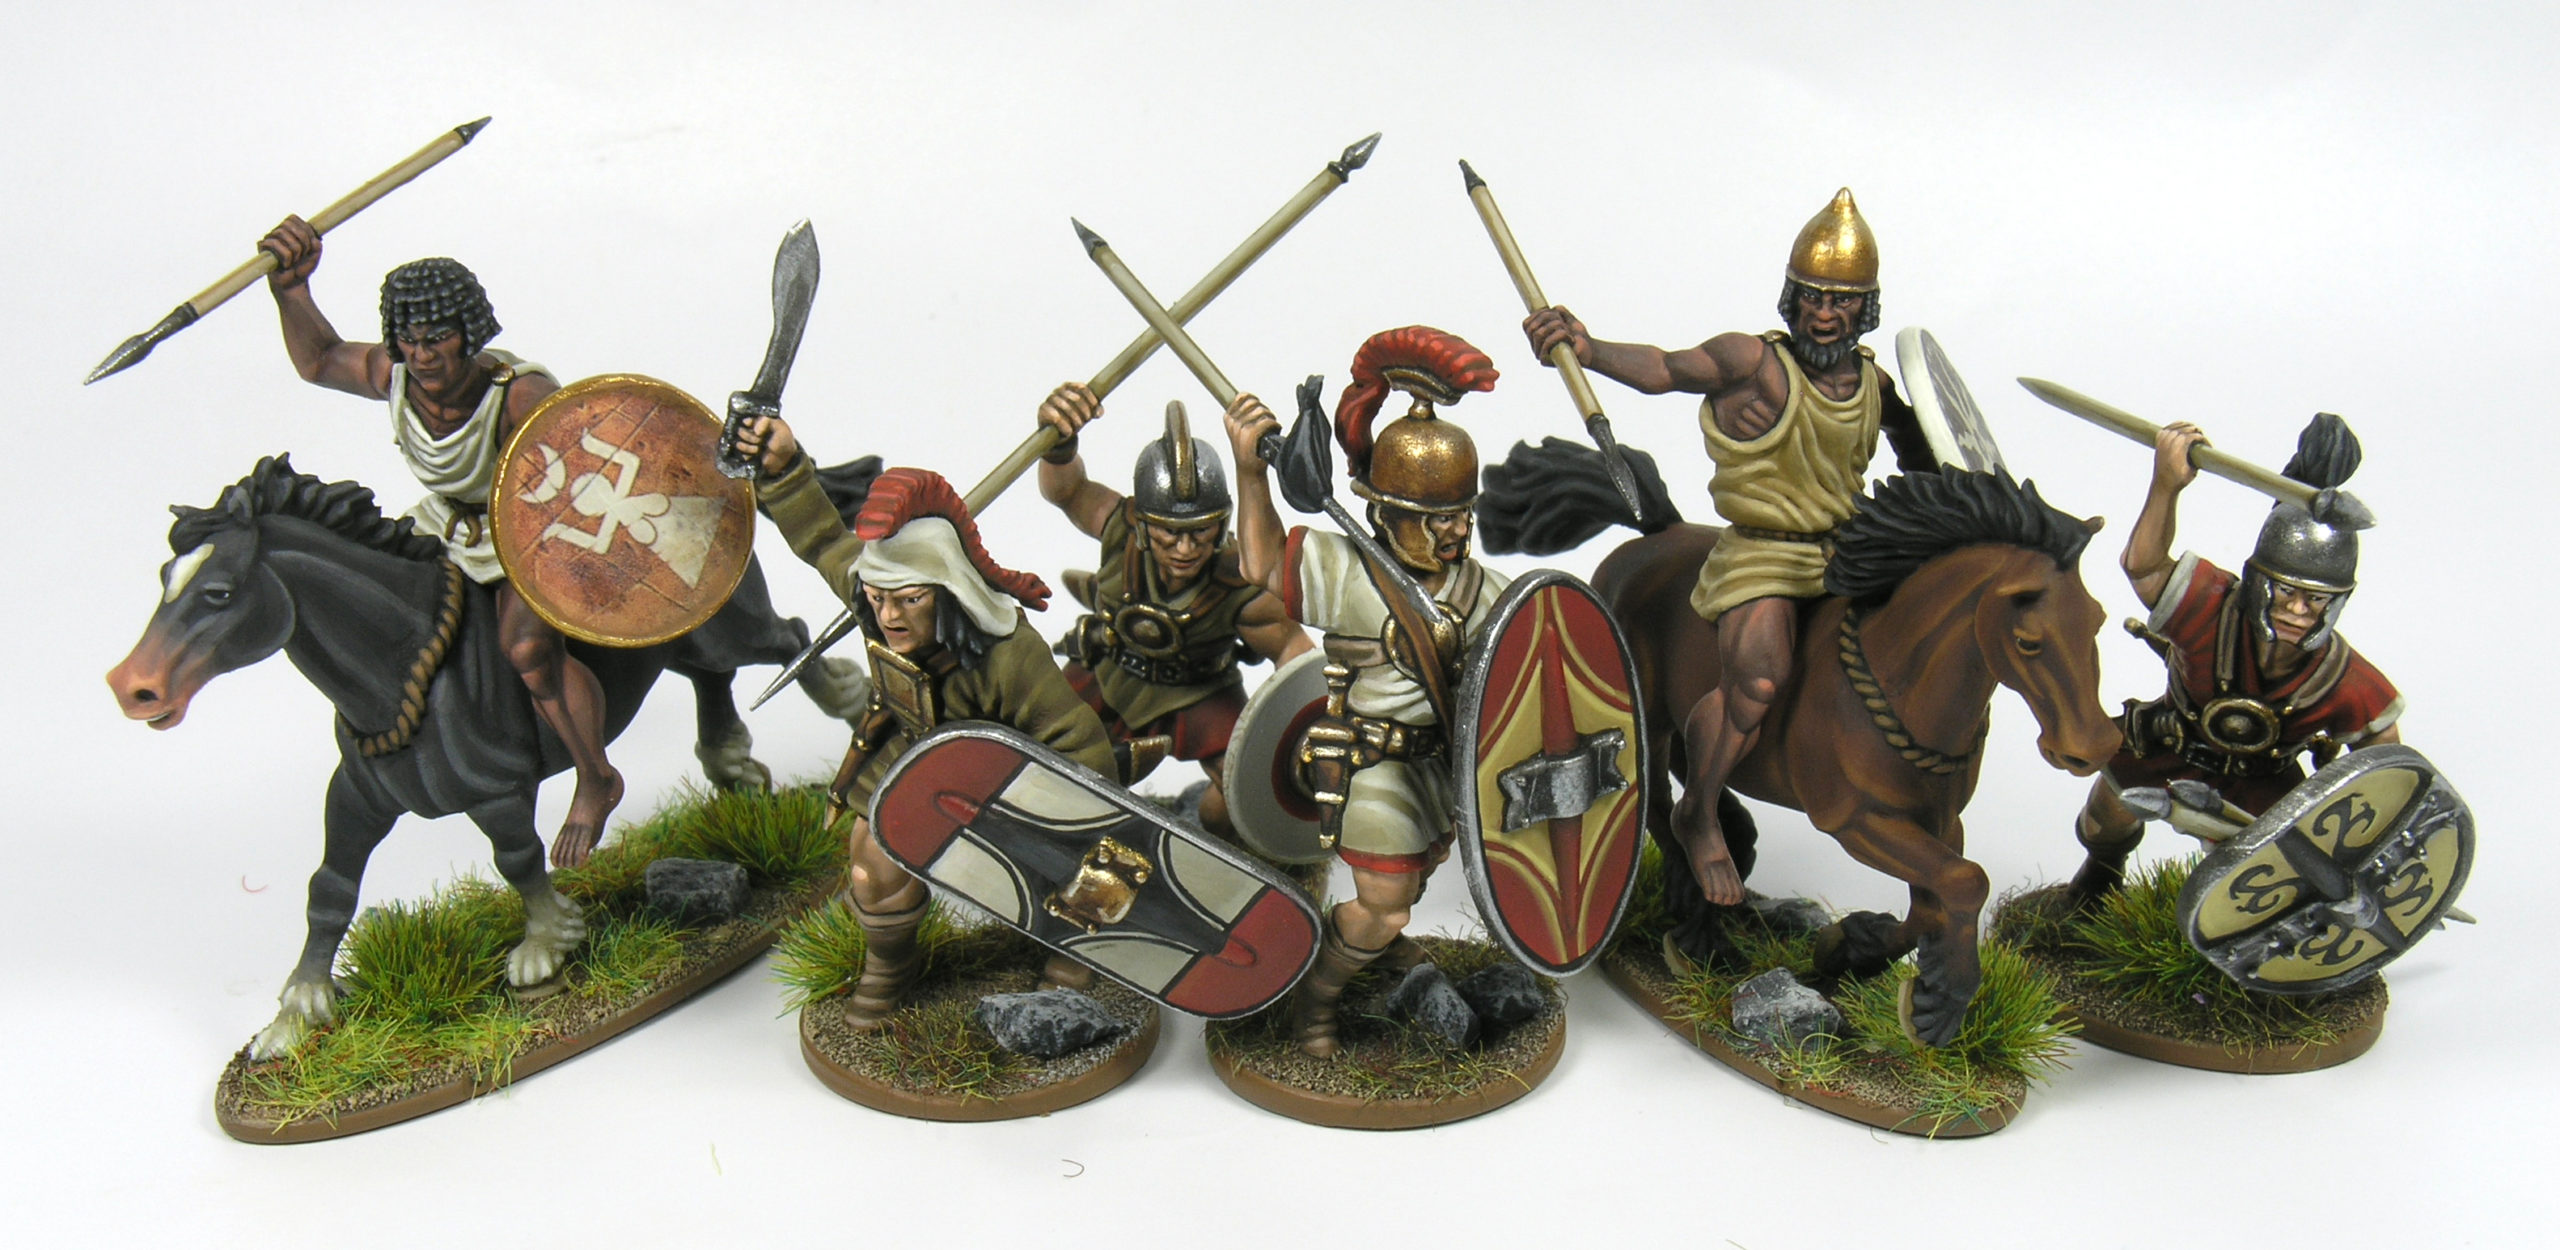
And the same recipes can be applied to 28mm miniatures, as you can see in these Iberian and Numidian warriors from Victrix Miniatures:
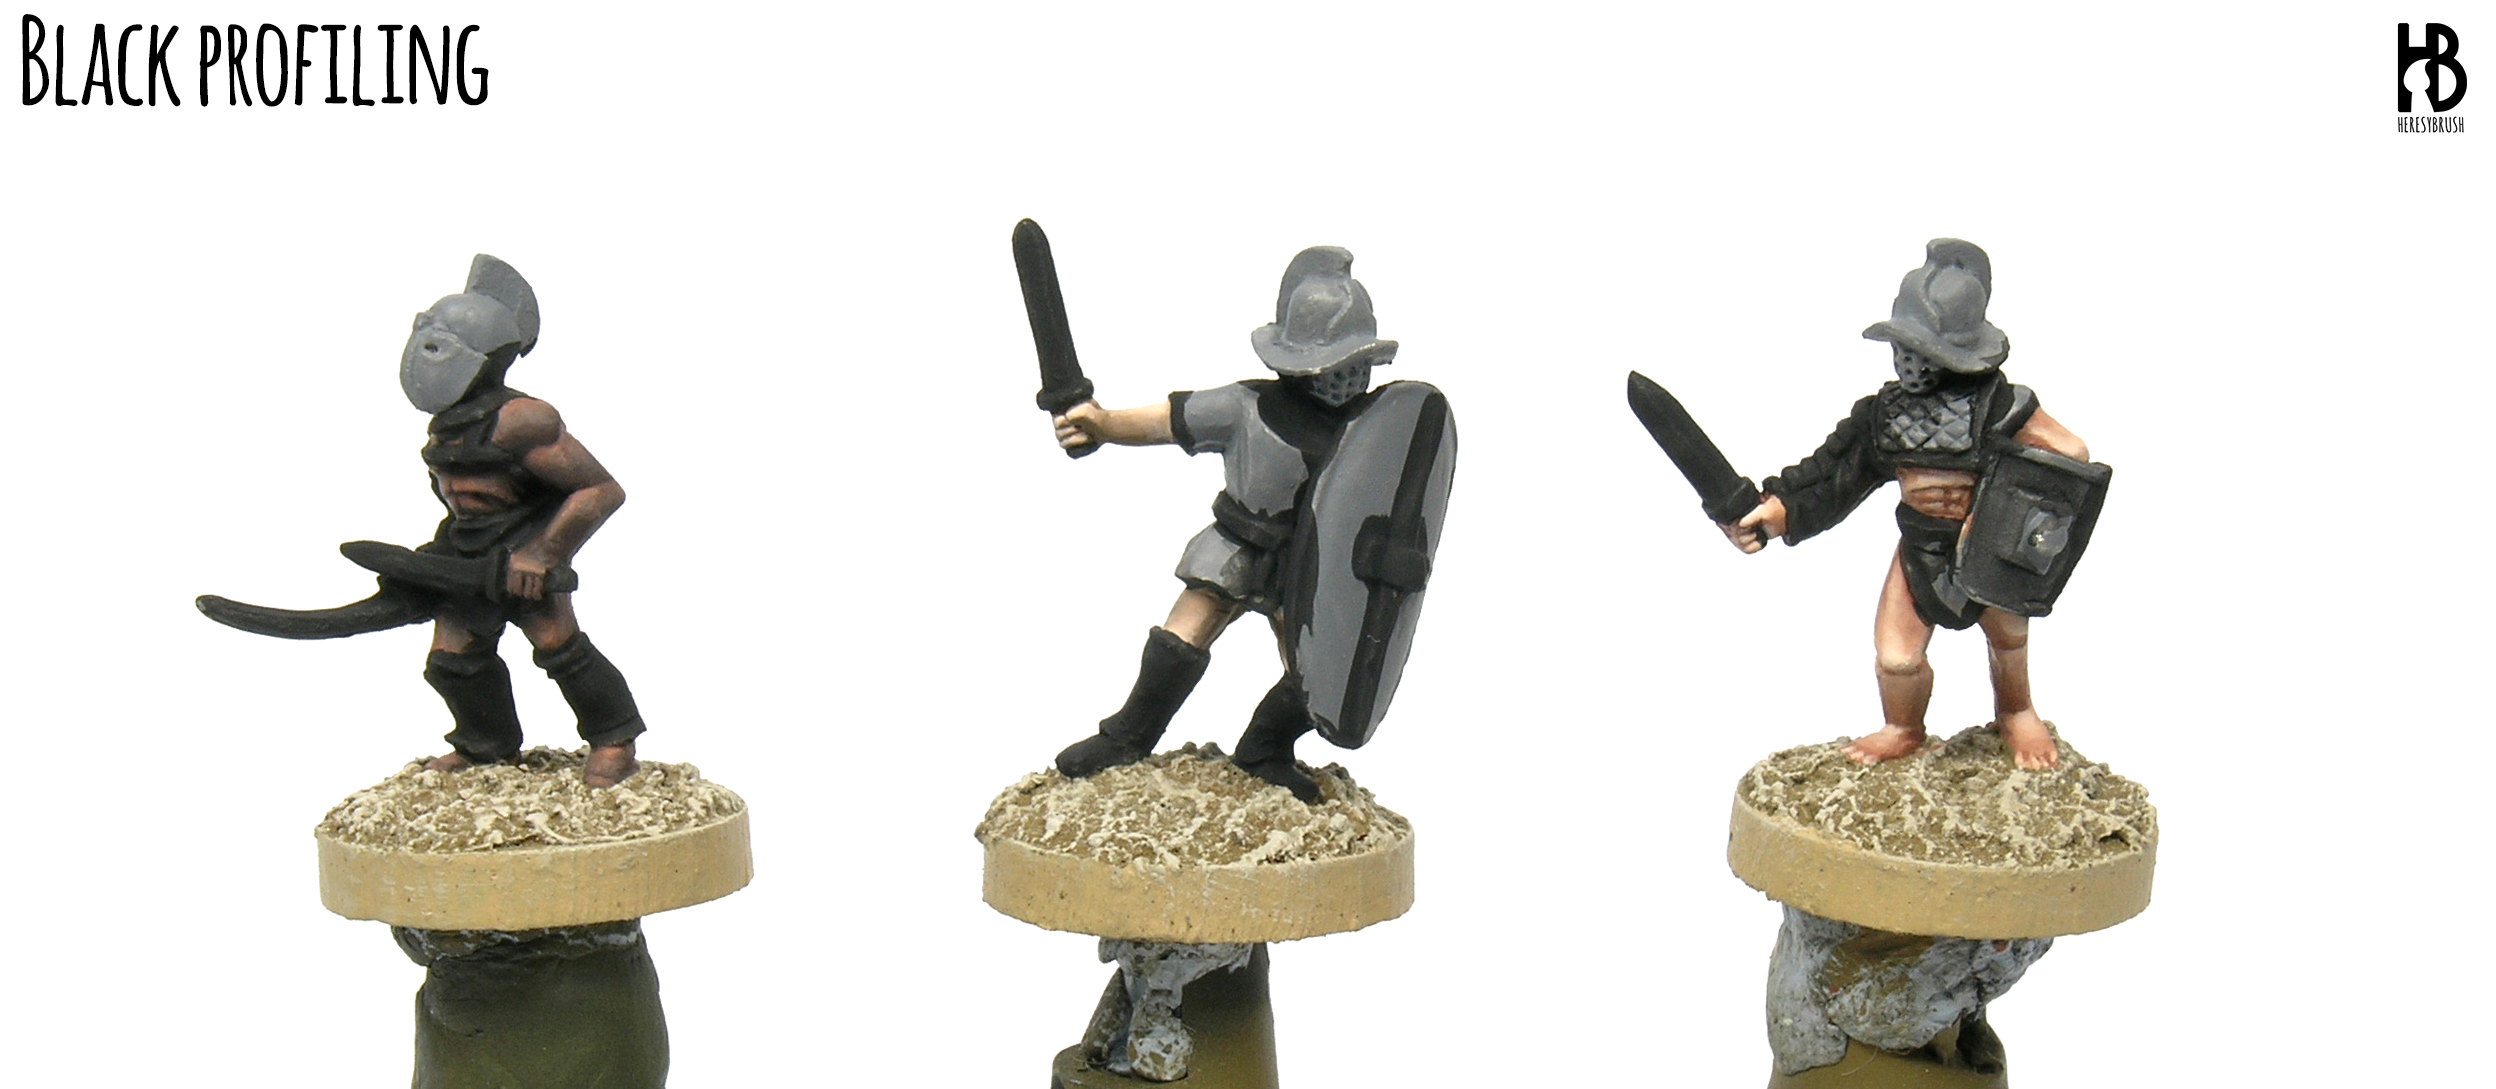
Step 3 – Black profiling
I like to add this short step before painting the rest of the miniature when painting 15mm. The idea is to clearly stand out the different elements of the model by painting a very thin black line around each part. This makes easier to identify each part.
Step 4 – Clothes and leather
To paint the clothes I used the layering method described in this other article where I explained how to paint 15mm Vikings. And to paint the leather parts I followed pretty much these explanations.
I will say just couple of things here. When painting white I do not use white paint. Instead, I use Ivory (918, Vallejo). This contains a little bit of yellow, so that it is warmer and covers much better than pure white. In addition, note that the pure white does not exist in nature. It has always reflections of other colors (grey, yellow, blue, etc).
On the other hand, to paint blue clothes I love the Vallejo color “Periscopes” (309, Vallejo). It is a short of grey blue color (with some traces of green) that generates a very interesting tone that in my opinion resembles very well the cheap blue dye used by Romans (= mild or blunt blue).

In fact, it is important to understand the dyes used by Romans. They had different options depending on the price. Normally the more expensive, the more intense. For example, a cheap option for blue was done with fermented leaves of the herb woad (Isatis tinctorial), which generated a blunt blue color. In contrast, more intense blue dyes such as indigo were very expensive. The indigo dye was done using indigo plants (Indigofera tinctorial) and imported from india. Taking this into account, you can tell different stories in your miniatures by using one color or antoher. Here, I wanted to represented a cheap and worn-out blue, and that is why I used Periscopes and I forced the lights with white. In contrast, for the red color I wanted to create a rich and intense color (an expensive red dye was obtained from female insects (Kermes)). To do it, I apply the final warm highlight with vermillion.
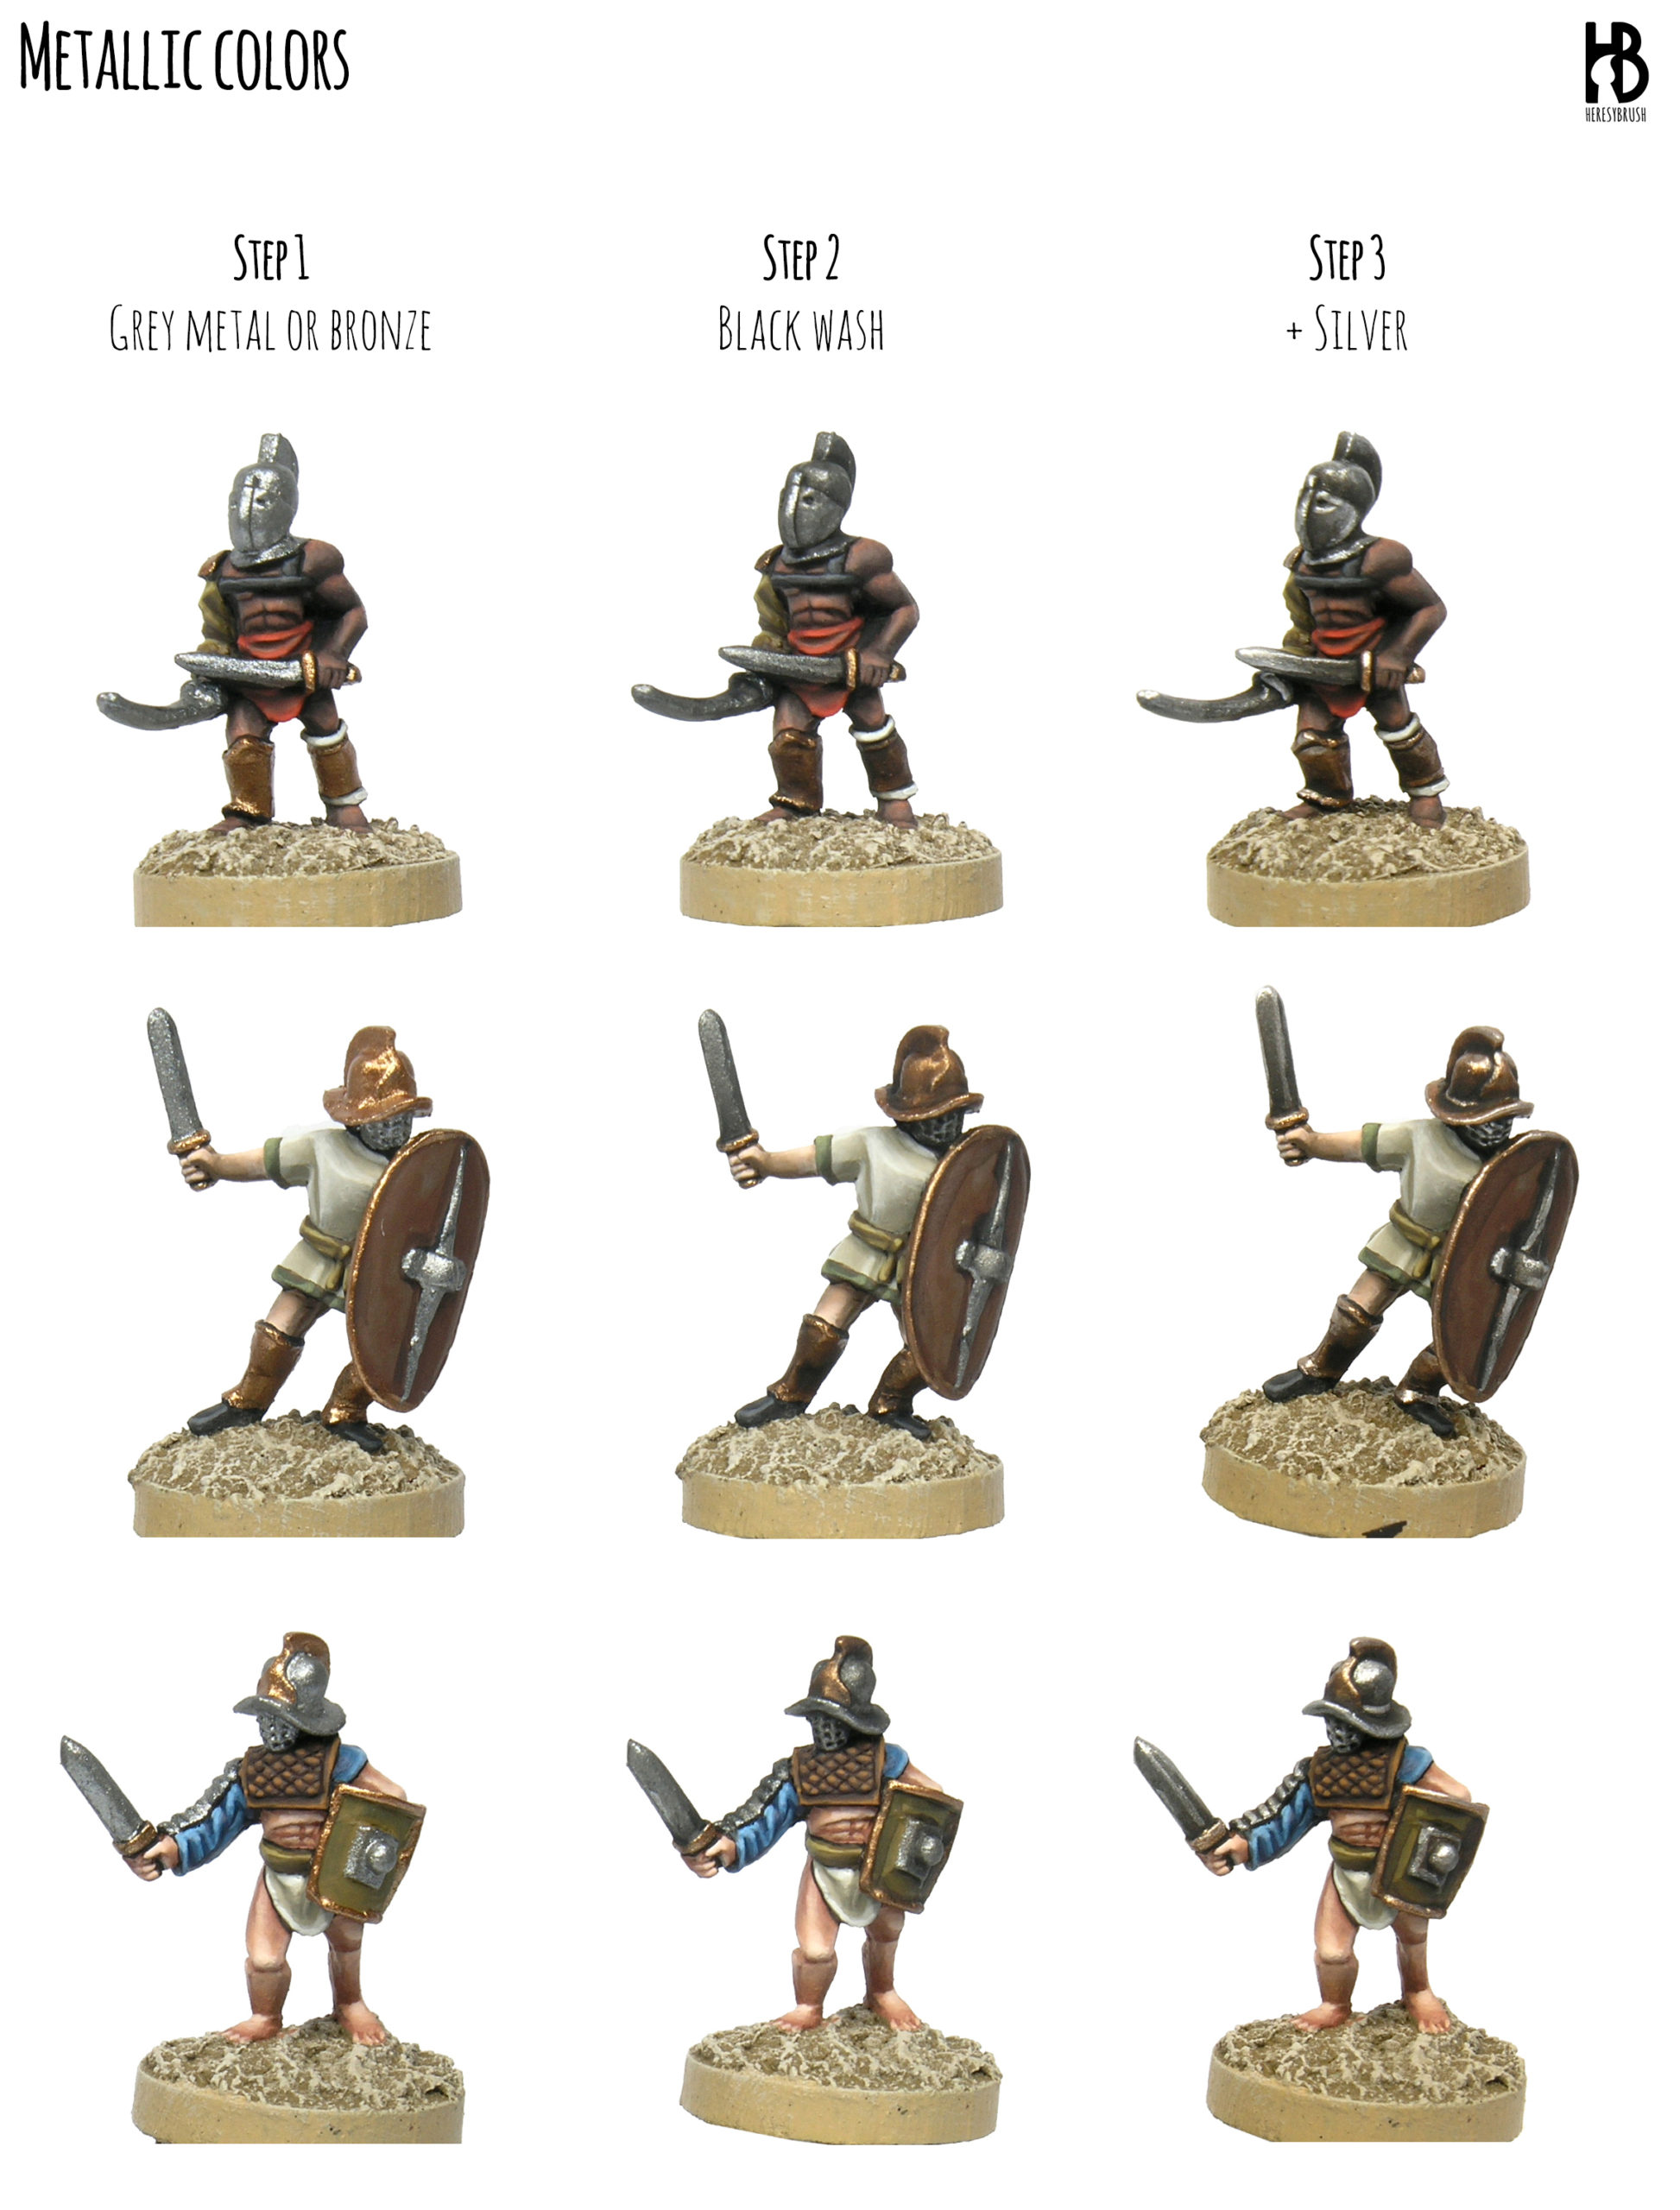
Step 5 – Metallic colors
You can find a very detailed tutorial to paint metallic colors here.
Step 6 – Shields
And to paint the shields you can also have a look at this article about Vikings and at this other one about Romans (in Spanish).

Fantastic! I’ve struggled with painting African skin tones for a long time, this was really helpful! Thank you so much for posting all the guides you do on here, they’re excellent inspiration and learning materials.
Back when you first released the 2nd edition of Painting Wargame Tanks you hinted at an infantry project with 15mm winter Germans. Is that still in the works??
Thanks for your comment.
Yes, that project is still in the pipeline…although to be honest I have not advanced it much. The idea was to cover different painting styles for 15mm infantry by painting two FoW bases of different armies. I planned around 10 different sets. Only 4 are done. I should push it forward!
All the best,
R.
Glad to hear it’s still in the pipeline! Eagerly looking forward to it. Keep up the great work!